Table of Contents
Advertisement
Advertisement
Table of Contents

Related Manuals for Phonak Exélia Art micro


Summary of Contents for Phonak Exélia Art micro
- Page 1 Exélia Art micro / Exélia Art micro Petite User Guide 0459...
-
Page 2: Table Of Contents
Contents Welcome Description Short introduction Inserting the battery Switching ON/OFF Selecting a hearing program Preparation Replacing the battery Tamper proof battery compartment (optional) 14 Identifying left and right hearing instruments 16 Inserting your hearing system with micro tube into your ear Closed domes Inserting your hearing system with earmold into your ear... - Page 3 Telecoil (optional) EasyPhone (optional) Wireless accessories (optional) myPilot iCom iView Remote control (optional) FM communication (optional) Dynamic FM transmitters Multi-frequency FM receivers MyLink EasyFM Maintenance Microphone Protector Micro tube and dome Important points Warning Service and Warranty Phonak distributors worldwide...
- Page 4 This symbol indicates features, options and accessories which are available for Exélia Art micro and not for the Exélia Art micro Petite version.
-
Page 5: Welcome
Exélia Art is a quality product developed by the Swiss company Phonak, a world leader in hearing technology, innovation and reliability. With proper care and usage, your hearing system will support your hearing and communication needs for many years. -
Page 6: Description
Description Hearing system with micro tube and dome Microphone inputs with Microphone Protector Program switch Battery compartment with nail grip and ON/OFF switch Micro tube /sound output Dome Retention... - Page 7 Hearing system with micro tube and SlimTip – micro tube and dome Individual SlimTip Removal handle Hearing system with earmold – See micro tube and dome Hook / sound output Individual earmold...
-
Page 8: Short Introduction
Short introduction Inserting the battery Details see page 10 Switching ON/OFF Details see page 25... -
Page 9: Selecting A Hearing Program
Selecting a hearing program via Toggle Details see page 26... -
Page 10: Preparation
Preparation Replacing the battery Use battery size 13 for your Exélia Art micro system. Use battery size 10 or 312 for your Exélia Art micro Petite system (see page 12). Using the nail grip, open the battery compartment completely and remove the old battery. Remove the protective foil from the new battery. - Page 11 Insert the new battery with the “+” sign (flat side of the battery) as shown below. The correct battery orientation can also be seen on the inside of the battery compartment. Close the battery compartment.
- Page 12 Preparation Your Exélia Art micro Petite hearing system can be operated either with size 10 (standard) or size 312 batteries (optional). Your hearing care professional may modify the devices accordingly. The 312 battery lasts longer. The 10 battery creates an even smaller overall instrument size (refer to picture below).
- Page 13 Handle the battery compartment with care and do not use excessive force. If there is any resistance when closing the compartment, ensure that the battery is inserted correctly. The compartment may not close properly if the battery is upside down, and the instrument will not work.
-
Page 14: Tamper Proof Battery Compartment (Optional)
Preparation Tamper proof battery compartment (optional) The battery is locked inside the battery compartment for safety reasons. The latch can easily be opened with a fingernail. Place the fingernail in the groove and pull the latch away from the hearing instrument then push it upwards “click”... - Page 15 The battery can only be inserted when the latch is open . Move the latch over the inserted battery so that it lies against it . Lock the battery by pushing towards the hearing instrument with your finger . Before you close the battery compartment, check that the latch is locked in position and the battery can’t be removed.
-
Page 16: Identifying Left And Right Hearing Instruments
Preparation Identifying left and right hearing instruments It is important to use the correct hearing instrument for each ear. Your hearing care professional can mark the hearing instruments for you. The color code is visible when the battery compartment is opened. It will identify left and right hearing instruments as follows: Exélia Art micro Exélia Art micro Petite... -
Page 17: Inserting Your Hearing System With Micro Tube Into Your Ear
Inserting your hearing system with micro tube into your ear Open domes and SlimTip Place the hearing instrument over the top of your ear Hold the micro tube where it attaches to the dome or SlimTip and gently push the dome or SlimTip into your ear canal. - Page 18 Preparation Place the retention tail (if available) of the micro tube into the bowl part of your ear To remove your hearing instrument, grasp the micro tube near the dome and pull it out of your ear gently but firmly. In very rare cases, the dome can remain in the ear canal when removing the micro tube from the ear.
-
Page 19: Closed Domes
Closed domes The closed dome has a different design than other domes (refer to pictures). The closed dome consists of two fins overlapping each other. Before inserting the closed dome into the ear canal, it is important to check the position of these fins. - Page 20 Preparation Correct position Wrong position Moving the fins...
- Page 21 Inserting your hearing instrument with earmold into your ear Using the hand on the same side you wear your hearing instrument, grasp the earmold between the thumb and index finger. Raise your hand to your ear making sure the canal portion of the earmold faces your ear.
- Page 22 Preparation Place the canal portion of the earmold inside your ear canal. If it is difficult to get it into place, stretch your ear by pulling it gently backwards and upwards with your other hand. When the canal portion is in place, twist the earmold backwards so that it fits into the bowl part of your ear and the helix portion is under the fold.
- Page 23 Now position the hearing instrument behind the ear. Be careful not to twist the tubing. Check the placement of the earmold by tracing the contour of the ear with your finger. To remove your hearing instruments grasp the earmold, not the tubing, and pull it out of your ear gently but firmly.
-
Page 24: Fine Tuning Based On Your Personal Preferences
Preparation Fine tuning based on your personal preferences The fitting process has limited capabilities of reproducing the full spectrum of your personal sound environments. This limitation is overcome by the ability of your hearing system to learn from your real life volume adjustments. -
Page 25: Operation
Operation Switching ON/OFF Switching OFF Using the nail grip, slightly open the battery compartment until it snaps to its OFF position. Switching ON Close the battery compartment. Your hearing system is always in the default hearing program and at your preferred volume when turned ON. -
Page 26: Hearing Programs
Operation Delayed activation The Exélia Art hearing system requires several seconds to start up. Your hearing care professional may have activated a further delayed activation timer. This function delays the activation of the hearing system (for 9 or 15 seconds) after the battery door is closed in order to avoid any disturbance while placing it on your ear. - Page 27 Program switch The program switch allows manual toggling between the “Automatic Mode”, the “Mute Mode” and individual hearing programs. A short melody confirms the selection of the “Automatic Mode”. Option without program switch The Exélia Art micro hearing system is also available without the program switch.
-
Page 28: Synchronized Manual Control
Operation Synchronized manual control An automatic synchronisation for program selection, called QuickSync, is integrated in your hearing system. Users wearing two hearing instruments only have to activate the functionality on one instrument; the other one will be adjusted automatically. ZoomControl This special hearing program allows you to choose from four directions in which to focus your hearing system (front, back, left or right). -
Page 29: Telecoil (Optional)
Telecoil (optional) Your hearing care professional may have activated a Telecoil in your hearing system. The programs with Telecoil can be used with hearing system compatible phones or via inductive loop systems (present in some school settings, theatres, churches etc.). Ask your hearing care professional to print out the complete description of your individual hearing programs and how to access them with your myPilot... -
Page 30: Easyphone (Optional)
Operation EasyPhone (optional) Your hearing care professional may have activated EasyPhone in your hearing system. The EasyPhone function enables your hearing system to automatically select your telephone program when the telephone handset is held close to your ear. An acoustic signal confirms the switch. - Page 31 If you hold the telephone receiver in your right hand when making telephone calls, position the magnet in the upper right half of the receiver. If you hold the telephone receiver in your left hand, position the magnet in the upper left half of the receiver.
- Page 32 Operation Use of EasyPhone Use the telephone in a normal manner. An acoustic signal indicates the activation of the EasyPhone program. At the beginning, you may need to move the handset slightly to find the optimum position for a reliable switch and comfortable hearing. If necessary, move the magnet to another position on the handset to increase your comfort of use.
-
Page 33: Wireless Accessories (Optional)
Wireless accessories (optional) myPilot The myPilot command center is an optional accessory for your hearing systems. It allows a convenient, user-friendly and discreet control of all the functions of your hearing system and additional benefits. ½ Volume control ½ Program selection ½... - Page 34 Wireless accessories (optional) For optimum results, position your myPilot as shown in the drawing. Operating range max. 50 cm (20”) Do not use your myPilot in locations where it is forbidden to use electronic devices.
-
Page 35: Icom
iCom iCom is an optional accessory available for Exélia Art hearing systems. With the push of a single button, iCom connects your hearing system with the technology around you. Bluetooth connections iCom offers a simple way to connect your mobile phone via Bluetooth to your hearing system. - Page 36 Wireless accessories (optional) FM compatibility iCom also offers FM accessibility when a Phonak FM receiver is connected, refer to picture below. EasyAudio and EasyBluetooth Your hearing system contains two special audio programs: EasyAudio and EasyBluetooth. These programs are automatically selected in your hearing system when an audio or Bluetooth signal is received from iCom.
-
Page 37: Iview
iView iView, the status viewer, is an optional accessory for parents with small children and also for teachers or caregivers. Just by the press of a button, iView shows the status of the hearing instrument's battery, the current hearing program and volume settings, displayed on a large screen. -
Page 38: Remote Control (Optional)
Remote control (optional) Phonak offers a comprehensive range of modern remote controls. Ask your hearing care professional to demonstrate them to you. Choose the model that is most convenient for your lifestyle and your taste. WatchPilot2 Exclusive and modern, available for women and men, with sporty rubber band or elegant metal band. - Page 39 For best results with your KeyPilot2 or WatchPilot2 remote control, refer to the drawing. For detailed information on the use of your remote control, please refer to its user guide. Your hearing care professional can also print an individual description of your hearing programs for you.
-
Page 40: Fm Communication (Optional)
FM communication (optional) Your hearing system is equipped with Direct Audio Input (DAI). It allows you to fully benefit from the high-end FM systems from Phonak. When noise, distance or reverberation is a problem, FM systems greatly improve communication. A wireless FM communication system consists of a transmitter and a receiver. -
Page 41: Dynamic Fm Transmitters
Dynamic FM transmitters Phonak offers Dynamic FM transmitters for all customers and needs: inspiro The transmitter for teachers and suitable for use in schools SmartLink+ For teenagers and adults who want nothing less than the very best ZoomLink+ Comfortable transmitter... -
Page 42: Multi-Frequency Fm Receivers
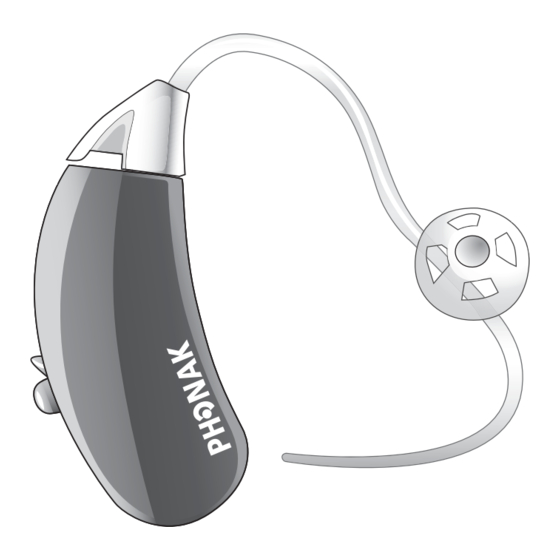
FM communication (optional) Multi-frequency FM receivers (see page 8) Phonak recommends the following FM receiver with your Exélia Art hearing system. MicroLink ML12i : Perfectly integrated into the Exé- lia Art micro design for daily use. Switching ON/OFF on the hearing system can easily be done (see page 8). -
Page 43: Mylink
MyLink As an alternative to iCom with an FM receiver, MyLink is a small and appealing FM receiver that is compatible with hearing systems with a Telecoil. MyLink picks up the FM signal and relays it to the hearing instrument. -
Page 44: Easyfm
FM communication (optional) EasyFM The EasyFM function automatically selects your FM program when an FM receiver is connected to your hearing system in automatic mode and an FM signal is detected. An acoustic signal confirms the switch. The hearing system switches back to the automatic mode when the FM signal is turned off. -
Page 45: Maintenance
Maintenance Microphone Protector Important: The Microphone Protector is an exclusive Phonak system designed to protect the Exélia Art high-tech microphones from debris. As a result, they last much longer, reducing the service costs of your hearing system. The Microphone Protector can be replaced if needed. - Page 46 Maintenance Important: Consult your hearing care professional about changing the Microphone Protector if you experience any of the following: ½ The hearing system sounds quieter than usual ½ There is a reduction in sound quality ½ Understanding in noise becomes more difficult ½...
-
Page 47: Micro Tube And Dome
Micro tube and dome The following care and maintenance instructions will help extend the life span and ensure the quality and comfort of your hearing instrument fit with the micro tube. The micro tube feeds the amplified sound from the hearing instrument into the ear. - Page 48 Maintenance Step 2 Detach the micro tube from the hearing instrument as follows: ½ Hold the micro tube in one hand and the hearing instrument in the other hand. ½ Gently twist the micro tube 90° and pull it straight out, away from the hearing instrument 90°...
- Page 49 Insert the cleaning rod where the micro tube attaches to the hearing instrument and push it all the way through the micro tube and out through the dome or SlimTip . After cleaning it is important to remove the cleaning rod.
- Page 50 Maintenance Attach the micro tube onto the hearing instrument as follows: ½ Hold the micro tube in one hand and the hearing instrument in the other hand. ½ Push the micro tube onto the hearing instrument until it is snug...
- Page 51 It is not recommended to submerge or rinse the micro tube, the dome or SlimTip in water, as there is a risk that a water drop may become lodged in the micro tube. As a consequence, sound will be prevented from going through the micro tube. The micro tube and dome should be changed every three months or sooner if the micro tube becomes stiff or brittle.
-
Page 52: Important Points
Maintenance Important points 1) Always use new batteries for your Exélia Art hearing system. You can return empty batteries to your hearing care professional. 2) When your hearing system is not in use, leave the battery compartment open to allow any moisture to evaporate. - Page 53 5) Daily cleaning and the use of a drying system is highly recommended. "C&C line" from Phonak is a complete set of cleansing products. Your hearing care professional will be glad to advise you. Never use household cleaning products (washing powder, soap, etc.) to clean your hearing system.
- Page 54 Maintenance The symbol with the crossed out disposal bin indicates that this hearing system shall not be treated as household waste. Please hand over your old or unused hearing system to the applicable collection point for the recycling of electrical and electronic equipment or bring it to your hearing care professional for appropriate disposal.
-
Page 55: Warning
Hearing systems in directional microphone mode reduce mainly background sounds. Warning signals coming from behind and vehicles’ horns approaching from behind are partially or completely suppressed. Changes or modifications made to this equipment not expressly approved by Phonak are not allowed. -
Page 56: Service And Warranty
Damage caused by third parties or non-authorized service centers renders the Phonak warranty null and void. This warranty does not include any services performed by hearing care professionals in their offices. This warranty... - Page 58 2) this device must accept any interference received, including interference that may cause undesired operation. Changes or modifications made to this equipment not expressly approved by Phonak may void the FCC authorization to operate this equipment. Notice 2 This Class B digital apparatus complies with Canadian...
- Page 59 Notice 3 This equipment has been tested and found to comply with the limits for a Class B digital device, pursuant to Part 15 of the FCC Rules. These limits are designed to provide reasonable protection against harmful interference in a residential installation.
-
Page 60: Phonak Distributors Worldwide
France Phonak France SA, 69500 Bron Germany Phonak GmbH, 70736 Fellbach- Oeffingen, EC Representative India Phonak India Pvt. Ltd., 100 034 New Delhi Italy Phonak Italia S.r.l., 20159 Milano Japan Phonak Japan Co., Ltd., Tokyo 101-0044 Jordan Phonak Middle East, 11181 Amman Mexico Phonak Mexicana, S.A. - Page 61 Poland Phonak Polska SP Z.0.0 00-567 Warszawa Portugal Phonak Ibérica S.A., 03008 Alicante, Spain Russian Federation Phonak CIS Ltd., Moscow, 115114 Spain Phonak Ibérica S.A., 03008 Alicante Sweden Phonak AB, 117 43 Stockholm Switzerland Phonak AG, Phonak Schweiz, 8712 Stäfa Turkey Phonak Turkey A.S., 34357 Istanbul...
- Page 62 The CE symbol is a confirmation by Phonak AG that Exélia Art products and accessories meet XXXX the requirements of directive 93/42/EEC on medical devices and the R&TTE Directive 1999/5/EC on Radio and Telecommunication Terminal Equipment. The numbers after the CE symbol are the numbers of consulted certified bodies under the above mentioned directives.
- Page 63 Transportation and Temperature should not exceed limits of storage conditions –20°/60° Celsius at a relative air humidity of 65% for extended periods during transportation and storage. Air pressure between 500 and 1100 hPa is not detrimental to the instrument. Australia & New Zealand Brazil China Japan...
- Page 64 www.phonak.com...
Need help?
Do you have a question about the Exélia Art micro and is the answer not in the manual?
Questions and answers