
Related Manuals for Gigaset Gigaset S820H


Summary of Contents for Gigaset Gigaset S820H
- Page 1 Congratulations By purchasing a Gigaset, you have chosen a brand that is fully committed to sustainability. This product’s packaging is eco-friendly! To learn more, visit www.gigaset.com.
-
Page 3: Gigaset S820H - Touch & Type
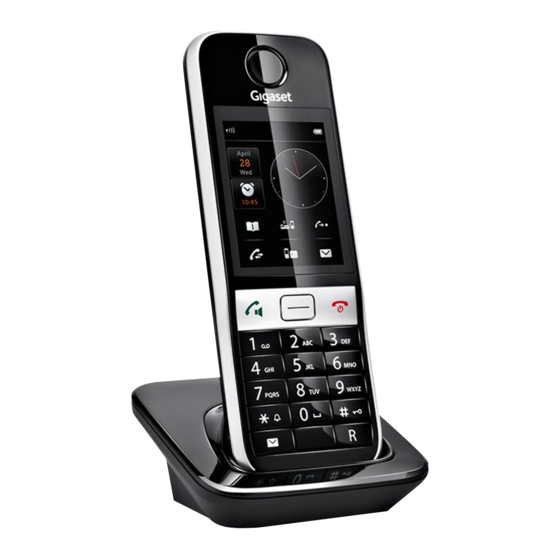
Gigaset S820H - Touch & Type Gigaset S820H - Touch & Type Touchscreen/display ¢ Status bar ( page 10) ¢ Icons ( page 34) show the telephone's current set- ¢ tings and operating status. Touch the status bar to open the status page ( page 10). -
Page 4: Table Of Contents
Gigaset S820H - Touch & Type ........ -
Page 5: Safety Precautions
Safety precautions Safety precautions Warning Read the safety precautions and the user guide before use. Explain their content and the potential hazards associated with using the device to your chil- dren. Use only the power adapter indicated on the device. Use only rechargeable batteries that correspond to the specification (see "Technical Data"). -
Page 6: Getting Started
Getting started Getting started Checking the package contents One Gigaset handset, one battery cover (rear cover of the handset), two batteries, one charger with charger cradle, one belt clip, one rubber seal for the USB connection, one user guide. Setting up the charger The charger is designed for use in dry rooms in a temperature range of +5°C to +45°C. -
Page 7: Setting Up The Handset For Use
Getting started Setting up the handset for use The handset’s display and keys are covered with a protective film. Please remove the protective film. Caution Please do not use any touchscreen styli to operate the handset. Do not use any protective sleeves/films from other manufacturers, as they may restrict the operation of your handset. -
Page 8: Charging The Battery
Getting started Charging the battery The battery is supplied with a partial charge. The batteries are fully charged when the lightning icon on the display goes out. ¤ Place the handset in the charger for 14.5 hours. 14.5 hr Please note The handset may only be placed in the designated Gigaset S820/S820A base or the charger. -
Page 9: Display Pages
Display pages Display pages Idle display (individually customisable) You can customise the idle display to suit your needs. Bring together the key applications you want to start up directly from idle status with a single "touch". Changing the idle display Idle status Configuration mode ò... - Page 10 Display pages Menu pages (dependent on base) "Applications" "Settings" Applications Settings Applications Settings Applications Settings ž á ï Á ã í Š Baby 1 Touch Divert Date + Audio Display Select Call Pro- Quick tection Phone Call Time Settings Services Dial ¾...
- Page 11 Display pages Messages page The contents of the messages page and lists are dependent on the base. The image on your dis- play may therefore differ from the user guide. You can call up the messages page by pressing the messages key d on the keypad. You can access the following message lists: 5 Network mailbox, if your network provider supports this function and the number of the network mailbox is stored in your telephone...
-
Page 12: Deleting Lists
Display pages List entry The following information is displayed in the list entries: Call list (example) The list type (in the header) Missed Calls Icon for the type of entry: Call list: ™ (Missed), › (Accepted), ý š (Outgoing) James Foster ™... -
Page 13: Using The Telephone
Using the telephone The Gigaset S820H handset has a unique operating con- cept. It combines the benefits of the touchscreen with those of a conventional keypad. You nav- igate around the menu settings and applications and activate/deactivate functions via the touchscreen and can enter numbers and letters via the keypad. -
Page 14: Ringtones (Handset)
Using the telephone To unlock, swipe across the display from left to right, Slide to unlock Unlocked pressing down on the bottom line. Please note When the keypad lock is active, you cannot call emergency numbers. Operating the touchscreen Icons, list entries, switches and selection areas shown on the display are touch sensitive areas. Touching these areas allows you to set and start functions and navigate between the various dis- play screens (pages). -
Page 15: Returning To The Previous Display
Using the telephone Switch: switching functions on/off (activating/deactivating) or selecting functions Touch the switch briefly to activate/deactivate or select/ ‰ Activated/ deselect functions. selected The function is activated or selected if the switch is orange ‰ (text on) or light grey ( icon). -
Page 16: Making Calls
Making calls Entering text Each key between 0 and O is assigned several letters and characters. The characters are displayed in a selection line at the bottom of the screen when you press a key. The selected character is highlighted. Briefly press the key several times in succession to select the required letter/character. -
Page 17: One Touch Call
Making calls Dialling from the call list Menu key v ¤ — Call List Call list (example) ¤ Press c. The number of the entry marked with the All Calls green dot is dialled. ý James Foster ¤ ™ 18:30, Home Touch an entry to open the detail view. -
Page 18: Accepting A Call
Making calls Accepting a call You have the following options: ¤ Press c. ¤ ¢ If Auto Answer is activated ( page 20), remove the handset from the charger. Accepting/rejecting call waiting If you receive a call during a conversation, you will hear a call waiting signal and see a corre- sponding message on the display. -
Page 19: Call Display
Making calls Call waiting Telstra (Australia) If this function is activated, a call waiting tone sounds dur- ing an external call to indicate that a further party is call- ing. The following message is displayed. Incoming call from You have the following options: ¤... -
Page 20: Making Internal Calls
Making calls Making internal calls Internal calls to other handsets registered to the same base are free of charge. Menu key v ¤ ¤ ‡ Internal Call if necessary, select a handset from the list or touch All Handsets (group call). After opening the list, press c to initiate a group call to all handsets. -
Page 21: Changing Phone Settings
Changing phone settings Changing the earpiece, handsfree and headset volume Use the side keys Ô / Ó ( ¢ page 1) to adjust the volume for the current mode (handsfree, ear- piece, headset) during a call. The current setting appears on the display . -
Page 22: Setting The Display Backlight
Changing phone settings Setting the screensaver/Slideshow Choose between an analogue clock/digital clock/picture/ Screensaver slideshow. You can load pictures onto your handset using ¢ the Gigaset QuickSync ( page 33) software. To show the idle display again, briefly press a or the dis- Activation play. -
Page 23: Volume
Changing phone settings Ring tone volume for all calls ¤ Touch Ô / Ó, several times if necessary, to adjust the Ringtones (Handset) volume. Volume ¤ Activate/deactivate the crescendo ring tone (increas- Crescendo ing volume) with the Crescendo switch. The activated crescendo only applies to ring tones. It does Internal Calls not affect how a melody is played back. -
Page 24: Eco Dect
ECO DECT Restoring handset to default settings You can reset individual settings. Menu key v ¤ ¤ ¤ ¤ Ê Menu page Settings System Resets Handset Reset The following are not affected by the reset: Date and time Registrations of handsets to the base and the current base selection System PIN Entries in the calendar and contacts Redial list... -
Page 25: Network Mailbox
Network mailbox Network mailbox You can only use the network mailbox if you have requested it from your provider and saved the network mailbox number in your phone. ¤ ¤ Menu key v ¶ Menu page Settings Network Mailbox ¤... - Page 26 Bluetooth devices Activating/deactivating Bluetooth mode You can activate/deactivate Bluetooth mode using the sta- ¢ Bluetooth tus page ( page 10) or via Menu key v ¤ ¤ Menu page Settings ³ Bluetooth ¤ Activation Activation on/off If Bluetooth is activated: ¢ ³...
-
Page 27: Contacts (Address Book)
Contacts (address book) Editing the list of paired (trusted) devices A ô next to the device name in the list indicates a headset and = indicates a data device. ¤ ¤ ¤ Open the Known Devices list Select device View device information ¤... -
Page 28: Creating A New Entry
Contacts (address book) Opening the contacts Menu key v ¤ œ Contacts or during a call, depending on the situation, ¤ œ or Options Contacts Creating a new entry ¤ Open the contacts. New Entry If no entries have been created yet ¤... - Page 29 Contacts (address book) Defining the order of the contacts entries You can define whether the entries are to be sorted by first name or surname. ¤ ¤ Menu key v œ Contacts Press First Name or Sort by Surname. If no name was entered, the number with the green dot is copied to the surname field.
-
Page 30: Receiving A Vcard With Bluetooth
Contacts (address book) Transferring the contacts as a vCard with Bluetooth Entire contacts: Menu key v ¤ ¤ ¤ œ Contacts Options Copy List Single entry: ¤ ¤ ¤ ¤ Menu key v œ Contacts Open the detail view for the entry Options Copy ¤... -
Page 31: Call List
Call list Call list Your telephone stores various types of calls. Call list (example) ¤ ¢ Open the call list via the messages page ( page 9) ¢ Missed Calls or message pop-up ( page 9); open the Missed Calls list. ý... - Page 32 Calendar Setting the tones and volumes of the reminder signal Menu key v ¤ ¤ ¤ ì Audio Settings Menu page Settings Reminder Signal ¤ Set the volume using Ô / Ó or set increasing volume using the switch next to Crescendo. ¤...
-
Page 33: Alarm
Alarm Alarm Prerequisite: the date and time have already been set. You can activate/deactivate and set the alarm as follows: Menu key v ¤ ¤ Ü Alarm on/off ¤ Touch N to change the settings for the alarm: ¤ Alarm Time Set the hour and minute for the wake-up time Time... -
Page 34: Baby Phone
Baby phone Baby phone When the baby phone is switched on, the stored (internal or external) destination number is called as soon as a defined noise level is exceeded in the vicinity of the handset. The baby alarm call to an external number is cancelled after approximately 90 seconds. The talk and menu keys are locked when the baby monitor is activated. -
Page 35: Synchronising With Your Pc (Gigaset Quicksync)
Synchronising with your PC (Gigaset QuickSync) Synchronising with your PC (Gigaset QuickSync) You can: Synchronise your handset's directory with your Google contacts online via the cloud. Synchronise the contacts on your handset with your PC’s Outlook contacts. Load caller pictures to the handset from the PC. Download pictures as a screensaver from the PC to the handset. -
Page 36: Display Icons
Display icons Display icons Options bar icons The following functions are available in the options bar depending on the operating situation: Icon Action Icon Action ‘ þ Return to the previous display Delete è – Mute handset microphone Save/select – (orange) Unmute handset microphone Edit entry, enter new appointment... - Page 37 Display icons Signalling display icons < š Connection Connection cannot be Establishing a connec- established established/connection ter- tion (outgoing call) minated ð Ø Ù Ú Ø w Ú Ø Ú Internal/external Alarm call Birthday reminder call call Ø á Ú Reminder call for appoint- ment ...
-
Page 38: Setting Options
Setting options Setting options Open the Settings menu page: ¤ Briefly press menu key v when the handset is in idle mode. ¤ Press Settings in the header. Please note Not all of the functions described in this user guide are available in all countries. á... - Page 39 Setting options ã (Dependent on base) Select Services (Dependent on base) Call Pro- tection í Key 2 page 15 Quick Key 9 Dial ª Auto Answer page 20 (Further menus dependent on base) Tele- phony Ë (Dependent on base) » Activation page 24 Search for Devices...
-
Page 40: Service (Customer Care) - United Kingdom And Ireland
Service (Customer Care) - United Kingdom and Ireland Service (Customer Care) - United Kingdom and Ireland Step by step towards your solution with Gigaset Customer Care www.gigaset.com/service After purchasing your Gigaset phone, please register it at: www.gigaset.com/register Your personal customer account gives you rapid access to our customer advisers, the online forum and much more. -
Page 41: Customer Service & Product Warranty - Australia And New Zealand
Customer service & product warranty – Australia and New Zealand Customer service & product warranty – Australia and New Zealand IMPORTANT Please retain your sales receipt as proof of the date of purchase. Customer Service If you require assistance in operating this product please contact us AUS: 1300 780 878 or by e-mail at the Customer Care section of our website at www.gigaset.com/au NZ: 0800 780 878 or by e-mail at the Customer Care section of our website at... - Page 42 Customer service & product warranty – Australia and New Zealand If it is necessary to have the product serviced, the customer service representative will inform you of the product return process. If it is necessary to have the product serviced under warranty in both Australia and New Zealand you will need to return the product to your place of purchase.
-
Page 43: Warranty
Warranty Warranty Guarantee Certificate United Kingdom Without prejudice to any claim the user (customer) may have in relation to the dealer or retailer, the customer shall be granted a manufacturer's Guarantee under the conditions set out below: In the case of new devices and their components exhibiting defects resulting from manufac- turing and/or material faults within 24 months of purchase, Gigaset Communications shall, at its own option and free of charge, either replace the device with another device reflecting the current state of the art, or repair the said device. -
Page 44: Guarantee Certificate Ireland
Warranty Guarantee Certificate Ireland Without prejudice to any claim the user (customer) may have in relation to the dealer or retailer, the customer shall be granted a manufacturer’s Guarantee under the conditions set out below: In the case of new devices and their components exhibiting defects resulting from manufac- turing and/or material faults within 24 months of purchase, Gigaset Communications shall, at its own option and free of charge, either replace the device with another device reflecting the current state of the art, or repair the said device. -
Page 45: Questions And Answers
Warranty Questions and answers If you have any queries about the use of your telephone, suggested solutions are available on ¤ ¤ the Internet at www.gigaset.com/service FAQ First steps for troubleshooting. The table below also lists steps for troubleshooting. Registration or connection problems with a Bluetooth headset. ¥... - Page 46 Warranty The other party cannot hear you. The handset is "muted". ¥ ¢ Unmute the microphone ( page 19). The caller's number is not displayed. 1. Calling Line Identification (CLI) is not enabled for the caller. ¥ The caller should ask his network provider to enable Calling Line Identification (CLI). 2.
-
Page 47: Environment
Environment Exclusion of liability Your handset's display has a resolution of 240x320 pixels. Each pixel consists of three subpixels (red, green, blue). It may be the case that a pixel is incorrectly controlled or has a colour deviation. This is normal and no reason for a warranty claim. -
Page 48: Appendix
Appendix Disposal Batteries should not be disposed of in general household waste. Observe the local waste dis- posal regulations, details of which can be obtained from your local authority. All electrical and electronic products should be disposed of separately from the municipal waste stream via designated collection facilities appointed by the government or the local authorities. -
Page 49: Specifications
Appendix Specifications Battery Technology: 2 x AA NiMH Voltage: 1.2 V Capacity: 1300 mAh Handset operating times/charging times The operating time of your Gigaset depends on the capacity and age of the battery and the way it is used. (All times are maximum possible times.) Standby time (hours) * Eco mode+ Standby time in... - Page 50 Appendix Character set tables Standard characters Press the relevant key the number of times indicated. ä á à â ã ç ë é è ê ï í ì î ö ñ ó ò ô õ ß ü ú ù û ÿ...
-
Page 51: Index
Index ..Index transferring internally (connecting) ......Call lists ....deleting an entry . - Page 52 Index ....Deleting transferring a call .......
- Page 53 Index ....Medical equipment Melody ....Questions and answers .
- Page 54 Index ....3-way conference ....... Time .