Table of Contents
Advertisement
Advertisement
Table of Contents

Related Manuals for Tangent Vita


Summary of Contents for Tangent Vita
- Page 1 Tangent VITA All-in-One, Space-Saving, Feature-Rich VITA User’s Manual...
- Page 2 FEDERAL COMMUNICATIONS COMMISSION (FCC) STATEMENT This equipment has been tested and found to comply with the limits for a Class B digital device, pursuant to Part 15 of the FCC Rules. These limits are designed to provide reasonable protection against harmful interference in a residential installation.
- Page 3 COPYRIGHT Copyright 2005© Tangent. The information in this user manual is protected by copyright laws. No part of this manual may be photocopied or reproduced in any form without prior written authorization from the copyright owners. All rights reserved.
-
Page 4: Safety Instructions
Important Safeguards Safety Instructions Read Instructions — All the safety and operation instructions should be read before operating the system Retain Instructions — The safety and operating instructions should be retained for future reference. Heed Warnings — All warnings on the appliance and in the operating instructions should be heeded. - Page 5 Important Safeguards 19. Unplug the power cord before inserting any add-on card or module. 20. Use power cord correctly. There are some important safety requirements. The power cord is equipped with a 3-prong grounded plug. The third prong is an important safety feature; do not defeat the safety purpose of the third grounded plug.
-
Page 6: Table Of Contents
TABLE OF CONTENTS I. Introduction 1-1 Product Specifications 1-2 Package Contents II. Product Overview 2-1. Front View 2-2. Rear View 2-3. Right side View 2-4. Left side View 2-5. Bottom View 2-6. System Structure 2-7. Chassis III. LCD Panel Monitor 3-1. -
Page 7: Introduction
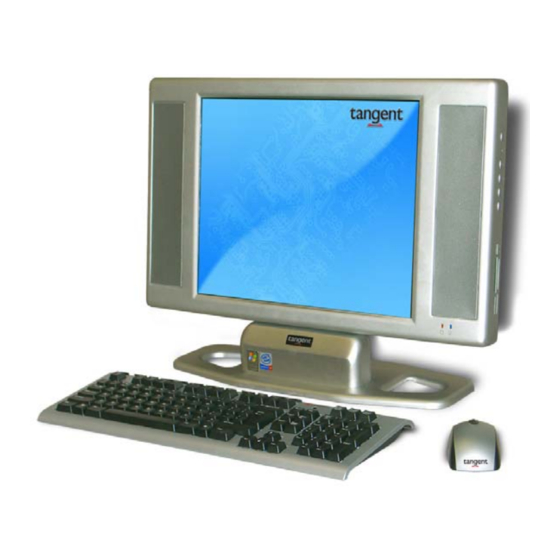
Introduction 1-1 Product Specifications Tangent's newest all-in-one PC tucks away an entire computer inside the sleek, slim 17" display. The full feature-set is neatly packed inside the back panel of this all-in-one computer. Tilt angle gives ergonomic flexibility to your set-up. Power, reset, volume, DVD/CD-RW drive, USB, and 7-in-1 media reader are conveniently located on the side. -
Page 8: Package Contents
Introduction Package Contents LCD PC Power Cord User’s Manuals Keyboard and Mouse Note: These pictures are for reference only, and may not reflect the exact contents of the package. - 2 -... -
Page 9: Product Overview
Product Overview 2-1 Front View (1) LCD Display Panel (2) Built-in Speaker (3) LED Indicator (4) Tilt Stand (1) LCD Display Panel Equipped with a 17 in. LCD, SXGA standard (2) Built-in Speaker Two 2.5W built-in speakers for stereo sound (3) LED Status Indicators Power Indicator: Indicates the system status. -
Page 10: Rear View
Product Overview 2-2 Rear View (1) Ventilation Openings (2) 2 x USB 2.0 Ports (3) Drawable sub-stand (1) Ventilation Openings Slots and openings in the cabinet are provided for ventilation to ensure reliable operation of the system, and to protect it from overheating. (2) USB 2.0 Ports The two 4-pin Universal Serial Bus (USB) ports can connect a wide variety of devices via the USB cable and each port is able to connect up to 128 devices via... -
Page 11: Right Side View
Product Overview 2-3 Right Side View (1) Function Keys (2) Card Reader (1) Function Keys Power Key: Turns the system and LCD Panel on or off. This system uses a special one-button design. Press it to turn on the system and panel. Press momentarily again to turn off the system and panel. -
Page 12: Left Side View
Product Overview Note: Please refer to Chapter III LCD Panel Monitor for more information on functional control. (2) Card Reader This card reader includes 1x USB port, 1x Compact Flash, 1x Memory Stick, 1x Smart Media, and 1x Secure Digital. It supports USB Revision 2.0, Compact Flash I / II, IBM Micro drive, Smart media, Secure Digital, Mini SD, Multi Media Card, RS-MMC, Memory Stick, MS-Pro, MS-Duo, MS-Pro Duo. -
Page 13: Bottom View
Product Overview 2-5 Bottom View (3) Power Socket (2) Fan Grill (5) VGA/SP Wire Hole (4) Mainboard I/O Ports (1) Voltage Switch (6) Expansion Slot Covers (1) Voltage Switch The manual select switch needs to be adjusted based on different AC inputs. AC Input Voltage: 100 - 127V ~/5A 60 Hz;... - Page 14 Product Overview PS/2 Mouse Port The green 6-pin mini DIN connector is to connect a PS/2 mouse. PS/2 Keyboard Port The purple 6-pin mini DIN connector is to connect a PS/2 Keyboard. LAN Jack The RJ-45 allows connection to Local Area Network (LAN). For transmission rate, see motherboard manual.
-
Page 15: System Structure
Product Overview (6) Expansion Slot Covers PCI riser card slot covers 2-6 System Structure (1) Hard Disk Drive (2) Mainboard (3) Power Supply (1) Hard Disk Drive The Hard Disk Drive is 3.5” ATA or SATA. (2) Mainboard The mainboard is standard microATX form factor. (3) Power Supply Wattage: 220W max. -
Page 16: Lcd Panel Monitor
LCD Panel Monitor 3-1 LCD Panel Monitor Specifications The LCD Panel is a 17” high-performance intelligent multi-scan TFT-LCD color monitor. It can display 16.2M color images at its native resolution of 1280 x 1024. The microprocessor-based design provides digital controls for precision, auto-synchronization and auto-sizing for convenience and user-programming capabilities for flexibility. -
Page 17: Adjust The Monitor
LCD Panel Monitor 3-3 Adjust the Monitor 3-3-1 Monitor Control Keys on the right side of chassis There are 6 keys for user to adjust the monitor including Power, Down, Menu and Auto. The descriptions of these keys are: Power Key: Turns the System and LCD Panel power on or off. Up key: Makes cursor move up the sequence in menu. - Page 18 LCD Panel Monitor sub-menu. Choose “BRIGHTNESS” and press “ Menu” key again to show the level. Press “Up”/”Down” key to adjust the brightness level. The scale can be adjusted from maximum (100) to minimum (0). Press “Menu” key to save the adjustment and go back to the main menu.
- Page 19 LCD Panel Monitor In the main menu, choose “AUTO ADJUST”. Press “ Menu” key, the system will adjust vertical position, phase, horizontal position and pixel clock automatically. Exit automatically in 5 seconds. DSPLAY ADJUST H. (Horizontal) POSITION: adjusts the horizontal position of the display. In the main menu, choose “DSPLAY ADJUST”.
- Page 20 LCD Panel Monitor In the main menu, choose “DSPLAY ADJUST”. Press “ Menu” key to enter the sub-menu. Choose “V. POSITION” and press “ Menu” key again to show the position level. Press “Up”/”Down” key to adjust the position level. The scale can be adjusted from maximum (255) to minimum (0).
- Page 21 LCD Panel Monitor SHARPNESS: adjusts the sharpness of the display. In the main menu, choose “DSPLAY ADJUST”. Press “ Menu” key to enter the sub-menu. Choose “SHARPNESS” and press “ Menu” key again to show the sharpness level. Press “Up”/”Down” key to adjust the sharpness level. The scale can be adjusted from maximum (255) to minimum (0).
- Page 22 LCD Panel Monitor OSD: adjust On Screen Display (OSD) position. OSD H-POS means adjust OSD horizontal position. OSD V-POS means adjust OSD vertical position. In the main menu, choose “OSD”. Press “ Menu” key to enter the sub-menu; then press “Up”/”Down” to choose OSD horizontal or vertical position. Press “ Menu” key again in the sub-menu to show OSD position.
- Page 23 LCD Panel Monitor RECALL: takes you back to the present setting automatically. In the main menu, choose “RECALL”. Press “ Menu” key, the system will automatically recall the present setting. Exit automatically in 5 seconds. SAVE AND EXIT: Save adjustments and leave. In the main menu, choose “SAVE AND EXIT”;...
-
Page 24: Troubleshooting
1. Check if the audio cable is connected properly to the Line-out port. 2. Check if the monitor volume is set properly. Note: Please be aware that this is not a comprehensive support guide. For more detailed information please refer to the motherboard manual or contact Tangent Technical Support.
Need help?
Do you have a question about the Vita and is the answer not in the manual?
Questions and answers