Table of Contents
Advertisement
Quick Links
Advertisement
Table of Contents

Subscribe to Our Youtube Channel
Related Manuals for ADEMCO Vista AT


Summary of Contents for ADEMCO Vista AT
- Page 1 Previous Menu visrililA SECURITY SYSTEM VISTA CONSOLE ALPHA VISTA CONSOLE USER7S MANUAL...
-
Page 2: Table Of Contents
TABLE OF CONTENTS lNTRODUCTION ..............4 IDENTIFY’INGTHE EQUIPMENT . - Page 3 SECTION 2. SECURITY SYSTEM WITH ALPHA VISTA CONSOLE ........... . 25 FUNCTIONS OF THE CONSOLE FOR OPEN ZONES .
- Page 4 USER?5AIMMJ!XL HWUODUCR’IOM Congratulations on your ownership of the VISTA AT secur- VISTA type)’ which permits full confrol of system operation, ity system. You’ve made a wise decision in choosing it, for it various sensors which serve to provide perimeter and inte- offers the best security protection available today.
- Page 5 GLOSSARY ZONES A specific area of protection. The following glossary of terms used throughout the manual will ayoid any confusion. BYPASS: To disarm a specific area of burglary protection while leaving other areas operational. ARM/DISARM: “Armed” simp!y means that the bur- DELAY ZONE: An area of protection containing doors glary portion of your system is turned ON and is in a state of...
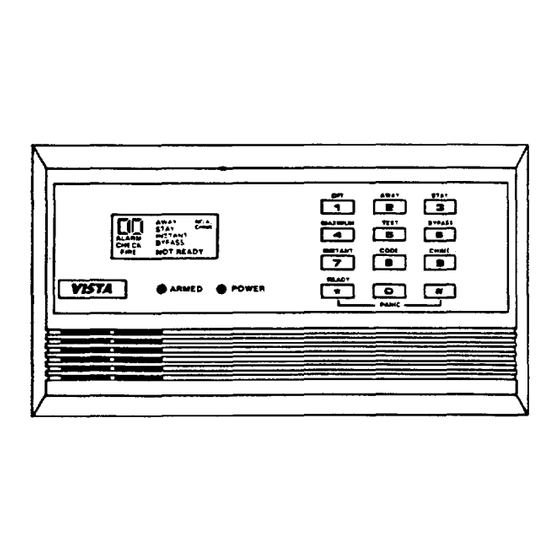
- Page 6 IDENTIFYING THE EQU[PMENT THE VISTA CONSOLE: ALPHA VISTA CONSOLE: enables vou to control all svs- is similar to the tern functions and also enables you t~monitor and diag-’ VISTA Console, except that it is equipped with a 2-line, 32- nose system operation. It is equipped with a multifunction character, fully programmable alphanumeric...
- Page 7 DELAY TIMES ZONE ENTRY AND EXIT These are set by your installer during installation determine the number of seconds available for exit and entry through a delay zone, when arming and disarming the burglary protection, to avoid setting off an alarm. The delay times for your system should be recorded here: Exit Delay #1 seconds*...
- Page 8 mA1wuM TEST ‘Qg %&= BYPASS c:tl~ Wlslhtil Cnlmi NOT READY 12zKKl...
- Page 9 1 LCD (Liquid Crystal Display) WINDOW: Combined CHECK: When a malfunction is discovered in the sys- protection zone identification display (2-digit) and sys- tem at any time or if a fault is detected in a FIRE zone at any time or in a DAY/NIGHT burglary zone during a tem status display: disarmed period.
- Page 10 KEYS O-9 are used to enter your individual security access code(s). CODE KEY: Allows the entry of new temporary access codes that can be given to users of the sys- tem. [MASTER SECURIJY CODE + CODE key+ NN + TEMPORARY SECURITY CODE, where: NN = user numbers 03 through 15 or 04 through 14 (depending upon installation configuration)].
-
Page 11: Checkingforopen Zones
CHECKINGFOR OPEN ZONES BEFORE ARMING YOUR ALARM SYSTEM, ALL PROTECTED DOORS, WINDOWS AND OTHER PROTECTION ZONES MUST CLOSED. Prior to arming, if NOT READY is displayed, check for open zones by depressing the READY key. 2. All open protection zones will be displayed. 3. -
Page 12: Arming The System
ARMING THE SYSTEM (WITH NO ONE REMAINING) .“., SECURITY CODE -Mco / ‘ —. See page 7 for the Entry and Exit delay periods that have been sent for your PROCEDURE: With READY displayed, enter the security code (or “#” You wil be able to exit within the exit delay period. -
Page 13: Armingthesystem (With Nooneremaining) Disarmingthe System And Silencing Alarms
DiSARMING THESYSTEM AND StLEhfCIIWALARMS (FOR AWAY, STAY, INSTANT, AND MAXIMUM ARMING) PROCEDURE: Enter security code. SECURllW CODE 2. Press OFF. If an alarm has occurred, note the numbers displayed and repeat procedure to restore the READY display. If READY will not display, go to the displayed protection zone and remedy the fault Fmml “... -
Page 14: Armingthe System (Whileinside, Expecting Alatearrival)
ARMING THE SYSTEM (WHILE INSIDE, EXPECTING A LATE ARRIVAL) PROCEDURE: RESULT: With READY displayed, enter the security code (or “#” . All perimeter protection zones are armed and will if “Quick Arm” is used). sound alarms immediately when violated. (Except Press the STAY key. - Page 15 &*t55 E551551E5 12EKl SECURllV CODE RESULT: PROCEDURE: . All interior protection zones are disarmed for freedom of 1. With READY displayed, enter the security code (or “#” movement throughout the interior. if “Quick Arm” is used): All perimeter protection zones, including those with 2.
-
Page 16: Arming The System (While Inside, With Maximum Securlly)
ARMING THE SYSTEM (WHILE INSIDE, WITH MAXIMUM SECURITY) &eta —. —. SECURITY CODE PROCEDURE: RESULT: . All protection zones (perimeter and interior), including With READY displayed, enter the security code (or “#” those with delays, are armed (after exit delay) and will if “Quick Arm”... -
Page 17: Bypassing Protectionzones
BYPASSING PROTECTIONZONES (USED FOR ARMING SYSTEM WITH ONE OR MORE ZONES SELECTIVELY LEFT UNPROTECTED) “.. “., tata fqm~ mlizl .”,. ..” RESULT: PROCEDURE: All bypassed protection zones will not cause an alarm System must be disarmed first. when violated. 2. Enter security code+ BYPASS+ zone number(s) (e.g., 01,02,03,... -
Page 18: Displaying Bypassed Protection Zones
DISPLAYING BYPASSED PROTECTION ZONES (USED FOR DETERMINING WHAT PROTECTION ZONES HAVE BEEN BYPASSED) PROCEDURE: 1. If BYPASS is displayed, enter security code+ BYPASS. 2. Wait for all bypassed protection zones to be sequen- tially displayed (each accompanied by one beep). NOTE: The system must be in the disarmed mode when this display function is performed,... -
Page 19: Temporary Codes
TEMPORARY CODES SECURITY CODE CAUTIONS: PROCEDURE: Enter master security code, . Up to thirteen (or eleven, depending on configuration) separate temporary codes may be assigned. 2. Press CODE + user number (03-1 5)* + the temporary not assign a temporary code that conflicts with the security code. -
Page 20: Chime Annunciation
CIIUMEAhENUFI#CIATION PROCEDURE: RESULT: THIS FEATURE IS FUNCTIONAL ONLY WHEN THE When a door in the delay zone is opened, or a perimeter BURGLARY SYSTEM IS DISARMED. zone is disturbed (e.g., window opened), NOT READY will be displayed and three tones will be heard at the 1. -
Page 21: Ambush
AMBUSH [WHEN FORCED TO DISARM (OR ARM) SYSTEM UNDER THREAT] ‘-@ RESULT PROCEDURE: The system will disarm, but the system can silently notify 1. Enter the first three digits of the security code. the central station Of vour situation, if you have that increase the final digit by one and then press OFF (or service. -
Page 22: Panic
PERSONAL EMERGENCY of the following symbols may FIRE appear next to each set of active emergency keys: POLICE PROCEDURE: Press A and # keys simultaneously*. ‘Key 1 and e and/or keys 3 and # may also have been programmed for silent or audible emergency alarm at the time of installation (see berow). -
Page 23: Summary Of Audible Notifications
SUMM ——— —— — ———— ——— =AUDIBLE NOTIFICATIONS AT CONSOLE Jlf Used) CAUSE I DISPLAY LOUD, INTERRUPTED SAME FIRE ALARM FIRE and ALARM is displayed; protection zone in alarm SOUND* ALARM is displayed. LOUD, CONTINUOUS SAME BURGLARY/AUDl[ ALARM displayed; protection zone in alarm is also EMERGENCY ALAtM... -
Page 24: Trouble Conditions
TROUBLE CONDITIONS If the word CHECK appears on the Console’s display accompained by a rapid “beeping” at the Console, it indi- cates that there is a trouble condition in the system. Typicai Troubie Dispiays: 1. A display of CHECK accompanied by a numeric display of 97 indicates that a problem exists with the system that eliminates... -
Page 25: Functionsof The Console
FUNCTIONSOF THE CONSOLE 3. AWAY KEY: Completely arms the burglary portion of 1. DISPLAY WINDOW: A 2-line, 32-character Liquid the system, (SECLJRlm CODE + AWAY). Crystal Display (LCD). Displays protection zone 4. STAY KEY: Arms the burglary portion of the system identification, system status, messages, and user... - Page 26 9, KEYS O-9: Used to enter your individual 4-digit security access code(s). 10. CODE KEY: Allows the entry of new temporary access codes that can be given to users of the system. (MASTER SECURITY CODE + CODE key+ NN + TEMPORARY SECURITY CODE, where: NN = user numbers 03 through 15 or 04 through 14, depending...
-
Page 27: Checking For Open Zones
CHECKING FOR OPEN ZONES tiel%l FAULT 05 FRONT izldb~ PSTAIRS BEDROOM Lz3Gtfm 0“””’” “-” BEFORE ARMING YOUR ALARM SYSTEM, ALL PROTECTED DOORS, WINDOWS AND OTHER PROTECTION ZONES MUST BE CLOSED. 2. All open protection zones will be displayed. 1. If the following display is present prior to arming, check for open zones by depressing the READY key. -
Page 28: Arming The System (With No One Remaining)
“ k H%tii-@ ! See page 7 for the Ent~ a~d Exil delay cwriods that have been iet for your syslem. RESULT: PROCEDURE: You wil be able to exit within the exit delay period. The following must “be displayed before arming can be atiempted. -
Page 29: Disarming The System And Silencing Alarms
IXSAIWUNG THE SYSTEM SILENCINGAL&RMS (FOR AWAY, STAY, INSTANT, AND MAXIMUM ARMING) PROCEDURE: Enter security code. 2. Press OFF. If an alarm has occurred, note the zone descriptor displayed and repeat procedure to restore the following display: If the above will not display, go to the displayed pro- tection zone and remedy the fault (close windows, etc.). -
Page 30: Arming The System (While Inside, Expecting A Late Arrival)
SECURITY CODE PROCEDURE: RESULT: 1. The following must be displayed before arming can be . All perimeter protection zones are armed and will attemDted. sound alarms immediately when violated. (Except those with entry/ exit delay, which will sound alarms when the delay period has expired). All interior projection zones are disarmed to permit freedom of movement throughout the interior. -
Page 31: Arming Thesystem
ARMING THESYSTEM (WHILE INSIDE, WITH NO EXPECTED LATE ARRIVALS) fiat% ARMED INSTANT* ZONE BYPASSED “,., .a”EO mWE” --’ SECURITY CODE PROCEDURE: RESULT: 1. The following must be displayed before arming can be c All for freedom of interior Protection zones are disarmed attempted, movement”throughout... -
Page 32: Arming The System (While Inside, With Maximum Securlly)
ARMING THE SYSTEM (WHILE INSIDE, WITH MAXIMUM SECURITY) SECURITY CODE PROCEDURE: RESULT: 1. The following must be displayed before arming can be All protection zones (perimeter and interior), including attempted. those with delays, are armed (after exit delay) and will Instantly cause an alarm when violated. -
Page 33: Bypassing Protection Zones
BYPASSING PROTECTIOIU ZONES (USECI FOR ARMING SYSTEM WITH ONE OR MORE ZONES SELECTIVELY LEFT UNPROTECTED) ,,.. DISARMED BYPASS -, “, mfia RESULT: PROCEDURE: All bypassed protection zones will not cause an alarm System must be disarmed first. when violated. 2. Enter security code+ BYPASS + zone number(s) (e.g., 01,02,03, etc.). -
Page 34: Displaying Bypassed Protection Zones
DISPLAYING BYPASSED PROTECTION ZONES (USED FOR DETERMINING WHAT PROTECTION ZONES HAVE BEEN BYPASSED) PROCEDURE: The following should be present if zones have been bypassed. DISARMED BYPASS READY TO ARM &&a BYPAS 05 FRONT To display the bypassed zones, enter security code + -.”. -
Page 35: Temporary Codes
TEMPORARY CODES SECURITY CODE CAUTIONS: PROCEDURE: depending on configuration) . Up thirteen (or eleven, Enter master security code. separate temporary codes may be assigned. 2. Press CODE+ user-number (03-15)*+ the temporary . Do not assign a temporary code that conflicts with the security code. -
Page 36: Chimeannunciation
CHMVIE AKfWNCtATIOlt 151ti(a ISARMED CHIME -, “. REAOV TO ARM 0“”” ““” ‘“’ —- PROCEDURE: RESULT: When a door in the delay zone is opened or a perimeter THIS FEATURE IS FUNCTIONAL ONLY WHEN THE zone is disturbed (e.g., window opened), the message BURGLARY SYSTEM IS DISARMED. -
Page 37: Ambush
AMBUSH [WHEN FORCED TO DISARM (OR ARM) SYSTEM UNDER THREAT] RESULT PROCEDURE: . The system can silently notify 1. Enter the first three digits of the security code. will disarm, but the system the central station of your situation, if you have that Increase the final digiiby one and then press OFF (or service. -
Page 38: Panic
PANIC PERSONAL EMERGENCY of the following symbols FIRE aDDear next to each set of active emergency keys: POLICE EEEl PROCEDURE: 1. Press x and # keys simultaneously*. * Keys 1 and and for keys 3 and # may also have been programmed for silent or audible emergency alarm at the... -
Page 39: Summary Of Audible Notifications
— —— — .—— —— ~AUDIBLE ?IJOTIFICATIWW AT CONSOLE II{ Used) CAUSE DISPLAY LOUD. INTERRUPTED SAME SOUND* FIRE ALARM . FIRE is displayed; number and descriptor of zone in alarm is disdaved. ALARM LOUD, CONTINUOUS SAME SOUND* BURGLARYIAUDIBLE ALARM is displayed; number and descriptor of zone in EMERGENCY ALARM... -
Page 40: Trouble Conditions
TROUBLE CONDITIONS If the word CHECK appears on the Console’s display 2. A display of CHECK accompanied by a display of one or more zone descriptors indicates that a problem accompanied by a rapid “beeping” at the Console, it indi- exists with those zone(s). -
Page 41: Self-Helpfeature
SELF-HELPFEATURE OFF: For turning off burglary protection or Abbreviated user’s instructions are built into the system silencing audible troubles and alarms. that can be easily viewed on the console’s message dis- play screen. This self-help feature will prove paflicularly AWAY: For turning on all burglary protection useful if this manual is not conveniently accessible when... -
Page 42: Protection Zones
PROTECTION ZONES One or more sensing devices will have been assigned by the installer of your alarm system to each of the various protection zones in your system (although may have been used). For example, the sensing device on your not every zone Entry/Exit... -
Page 43: Questions And Answers About Your Securiw System
ANSWERS ABOUT QUESTtOW YOUR SECURITYSYSTEM I’m in. My system is armed. 1accidentally set off the burglary alarm. What should I do? A, Go to your Console. Enter your security code and press OFF. This will silence the alarm sounder. If your alarm is connected to a police department or alarm monitoring service, you have successfully... - Page 44 (2. I return and my burglary alarm is sounding or alarm memory display is present. What should I do? A. Do not enter. Go to the nearest phone and call the police. fire alarm? Q. What should I do if I hear my Following your pre-arranged Emergency Evacuation...
-
Page 45: Emergency Phone Numbers
Fire Depatimenl Ambulance Doctor Emergency Pohce INFORMATION: SERVICING —-——.—— — —— Your local Ademco dealer is the person best qualified to service your alarm system. Arranging some kind of regular him is advisable. your local Ademco dealer is: service program wifh... -
Page 46: Fcc Statement
“FEDERAL COMtdUhJICATIONS COMMISSION (FCC) STATEMENT’ This equipment has been tested to FCC requirements and has been found The FCC requires the following for use. acceptable statement for your information: This equipment generates and uses radio in strict accordance with frequency energy and if not installed and used properly,... - Page 47 of heat or smoke detectors in the living room, dining room, With regard to the number placement of smoke/ bedroom(s), kichen, hallway(s), attic, furnace room, utility heat detectors, we subsciibe to the recommendations contained in the National Fire Protection Association’s storage rooms, basements...
-
Page 48: Emergency Evacuation
EMERGENCY EVACUATION Indicate escape routes for each room. Remember to keep these Every family should take steps to establish and regularly practice routes free from obstruction and post copies of the escape escape in the event of a fire. The following steps are a plan of route sketch in every room. -
Page 49: Owner's Insurance Premium Credit Request Form
A. GENERAL INFORMATION: Insured’s Name Address: Policy No.: Insurance Company: Ademco VISTA SECURITY SYSTEM Type of Alarm: Cl Burglary •l Fire U Both Serviced installed Name Name Address Address B. NOTIFIES (Insert B= Burglary,... - Page 50 OJ&~_*) ).)~;i:,~i ,’ C. POWERED A.C. With Rechargeable Power Supply TESTING: •l Quarterly •l Monthly •l Weekly El Other E. SMOKE DETECTOR LOCATIONS Furnace Room ,Kitchen Bedrooms ,Attic —, —, — Basement ,Living Room Hall — ,Dining Room_ F. BURGLARY DETECTING DEVICE LOCATIONS:...
-
Page 51: Draw Your Own Evacuation Plan
DRAW YOUR OWN EVACUATION PLAN... -
Page 52: The Limitations Of This Alarm System
WARNING THE LIMITATIONS OF THIS ALARM SYSTEM against burglary or fire or other While this system is an advanced design security system, it does not offer guaranteed protection emergency. Any alarm system, whether commercial or residential, to compromise or failure to warn for a variety of is subject reasons, For example: unprotected... - Page 53 passive Infrared the designed ranges as diagramed in their installation Molion Detectors can only detect intrusion within manual. Passive Infrared Detectors do not provide volumetric area protection. They do create multiple beams of proleclion, intrusion can only be detected in unobstructed areas covered by those beams.
-
Page 54: Warraniy
ADEMCO YEAR LIMITED WARRANTY Alarm Device Manufacturing Company, a Division of Pittway Corporation (<’Seller”), 165 Eileen Way, Syosset, NewYork 11791, warrants its security equipment (the “product”) to be free from defects in materials and workmanship for one year from date of original purchase, under normal use and service. - Page 56 2UBEMCOI DIVISION OF PITTWAY CORPORATION !44411 9f8a Copyright @ 19B8 PITTWAY CORPORATION...
Need help?
Do you have a question about the Vista AT and is the answer not in the manual?
Questions and answers