
Related Manuals for Austin Hughes Electronics CyberView RKP215-801


Summary of Contents for Austin Hughes Electronics CyberView RKP215-801
- Page 1 CyberView User Manual RKP215-801 RKP217-801 RKP215-1601 RKP217-1601 Rackmount LCD monitor Keyboard drawer with KVM switch Version 2.0 20 March 2004...
-
Page 2: Table Of Contents
User Manual Table of Contents General......................3 Unit Introduction................... 3 Unit Photograph.................... 3 Unit Features ....................3 Unit Packing Contents ................... 3 Important Information & Safeguards ............... 4 Preparation for Use..................4 LCD On Screen Display ..................5 Display & Navigation Using Membrane Keys ........... 5 Customizing the LCD Settings................. -
Page 3: General
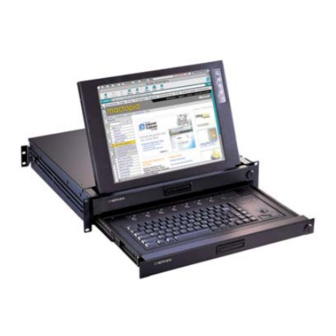
User Manual General Unit Introduction Thank you for purchasing the 2U Rackmount LCD monitor keyboard drawer with KVM switch. The unit is a unique combined 19” rack mountable unit designed to provide access to and control of multiple servers from a single unit. The unit offers space saving leading edge, flexible, features and provide tangible benefits to the user while ensuring the reliability, cost efficiency and return on hardware investment expected for today’s broadcast, enterprise and service provider networks. -
Page 4: Important Information & Safeguards
User Manual Important Information & Safeguards • Please read these safety instructions carefully • Keep this user manual for later reference • Disconnect the unit from the mains input power supply source before cleaning • Do not spray aerosol or liquid cleaners directly on the unit, use only a soft cloth for cleaning •... -
Page 5: Lcd On Screen Display
User Manual 2. LCD On Screen Display Display & Navigation Using Membrane Keys The On screen display built into the unit provides users with an efficient method of adjusting to the display input signal. This section explains clearly how to navigate the OSD using the membrane keys, shown below, that you will find on the unit to the right side of the LCD screen. -
Page 6: Customizing The Lcd Settings
User Manual 2.1.2 To Select a Menu Item Simply press the key to scroll 2.1.3 To Enter the Sub Menu Simply press the key marked 2.1.4 To Change an Input Value Simply use the key marked 2.1.5 To Save the setting Simply press the key marked 2.1.6 To Exit the Main Menu... -
Page 7: Miscellaneous Sub Menu
User Manual 2.2.3 Phase / Clock To optimize display qualities - follow the steps 2.1.1 through 2.1.5 2.2.4 Horizontal Screen Position To adjust horizontal screen position - follow the steps 2.1.1 through 2.1.5 2.2.5 Vertical Screen Position To adjust horizontal screen position - follow the steps 2.1.1 through 2.1.5 2.2.6... - Page 8 User Manual 3.1.1 Information To select information sub menu - follow the steps 2.1.1 through 2.1.5 3.1.2 OSD Timeout To select OSD Timeout sub menu - follow the steps 2.1.1 through 2.1.5 3.1.3 Color To select Color sub menu - follow the steps 2.1.1 through 2.1.5 www.austin-hughes.co.uk...
-
Page 9: Setting Os Refresh Rate - Microsoft Windows
User Manual 3.1.4 OSD language To select the OSD language sub menu - follow the steps 2.1.1 through 2.1.5 4. Setting OS Refresh Rate - Microsoft Windows® On the windows desktop ‘right click’ the mouse key and then select ‘properties’ Select ‘Settings’... -
Page 10: Connecting Your Kvm Switch
User Manual 5. Connecting Your KVM Switch 12V DC Power In KVM Channel Ports Cascade Port Consol Port • KVM Channel Port – to connect servers using 3 in 1 KVM cable • Cascade Port – to connect to another KVM switch •... -
Page 11: Kvm Navigation Using Membrane Keys
Membrane Keys built into the unit provide users an efficient method of changing KVM ports very quickly and accurately. This section explains clearly how to switch and monitor the KVM ports using the membrane keys that you will find on the CyberView unit underneath the LCD screen. LED highlights ‘Active Channel’... -
Page 12: Kvm Navigation Using On Screen Display & Hot Keys
User Manual This LED box displays the Bank Select Bank Button 1 - 8 8. KVM Navigation using On Screen Display & Hot keys Scroll Hold down the FN key and press on your keyboard twice in succession - the OSD will be displayed for 10 Sec;... -
Page 13: To Reset The Kvm To Default Setting Using The Membrane Keys
User Manual The Unit default setting is Consul OFF – the user must key in the current password to operate the unit To reset the KVM to default setting using the membrane keys Simply press the and channel buttons together To select the previous channel Scroll Simply press the... -
Page 14: To Reset The Kvm To Default Rom Setting
User Manual 8.10 To reset the KVM to default ROM setting Scroll Simply press the on your keyboard twice in succession followed by the on your keyboard (note -: THIS DOES NOT RESET THE PASSWORD) 8.11 To identify an active channel ☼... -
Page 15: Lcd Technical Specification
User Manual 9. LCD Technical Specification 15" Size Screen Area TFT Active Matrix Display Area 304.1mm (h) x 228.1mm (V) Contrast Ratio 300:1 130 deg (H) z 115 deg (V) TYP Viewing Angle Resolution 1024 x 768 XGA 0.297mm (H) x 0.297mm (W) Pixel Pitch Response Time Tr = 5ms, TF = 20ms TYP... - Page 16 User Manual Size 17" Screen Area TFT Active Matrix Display Area 337:92mm (h) x 270.336mm (V) Contrast Ratio 350:1 Viewing Angle 150 deg (H) z 125 deg (V) TYP Resolution 1280 x 1024 SXGA Pixel Pitch 0.264mm (H) x 0.264mm (W) Response Time Tr = 5ms, TF = 20ms TYP Brightness...
-
Page 17: Kvm Technical Specification
User Manual KVM Technical Specification PC Port 8 or 16 PC Port Connector (female) HDDB 15Pin PS/2 Keyboard mini DIN 6 Pin PS/2 Mouse Cascade Port (female) mini DIN 6 Pin VGA HDDB 15Pin OSD Manual Control, Manual soft key Control PC Selection &... -
Page 18: Lcd Troubleshooting
User Manual LCD Troubleshooting 11.1 The LCD does not function, the PC input is operational • Ensure that the Power adaptor is securely plugged in at both ends and has power feed from the supply source; check that the Green led light is on on the adaptor unit •... -
Page 19: Warranty
User Manual Warranty 13.1 Period & Conditions Warranty is from the date of sale of the unit, subject to the terms and conditions of the Austin Hughes Europe Authorised channel partner who supplied the unit, please refer to your authorised channel partner for terms &...
Need help?
Do you have a question about the CyberView RKP215-801 and is the answer not in the manual?
Questions and answers