
Related Manuals for Alto CYCLONE


Summary of Contents for Alto CYCLONE
- Page 1 F o r m u s i c w i t h p a s s i o n User's Manual CYCLONE large scale mixing console www.altoproaudio.com Version 1.0 APRIL. 2006 English...
-
Page 2: Safety Instructions
SAFETY RELATED SYMBOLS Fuse To prevent fire and damage to the product, use only the recommended fuse type as indicated in this CAUTION manual. Do not short-circuit the fuse holder. Before RISK OF ELECTRIC SHOCK DO NOT OPEN replacing the fuse, make sure that the product is OFF and disconnected from the AC outlet. -
Page 3: Preface
EQ (4 band fixed EQ for stereo channels), 6 Auxiliary sends, Level Set preamp and fader LEDs etc.. Besides, the CYCLONE is equipped with fully featured oscillator and talkback sections that will allow the sound engineer to work in a very fast and reliable way. Seeing is believing, let's meet CYCLONE. -
Page 4: Table Of Contents
............................4 MAIN FEATURES ............................5 INSTALLATION AND CONNECTIONS ......................6 CYCLONE PICTURES ..........................8 FUNCTIONAL DESCRIPTION .........................10 Cyclone Mono input channels ........................10 Cyclone Stereo input channels ......................15 Cyclone Master Section .........................20 CYCLONE CONNECTIONS WIRING ......................28 TECHNIQUE & TROUBLESHOOTING ....................32 GLOSSARY ..............................37 BLOCK DIAGRAMS ..........................38... -
Page 5: Introduction
The Cyclone is an all purpose FOH mixing console that can be used as Monitor mixer as well, thanks to its 6 inde- pendent auxiliary sends. Each mono channel offers microphone and line input and insert points, lo-cut filter, four band Sweep EQ. -
Page 6: Main Features
MAIN FEATURES Pre-insert preamp Level Set LED Extremely high headroom offering excellent dynamic range Pre-fader, pre-eq channel insert MIC input channels with golden plated XLRs and balanced LINE inputs 2-band fixed and 2-band sweep EQ on mono channels 4 Stereo input channels with left-right balanced TRS jacks, and mono MIC 4-band fixed EQ on stereo channels Ultra-low noise discrete Mic Preamps with +48V Phantom Power 100mm high precision faders... -
Page 7: Installation And Connections
Place the mixing console on a flat and even surface, avoiding extremely hot, cold, dust or humid places. Your Cyclone should be situated so that its location or position does not interfere with its proper ventilation (e.g. on a carpet, on felt, etc.). - Page 8 All connector shells should be of metal construction in order to provide a screen when connected to the console. The Cyclone deserves to be operated with high quality twisted-pair audio cables to develop its full audio performances. XLR plug & socket...
-
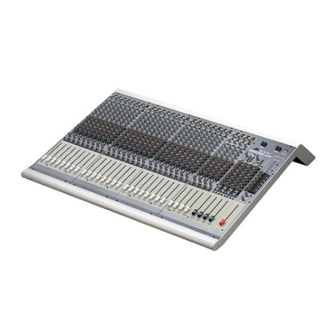
Page 9: Cyclone Pictures
CYCLONE PICTURES CYCLONE 160 CYCLONE 240... - Page 10 CYCLONE PICTURES CYCLONE 320...
-
Page 11: Functional Description
FUNCTIONAL DESCRIPTION [ Cyclone Mono Input Channels ] The Cyclone is supplied with all the connections which pro users deserve to connect every kind of signal sources to Cyclone inputs. Insert This unbalanced 1/4" jack connector has been designed to be used as insert... - Page 12 EQ, external dynamic controls and other ancillary equipment to shape its own sound! The Cyclone preamp section features all the useful controls to accurately manage the sound source in the most ver- satile way.
- Page 13 [ Cyclone Mono Input Channels ] We provided a very versatile EQ circuit with two sweep filters to satisfy professional users demand. Thanks to the wide overlap section of the 4 filters, this EQ allows to shape in a very efficient way the sound of all the sound sources which the sound engineers has to manage.
- Page 14 [ Cyclone Mono Input Channels ] LTO we thought that you deserve a very versatile auxiliary section. So we provided you six auxiliary sends. These AUX sends can control the signals level which come from AUX output, but they have no effect to the main output.
- Page 15 [ Cyclone Mono Input Channels ] The assign section is useful to manage the output assignment to several outputs, listen "in Solo" a channel and mute or not a channel signal. OUTPUT Assign to 1/2, 3/4, L/R These switches allow the sound engineer to address the signal to selected audio path.
-
Page 16: Cyclone Stereo Input Channels
[ Cyclone Stereo Input Channels ] Each Cyclone is supplied with four stereo input channels. These channels are ideal for stereo signals but we included the same circuit of mono inputs, with discrete preamp level section and low-cut filter. So the sound engineer has the... - Page 17 [ Cyclone Stereo Input Channels ] The Cyclone preamp section is fully featured with all the useful controls to manage the sound source. There are two different preamp input path for mono or stereo signals, the latter features just GAIN while the mono preamp input is regularly featured like any other mono input.
- Page 18 [ Cyclone Stereo Input Channels ] Stereo sources are generally keyboards outputs, pre-mixers, etc., so the signal deserves few EQ adjustments. For this reason we choose for the Cyclone stereo channels a four band fixed EQ. HIGH gain HIGH 12KHz It's a shelving filter giving the user a continuous adjustment of boost and cut from +15dB to -15dB @ 12kHz.
- Page 19 [ Cyclone Stereo Input Channels ] LTO we thought that you deserve a very versatile auxiliary section. So we provided you the same six discrete auxiliary sends of mono channels, with independent level controls. AUX 1 The AUX 1 send level can be adjusted from - up to +10dB.
- Page 20 [ Cyclone Stereo Input Channels ] The assign section is useful to manage the output assignment to several outputs, and also to PFL or MUTE a channel signal. OUTPUT Assign to 1/2, 3/4, L/R These switches allow the sound engineer to address the signal to the selected audio path.
-
Page 21: Cyclone Master Section
[ Cyclone Master Section ] The master section is the richest section of the mixer with plenty of inputs, outputs and control switches. Here's a detailed description of each connector. RTN1 LEFT (MONO) & RTN1 RIGHT These balanced connectors are for stereo auxiliary return 1. - Page 22 AUX 6 OUT This unbalanced1/4" TRS connector is for auxiliary 6 send. EXTERNAL POWER SUPPLY CONNECTOR CYCLONE has two external power supply connectors, one is EXTERNAL POWER SUPPLY CONNECTOR MAIN POWER, the other is BACKUP POWER. These two connectors are used to connect the unit to the mains with the enclosed power cord.
- Page 23 [ Cyclone Master Section ] LIGHT This 4-pin XLR connector must be used to connect 12V DC lamps(Max 8W). TALKBACK INPUT This input is for a talkback microphone, Which will be managed by SOURCES TALK BACK LIGHT HEADPHONES section. INPUT...
- Page 24 [ Cyclone Master Section ] TAPE IN LEVEL This pot will give the sound engineer the ability to manage the tape return signal level from - up to +10dB. OUTPUT Assign to 1/2, 3/4, L/R TAPE IN These switches allow the sound engineer to address the signal to the audio LEVEL path which he wants to.
- Page 25 [ Cyclone Master Section ] The aux send section is useful to control the overall level of the send to a monitor speaker or to an effects unit. Generally pre-fader is used for monitor purposes, allowing the sound engineer to set a level that's independent by channel fader setting.
- Page 26 [ Cyclone Master Section ] The group section contains all the controls for level and soloing the group signal. The most important feature is the To L/R switch that allows the sound engineer to use in a different way the group signal. Generally this switch is released when the sound engineer wants to record some grouped signals, while the switch is pressed when the sound engineer wants to use the groups signal as a part of the signal to be addressed to stereo mix.
- Page 27 LED level ladder LEFT RIGHT This 8-LED very accurate level indicator is another useful tool of Cyclone which provides sound engineers perfectly control mixer behaviour. PFL/AFL LED This LED shows the status of the level indicator when any PFL /AFL switch is pressed.
- Page 28 [ Cyclone Master Section ] CONTROL ROOM level LEVEL This stereo pot will give the sound engineer the ability to carefully manage CONTROL ROOM level from up to +10dB. CONTROL ROOM HEADPHONE MONITORS level LEVEL This stereo pot will give the sound engineer the ability to carefully manage the HEADPHONE MONITORS level from - up to +10dB.
-
Page 29: Cyclone Connections Wiring
CYCLONE CONNECTOR WIRING The Cyclone uses standard pro audio connectors and wiring configurations 1/4" jack Pin1 = Screen/Ground Pin2 = Hot Signal MIC IN Pin3 = Cold Signal Tip = Hot 1/4" jack TRS Ring = Cold LINE IN Sleeve = Screen... - Page 30 1/4" TRS insert Lamp Connector Pin 1: Chassis Pin 2: n.c. Send Pin 3: Ground Return Pin 4: VCC Ring 12VDC 8W max Sleeve [ Connectors needed: ] Kind of connectors needed Inputs MIC IN (total) XLR socket (female) LINE IN (mono CH) 1/4"...
- Page 31 For the right wiring please check also the following table Ring=Right Signal Sleeve Ring Strain Clamp Tip=Left Signal Sleeve=Ground/Screen Use for Headphone 1/4" Stereo (TRS) Jack Plug Sleeve Tip=Signal Strain Clamp Sleeve=Ground/Screen Use for Mono Line In, Mono 1/4"Jack Plugs 1/4"...
- Page 32 Ring=Return Signal (Connected together) To Channel Insert Sleeve=Ground/Screen Tip=Signal To Tape or FX Input Sleeve=Ground/Screen 'Tapped' Connection Direct Output Lead (Enables the Insert to be used as a Direct Output while maintaining the channel signal flow) To Processor Input Sleeve=Ground/Screen Tip=Send Signal To Channel Insert Ring=Return Signal...
-
Page 33: Technique & Troubleshooting
This section of the owner's manual gives you some basic information about the technique how to get the best perfor- mances from your Cyclone. Of course there are several tricks and tips. The last part of this chapter is about trouble- shooting. - Page 34 However (and this is a big however), there are still sources of potential problems. The Cyclone is able to operate at levels up to +21dBu on both the insert send and return. If the maximum input level of the compressor is less than +21dBu then it is possible to overload the input of the compressor.
- Page 35 EQ DIAGRAM In recording studios as well as on stage, the versatile Cyclone EQ section is a valuable sound tool. Its controls will allow the sound engineer to modify the frequency contour of sound to shape the character of instruments to obtain the sound he wants to.
- Page 36 Assign keys These switches allow the sound engineer to address the signal to the selected audio path. The odd/even numbered switches are used to send the signal to sub-groups (then you can send their signal to L/R outs) while L/R switch sends the signal directly to Main Mix output.
- Page 37 The final links in audio systems are graphical equalisers, loudspeaker processors and finally amplifiers and speakers. Graphical equalisers have the same problems as the Cyclone's EQ. If excessive boost is applied to the signal, the graphic equaliser's output (and subsequent electronics too!) may be overloaded. If, Cyclone output is higher than the maximum input level of the graphic, the input of the graphic equalizer may be overloaded.
-
Page 38: Glossary
GLOSSARY In this owner's manuals we used terms of pro audio slang, here's the explanation of some of those words SWEET SPOT It's the best place to listen to your mix, with all the details of stereo front, it's the 3 corner of a triangle, where the two other corners are the speakers. -
Page 39: Block Diagrams
CYCLONE BLOCK DIAGRAM... -
Page 40: Technical Specifications
CYCLONE - TECHNICAL SPECIFICATIONS Electronics Input Input Impedance Mic 2kohm Balanced Line 10kohm Balanced Input Gain Mic Continuously variable from 0dB to +60dB Input Gain Line - Mono Channel Continuously variable from -25dB to +35dB Input Gain Line - Stereo Channel... - Page 41 2 (XLR) (1/4"TRS jack) (1/4"TRS jack) (RCA jack) (1/4"TRS jack) General Dimensions (W Weight Power Consumption In inches in mm. Lbs. CYCLONE 160 17.3" 28.7" 5.3" 439.5 730 135 28.66 CYCLONE 240 24.4" 28.7" 5.3" 39.68 618.5 730 135 CYCLONE 320 32"...
-
Page 42: Warranty
WARRANTY 1. WARRANTY REGISTRATION CARD To obtain Warranty Service, the buyer should first fill out and return the enclosed Warranty Registration Card within 10 days of the Purchase Date. All the information presented in this Warranty Registration Card gives the manufacturer a better understanding of the sales status, so as to purport a more effective and efficient after-sales warranty service. - Page 43 No. 1, Lane 17, Sec. 2, Han Shi West Road, Taichung 40151, Taiwan http://www.altoproaudio.com Tel: 886-4-22313737 email: alto@altoproaudio.com Fax: 886-4-22346757 All rights reserved to ALTO. All features and content might be changed without prior notice. Any photocopy, translation, or reproduction of part of this manual without written permission is forbidden. Copyright 2006 SEIKAKU GROUP NF02542-1.1...
Need help?
Do you have a question about the CYCLONE and is the answer not in the manual?
Questions and answers