
Related Manuals for DriSteem STS


Summary of Contents for DriSteem STS
- Page 1 READ AND SAVE THESE INSTRUCTIONS DRI-STEEM MODEL STS and STS-DI ® ® STEAM-TO-STEAM HUMIDIFIERS Installation Instructions Maintenance Operations Manual For Toll-Free Technical Support, Call 1-800-328-4447 UL LISTED CUL LISTED...
-
Page 2: Table Of Contents
• Vertical Duct Installation ..............16 Start-Up and Operation • Water Control with VAPOR-LOGIC ........... 17 Recommended Maintenance ..............18 STS-DI Start-up and Recommended Maintenance ........19 Trouble Shooting Guide ................20 Replacement Parts ..................21 Two-Year Limited Warranty ..............24... -
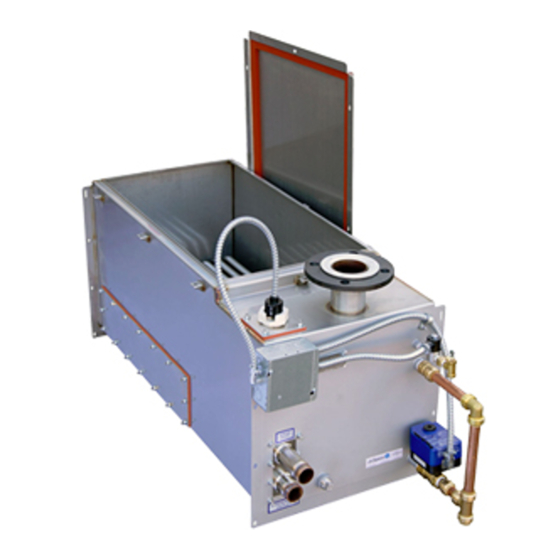
Page 3: Sts And Sts-Di Humidifiers
To Water Supply operate on water treated by reverse Water Strainer osmosis or deionization. However, Automatic STS humidifiers are available for use Steam Valve Heat Exchanger with these water types. The standard To Steam humidifier can be converted in the field... -
Page 4: Capacities And Dimensions
CAPACITIES AND DIMENSIONS Table 4-1: Mechanical dimensions for STS and STS-DI units with stainless steel heat exchanger(s) Table notes: S= Stainless steel SNC= Stainless steel without Teflon coating " " 1 " 1 ‰ " ‰ " ‰ " For use with DI/RO "... - Page 5 5/16" dia. mounting bolt holes Table 5-1: Humidifier weights ¾" drain STS and STS-DI (dual heat exchanger) size 800C and 800 SNC Table 5-1 note: *Suspending from overhead Front view construction is not recommended ¼"NPT water due to operating weight of unit.
-
Page 6: Mounting Methods
® 3. Due to the size and weight of the STS 200, 400 and 800 units, the trapeze hanger and wall brackets are not 2. Access (12" to 18" minimum) for periodic removal of the recommended. - Page 7 MOUNTING METHODS 6. Mounting STS Unit Away from Duct(s) Using Vapor Hose Vapor hose. (Pitch back min. 2" per foot to humidifier with supports to prevent pockets.) Maximum length 10'. Humidifier must be mounted level. Stainless steel dispersion tube in middle of duct.
-
Page 8: Piping
100 psi). Softened Water Reduces Water Usage The STS Humidifier works with all water types - potable, The fewer number of make-ups per unit of time and the softened or demineralized make-up water. lesser the amount of water per make-up, the more "on time"... - Page 9 PIPING Potable Water Figure 9-1: This piping method is recommended when For water less than 10 grains per gallon hardness the humidifier must be mounted higher than the duct. skimmer system alone, without softening, usually pro- vides a full season or more of humidification without a need for cleaning the evaporator.
- Page 10 PSI steam inlet pressure should not be STS. Failure to install this trap will cause water hammer, attempted. Check valves down stream of both steam which could damage the STS heat exchanger.
-
Page 11: Piping Diagrams: Steam, Water And Drain
PIPING DIAGRAMS: STEAM, WATER AND DRAIN Figure 11-1: Standard STS ® ¼" NPT Fill- Make-Up Valve Needle Valve Water Supply Shut Off Valve (not provided) To Water Supply Water Strainer Automatic Steam Valve Heat Exchanger OM-471 To Steam Supply Skimmer Tube... -
Page 12: Electrical
All wiring must be in accordance with all govern- ® ing codes and the STS wiring diagram. A wiring diagram Caution: Only qualified electrical personnel should is inside the control cabinet. The wiring between the perform installation and start-up procedures. -
Page 13: Steam Dispersion Installation
STEAM DISPERSION INSTALLATION STS Dispersion Tube Installation with Condensate Drain Vapor Hose Figure 13-1: Single Tube • Vapor hose should be supported Insertion Length 2.5" 3.25" to prevent sags or low spots and to maintain a minimum pitch of 2"... - Page 14 The distance steam will travel within a given airstream is predictable and can be determined using the STS catalog. If this has already been done, the travel distance should be specified; if not, consult the STS catalog or contact you...
-
Page 15: Rapid-Sorb Assembly And Installation
1. Unpack Shipment and verify receipt of all governing codes. RAPID-SORB components with packing list. Report any shortages at once to the DRI-STEEM factory. 8. Attach the header swivel hose connector to main header using the hose cuff and clamps provided, do not 2. -
Page 16: Vertical Duct Installation
® RAPID-SORB ASSEMBLY AND INSTALLATION Vertical Duct Installation Install the RAPID-SORB ® with dispersion tubes and header pitched to condensate drain as shown in figures 16-1,16-2, and 16-3. Figure 16-1: Plan View Figure 16-2: Elevation View Tube without Drain Airflow Recommended 2"... -
Page 17: Start-Up And Operation
100 micromhos/cm (2 grains/gal) minimum to function and may not operate in water treated by the reverse osmosis or deionizing process. Specially designed STS Model DI humidifiers are available for use with these water types. -
Page 18: Recommended Maintenance
2. Cleaning Probes Remove cap assembly and unscrew the probe holder from the STS unit. The scale will easily flake off from the sensing probes. The sensing portion (bottom 3/8") of the probe should be brushed clean with stainless steel wool. -
Page 19: Sts-Di Start-Up And Recommended Maintenance
Verify that all wiring connections have been made in (deionized water) accordance with the STS ® wiring diagram. The STS-DI humidifier does not require regular mainte- nance. A periodic visual inspection is recommended to Control System identify gasket or piping leaks. Control circuit and ®... -
Page 20: Trouble Shooting Guide
TROUBLE SHOOTING GUIDE Symptom Possible Cause Recommended Action Humidifier Will Not Heat No control transformer output. Verify control voltage. Set humidistat to Humidistat is not calling. "call". Inspect for faulty humidistat. Saftey controls open (high limit, Check safety controls. air proving, etc...) Faulty control board. -
Page 21: Replacement Parts
Probe Assembly 406060 Heat Exchanger, STS-25S 164420-101 * Valve, ¾" Electric (Auto Drain) 505400-001 Fill Valve, ¼" Solenoid, .125, STS-25, 50, 100 505084 Heat Exchanger, STS-50S 164420-102 * Heat Exchanger, STS-100S 164420-103 * Fill Valve, ¼" Solenoid, .281, STS-400, 800... - Page 22 Float Plate, STS-200/400/800 164410-002 Gasket, Cover, STS-100 160690-340 * Baffle, Probe Plate 124442 Gasket, Cover, STS 200/400/800 160690-200 * Float Valve Assembly STS 25-400 505210 Float Valve Assembly STS 25-800 505300 Knob, T-Handled Utility 700725 Heat Exchanger, STS-25S 164420-101 * * Specify humidifier model and serial numbers when ordering.
- Page 23 REPLACEMENT PARTS ® ® Figure 23-1: STS Control Cabinet with VAPOR-LOGIC Controls OM-1044 Table 23-1: VAPOR-LOGIC ® Controls Description Part No. Power Block 408300-001 Transformer 408960 Ground Lug 409250-017 LW430, Microprocessor Board 408641 LW440, Display Board 408651...
-
Page 24: Two-Year Limited Warranty
DRI-STEEM has notice of the possibility of such damages. By purchasing DRI-STEEM’s products, the purchaser agrees to the terms and conditions of this limited warranty.
Need help?
Do you have a question about the STS and is the answer not in the manual?
Questions and answers