Table of Contents
Advertisement
Quick Links
Advertisement
Table of Contents

Subscribe to Our Youtube Channel
Related Manuals for Digitus 4-CHANNEL SATA II


Summary of Contents for Digitus 4-CHANNEL SATA II
- Page 1 4-CHANNEL SATA II PCI EXPRESS CARD User Manual...
-
Page 2: Bus Interface
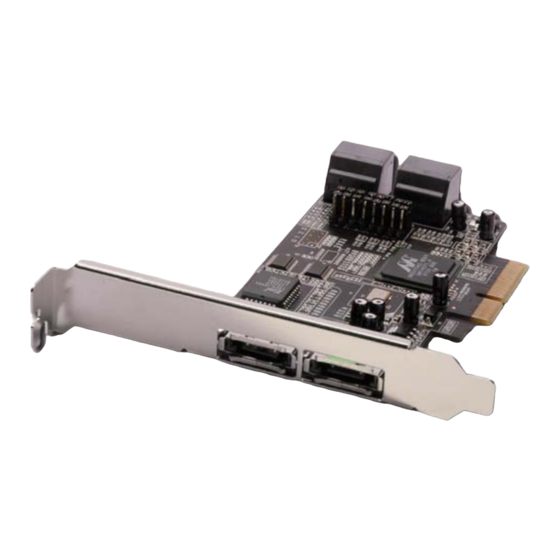
Features Marvell 88SX7042 chipset Compliant with PCI Express Base Specification 1.0a Compliant with Serial ATA 1.0 specification with support for full complement of SATA II optional features Supports SATA II Native Command Queuing (NCQ) Provides four independent channels to support up to four Serial ATA drives ... -
Page 3: Hardware Description
Hardware Description G (Jumper Settings) Description Active Port J2-J5 1-2 close Enable SATA Connector D 2-3 close Enable SATA Connector E J6-J9 1-2 close Enable SATA Connector C 2-3 close Enable SATA Connector F... -
Page 4: Hardware Installation
Note: There are six SATA ports in PCIe SATA II 300 4-Channel Adapter. We name these ports A to F. Ports A to D are internal SATA ports and E & F are external SATA ports. By changing the jumper setting on the PCIe SATA II 300 4-Channel Adapter that allows you to select between external and internal ports to use. -
Page 5: Driver Installation
controller that supports up to four Serial ATA hard disk drives. Install your hard disk drive(s) in chassis. Connect the Serial ATA hard disk drive to the system power supply using the included Serial ATA power cable. Connect one end of the Serial ATA cable to the hard disk drive. Attach the other end of the Serial ATA cable to the Serial ATA controller on the PCIe SATA II 300 4-Channel Adapter. - Page 6 At the Windows® 2000 Setup screen, press F6 to install the driver. When prompted, press S to specify the location of the driver. Insert the floppy disk, then press Enter. Select Marvell Serial ATA Adapter , then press Enter. Press Enter again to finish driver installation, then follow the on-screen instructions to complete the Windows installation.
- Page 7 For Windows® XP/Server 2003 For New Installation A new installation requires a floppy disk for the driver installation. To make this floppy disk, copy the contents of the “ DS-30104\2K_XP_2003_Vista” folder, found on the driver CD, onto a blank floppy disk then follow the directions below. Follow Microsoft’s Windows installation procedure.
- Page 8 For An Existing Installation At the Found New Hardware Wizard: XP (w/SP1 or earlier)/Server 2003: continue to step #2 XP (w/SP2 or later)/Server 2003(w/SP1 or later): select No, not this time, then click Next. Insert the driver CD, select Install the software automatically (Recommended), and click Next.
- Page 9 At the Windows Setup screen, press F6 to install the driver. When prompted, press S to specify the location of the driver. Insert the floppy disk, then press Enter. Select Marvell Serial ATA Adapter, then press Enter. Press Enter to finish driver installation, then follow the on-screen instructions to complete the Windows installation.
-
Page 10: For Windows Vista
For Windows® Vista For New Installation A new installation requires a floppy disk for the driver installation. To make this floppy disk, copy the contents of the “ DS-30104\2K_XP_2003_Vista” folder, found on the driver CD, onto a blank floppy disk then follow the directions below. Follow Microsoft’s Windows installation procedure. - Page 11 For An Existing Installation At Found New Hardware Wizard, select Locate and install driver software (recommended). Insert the driver CD, click Next. If the system prompts the user informing the drivers are not signed, select the option Install this driver software anyway. Click Close to complete the installation For Windows®...
- Page 12 For An Existing Installation At Found New Hardware Wizard, select Locate and install driver software (recommended). Insert the driver CD, click Next. If the system prompts the user informing the drivers are not signed, select the option Install this driver software anyway. Click Close to complete the installation.
Need help?
Do you have a question about the 4-CHANNEL SATA II and is the answer not in the manual?
Questions and answers