Table of Contents
Advertisement
Quick Links
Advertisement
Table of Contents
Troubleshooting

Related Manuals for Verizon HomeFusion Broadband


Summary of Contents for Verizon HomeFusion Broadband
- Page 1 HomeFusion Broadband User Manual...
-
Page 2: Table Of Contents
Getting Started ............1 Basic Concepts ..........................3 Contents of the HBR Box ......................4 Getting to Know the HBR ......................5 1.3.1 Front Panel ............................6 1.3.2 Back Panel............................10 Setup................12 Connecting the HBR to the MoCA Network ...............14 Powering on the HBR........................15 Connecting Your Network Devices..................16 2.3.1... - Page 3 GUI: My Network............46 Network Status..........................47 Network Connections.........................48 5.2.1 Ethernet Properties...........................49 5.2.2 Wireless Access Point Properties ....................50 5.2.3 Coax Properties..........................51 5.2.4 Broadband Connection (LTE)......................53 GUI: Firewall Settings ..........54 General.............................56 Access Control..........................58 Port Forwarding..........................60 DMZ Host ............................61 Port Triggering ..........................62 Remote Aministration ........................64 Static NAT............................66 Advanced Filtering ........................67...
- Page 4 8.1.7 Remote Administration........................87 8.1.8 Dynamic DNS............................89 8.1.9 DNS Server ............................91 8.1.10 Configuration File ..........................93 8.1.11 System Settings ..........................95 8.1.12 Firmware Upgrade..........................98 8.1.13 Network Objects..........................99 8.1.14 Universal Plug and Play........................ 101 8.1.15 SIP ALG ............................... 102 8.1.16 MGCP ALG............................103 8.1.17 IGMP Proxy ............................104 8.1.18 Port Forwarding Rules ........................
- Page 5 10.3 Resetting your HBR........................141 10.4 Configuring Dynamic IP Addressing on Windows............143...
-
Page 6: Getting Started
Getting Started... -
Page 7: Getting Started
Getting Started Introduction This User Manual helps you get to know your HomeFusion Broadband service and guides you through the configuration of features of the HomeFusion Broadband Router. DMS-CTC-20110909-0007 v2.0... -
Page 8: Basic Concepts
The HBA is mounted on the side of the house and is the interface between the Verizon 4G LTE Network and your MoCA devices. The HBR The HomeFusion Broadband Router is located in your home and is responsible for interconnecting: ... -
Page 9: Contents Of The Hbr Box
Responsible Driving Important Consumer Information Read these documents before you start using your HBR. The HomeFusion Broadband Router. In this User Manual we will refer to it as HBR. The Wall Mounting kit containing: The wall mount docking station ... -
Page 10: Getting To Know The Hbr
Getting Started Getting to Know the HBR This section introduces you to the different components of the HBR. Topic Page “1.3.1 Front Panel” “1.3.2 Back Panel” DMS-CTC-20110909-0007 v2.0... -
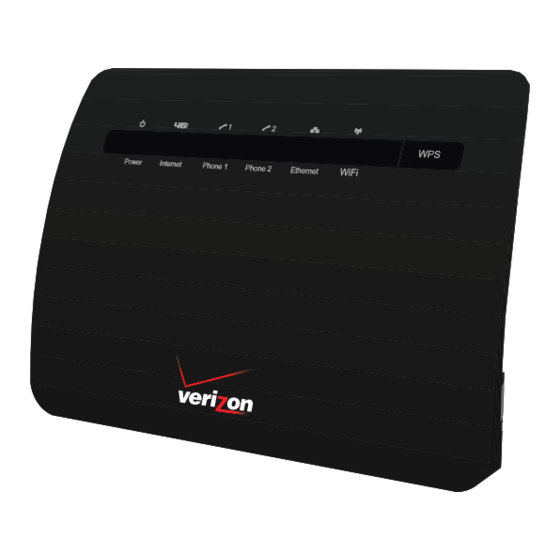
Page 11: Front Panel
Getting Started 1.3.1 Front Panel Status LEDs WPS button Components On the front panel of the HBR, you can find: The Status LEDs: These Status LEDs allow you to check the state of the services offered by the HBR. ... - Page 12 Color State Description Green Solid Connected to the Verizon telephone network. Blinking Call ongoing or connecting to the Verizon telephone network. Amber Blinking Voice mail message available. Solid Failed to connect to the Verizon telephone network. The HBR is either powered off or telephony is not enabled.
- Page 13 Getting Started Color State Description No devices connected to the Ethernet port. Solid The HBR is powered off or starting up. All devices connected to the Ethernet ports are powered off. WiFi LED Color State Description Green Solid Wireless is enabled, no client data activity Blinking Wireless is enabled, client data activity...
- Page 14 Getting Started Color State Description WPS not initiated. The HBR is powered off or starting up. For more information on how to connect your wireless clients using WPS, see “2.3.1 Connecting Your Wireless Devices via WPS” on page DMS-CTC-20110909-0007 v2.0...
-
Page 15: Back Panel
Getting Started 1.3.2 Back Panel Overview The following picture gives you an overview of all the back panel components: USB port (A) Allows you to power or charge your USB devices. The USB port can deliver up to 500mA of current. Consult the documentation of your device to check how much current it needs to be able to power or charge. - Page 16 WAN coaxial cable port (F) Allows you to connect the HBR to the HBA. Phone port (G) Allows you to connect your telephone to the Verizon Wireless telephone network. The Phone service is not supported at this time. DMS-CTC-20110909-0007 v2.0...
-
Page 17: Setup
Setup... - Page 18 For more information, see “2.3 Connecting Your Network Devices” on page Normally, the Verizon Wireless technician already took care of the installation of your HBR and HBA. So the only thing that you might need to do is add new network devices to your network.
-
Page 19: Connecting The Hbr To The Moca Network
Setup Connecting the HBR to the MoCA Network Procedure Coax Coax cable 1 Take one end of the coaxial cable and connect into the coaxial wall jack. 2 Connect the other end to the WAN port of the HBR. DMS-CTC-20110909-0007 v2.0... -
Page 20: Powering On The Hbr
Setup Powering on the HBR Procedure Power 1 Take the power supply that is included with your HBR. 2 Connect the power cord to the Power port of the HBR. 3 Plug the other end into an electrical outlet. 4 Push the On/Off switch to turn on the HBR. 5 Wait a few minutes to allow the HBR to complete the start up phase. -
Page 21: Connecting Your Network Devices
Setup Connecting Your Network Devices Introduction This section helps you to connect your network devices (for example, a computer, a network printer and so on) to the HBR network. Connection options If you want to connect your computer to the HBR using: A wireless connection, you can connect your computer: ... -
Page 22: Connecting Your Wireless Devices Via Wps
Setup 2.3.1 Connecting Your Wireless Devices via WPS Wi-Fi Protected Setup (WPS) allows you to add new wireless devices to your local network in a swift and easy way, without the need to enter any of your wireless settings (network name, wireless key, encryption type). Requirements ... -
Page 23: Troubleshooting
Setup Blinking red with a pause pattern This indicates that another WPS session is already ongoing. Wait for two minutes and then try again. Troubleshooting If you are having trouble connecting your wireless device via WPS, configure your wireless client manually. For more information, see “2.3.2 Connecting Your Wireless Device Manually”... -
Page 24: Connecting Your Wireless Device Manually
Setup 2.3.2 Connecting Your Wireless Device Manually Requirements Your network device must be equipped with a WiFi-certified wireless client. Your network device must be configured to obtain an IP address automatically. This is the default setting. Procedure If you want to connect a computer using the wireless network, configure the wireless client on your computer with the wireless settings printed on the label of the HBR. - Page 25 Setup Connect your computer on Windows 7 Proceed as follows: 1 Click the wireless network icon ( )in the notification area. 2 A list of available wireless networks appears. Double-click the HBR access point. The HBR is listed with the network name (SSID) that is printed on the back of the HBR (for example: TNCAP123456).
- Page 26 Setup 4 Windows prompts you to enter the network security key. Type the WPA2 key that is printed on the back of the HBR in the Network key and Confirm network key box and click Connect. Connect your computer on Windows XP Proceed as follows: 1 Right-click the wireless network connection icon ( )in the notification area...
- Page 27 Setup 4 You are now connected to the HBR: Connect your computer on Mac OS X Proceed as follows: 1 Click the Airport icon on the menu bar. 2 A list of available wireless networks appears. Select the HBR from the list. The HBR is listed with the network name (SSID) that is printed on the back of the HBR (for example: TNCAP123456).
-
Page 28: Wired Connection To The Hbr
Setup 2.3.3 Wired Connection to the HBR Requirements Both your network device (for example, a computer, an Ethernet switch and so on) and HBR must have a free Ethernet port. Your network device must be configured to obtain an IP address automatically. This is the default setting. -
Page 29: Wall Mounting The Hbr (Optional)
Setup Wall Mounting the HBR (Optional) Introduction This section will help you to wall mount the HBR. What you need A power drill A pencil to mark the mounting holes A small level is recommended to level the two holes ... - Page 30 Setup 5 Place the wall mount bracket back into position and insert the screws. 6 Carefully hang the HBR on the wall mount bracket. DMS-CTC-20110909-0007 v2.0...
-
Page 31: Graphical User Interface (Gui)
Graphical User Interface (GUI) - Page 32 Graphical User Interface (GUI) Introduction The Graphical User Interface (GUI) is a web browser interface that allows you to configure both the HBR and the HBA settings. Requirements JavaScript must be enabled on your browser (this is the default setting). For more information, consult the help menu of your web browser.
- Page 33 Graphical User Interface (GUI) Menu The menu bar on the top contains the following items: Icon Name For more information, see... Main “3.1 Main” on page Wireless Settings “4 GUI: Wireless Settings” on page My Network “5 GUI: My Network” on page Firewall Settings “6 GUI: Firewall Settings”...
-
Page 34: Main
Graphical User Interface (GUI) Main Main page The Main page provides a summary view of the main services of the HBR. The content of the page is divided into three groups: My Router For more information, see “3.1.1 My Router ” on page ... -
Page 35: My Router
Graphical User Interface (GUI) 3.1.1 My Router Introduction The My Router pane displays the status of the HBR’s network and Internet connection and contains the following items: HBR Status Broadband Connection Quick Links HBR Status The HBR Status informs you about the status of your Internet connection: Icon Description Indicates that the HBR is connected to the Internet. - Page 36 For more information, see “8.2.5 Users” on page 120. Verizon Help Click this link to view the online help of the HBR. Logout: Click this link to quit your session. You will need to re-enter your user name and password to return to the GUI.
-
Page 37: My Network
Graphical User Interface (GUI) 3.1.2 My Network Introduction The My Network pane, provides you an overview of the devices that are currently connected to the HBR. The following information is provided for each device: PC Name: Displays the name that will be used to reference to the device. -
Page 38: Action Zone
Graphical User Interface (GUI) 3.1.3 Action Zone Introduction The Action Zone pane allows you to access specific Verizon services and support information. Click: GO TO THE INTERNET NOW to browse to your home page. Quick Start Guide to view the latest version of the Quick Start Guide. -
Page 39: Gui
GUI: Wireless Settings... -
Page 40: Wireless Status
GUI: Wireless Settings 4.1 Wireless Status Introduction The Wireless Status page provides you an overview of the wireless settings that are currently used by the HBR. Overview The following settings are available: Radio Enabled: Displays whether the HBR’s wireless radio is active. ... - Page 41 GUI: Wireless Settings WPA+WPA2: This is a mixed mode. In this mode, WPA2 is the preferred encryption type but wireless clients that do not support WPA2 can still use WPA as encryption type. Choose this option if not all of your wireless clients support WPA2 or if you are not sure.
-
Page 42: Basic Security Settings
GUI: Wireless Settings Basic Security Settings Introduction The Basic Security Settings page allows you to configure the basic wireless settings of the HBR in a step-by-step approach. Your changes will only be applied as soon as you click the Apply button. Overview of the steps This section describes: Step 1: Turn Wireless ON/OFF... - Page 43 GUI: Wireless Settings Step 3: Channel If you want to change the channel for your wireless communication, select a new channel in the Channel list. We recommend that you use Automatic (this is also the default). When Automatic is selected the HBR will choose the channel that has the least interference. Only change it if you experience wireless connectivity problems.
- Page 44 GUI: Wireless Settings 3 If needed, complete the other steps 4 Click Apply on the bottom of the page. Step 6: Turn WPS ON Wi-Fi Protected Setup (WPS) allows you to add new wireless clients to your local network in a swift and easy way, without the need to enter any of your wireless settings (network name, wireless key, encryption type).
-
Page 45: Advanced Security Settings
GUI: Wireless Settings Advanced Security Settings Introduction The Advanced Security Settings page allows you to take your wireless security to the next level. To improve the security of your wireless network you can add the following security levels: Level 1: Securing your wireless traffic as it transmits through the air This level is allows you to encrypt your wireless traffic with a wireless key to make sure that only the sender and the receiver can read the data that is sent over your wireless connection. -
Page 46: Securing Your Wireless Connection
GUI: Wireless Settings 4.3.1 Securing Your Wireless Connection Encryption types The HBR supports the following encryption types: WEP: The least safe encryption type used for wireless connections. WEP has been proven to have security issues. Only use this encryption if your wireless device does not support WPA2 or WPA. -
Page 47: Ssid Broadcast
GUI: Wireless Settings 4.3.2 SSID Broadcast SSID To be able to distinguish one wireless network from another, each wireless network has its own network name, often referred to as Service Set IDentifier (SSID). All your wireless devices on your network must use this network name (and the correct encryption). -
Page 48: Wireless Mac Authentication
GUI: Wireless Settings 4.3.3 Wireless MAC Authentication MAC Address A MAC (Media Access Control) address is a unique hexadecimal code that identifies a device on a network. Each network device has such a MAC address. MAC Authentication When using MAC authentication, you allow or deny devices to access to your network based on their MAC address. -
Page 49: B/G/N Mode
GUI: Wireless Settings 4.3.4 802.11b/g/n Mode Introduction The 802.11b/g/n Mode page allows you to specify which wireless standards you want to support. Wireless standards The HBR is able to support the following wireless standards: 802.11n offers the highest speed (up to 130Mbps) and best range. ... -
Page 50: Other Advanced Wireless Options
Changing the Advanced Wireless Options may affect your router's wireless performance. Do not make any changes to these options unless you have been instructed to do so by Verizon Wireless support personnel. Accessing the Advanced Wireless Options page Proceed as follows: 1 On the Wireless Settings menu, click Advanced Security Settings. -
Page 51: Gui: My Network
GUI: My Network... -
Page 52: Network Status
GUI: My Network Network Status Introduction The Network Status page provides you an overview of the devices that are currently connected to the HBR. Device Information The following information is provided for each device: PC Name: Displays the name that will be used to reference this device. ... -
Page 53: Network Connections
GUI: My Network Network Connections Warning The settings covered in this section should be configured by experienced network technicians only! Introduction The Network Connections page allows you to configure the network connections of the HBR. Click or the name of the connection to edit or view the settings of the connection. -
Page 54: Ethernet Properties
GUI: My Network 5.2.1 Ethernet Properties Introduction The Ethernet Properties page allows you to view the properties of the Ethernet switch of the HBR. Accessing the Ethernet Properties page Proceed as follows: 1 On the My Network menu, click Network Connections. 2 The Network Connections table appears. -
Page 55: Wireless Access Point Properties
GUI: My Network 5.2.2 Wireless Access Point Properties Introduction The Wireless Access Point Properties page allows you to: Disable/enable the wireless access point. View/ change the network name (SSID) of the wireless access point. View the properties of the wireless access point of the HBR. Access Proceed as follows: 1 On the My Network menu, click Network Connections. -
Page 56: Coax Properties
GUI: My Network 5.2.3 Coax Properties Introduction A coax connection connects devices (such as set-top boxes) to the HBR using a coaxial cable. The Coax Properties page allows you to: Disable/enable the coax connection. View/change the settings of the coax connection. ... - Page 57 GUI: My Network Sent Packets: Displays the number of packets that were sent over the coax interface. Time Span: Displays the time amount of time for which the coax interface has been connected. Channel: The channel used by the coax connection. Controls Click: ...
-
Page 58: Broadband Connection (Lte)
GUI: My Network 5.2.4 Broadband Connection (LTE) Introduction The Broadband Connection (LTE) page allows you to access the broadband settings of the HBA. Accessing the broadband LTE settings Proceed as follows: 1 On the My Network menu, click Network Connections. 2 The Network Connections table appears. -
Page 59: Gui: Firewall Settings
GUI: Firewall Settings... - Page 60 GUI: Firewall Settings Overview This chapter describes the Firewall Settings pages. Topic Page “6.1 General” “6.2 Access Control” “6.3 Port Forwarding” “6.4 DMZ Host” “6.5 Port Triggering” “6.6 Remote Aministration” “6.7 Static NAT” “6.8 Advanced Filtering” “6.9 Security Log” DMS-CTC-20110909-0007 v2.0...
-
Page 61: General
GUI: Firewall Settings General Introduction The firewall controls the flow of data between the local network and the Internet. Both incoming and outgoing data are inspected and then either accepted (allowed) or rejected (barred) from passing through the HBR according to a set of rules. The rules are calculated to stop unwanted intrusions from the outside, while allowing local network users access to required Internet services. - Page 62 GUI: Firewall Settings 3 The General page appears: 4 Select the firewall level of your choice. 5 Check the Block IP Fragments box to protect the local network from attacks that use fragmented data packets to sabotage the network. VPN over IPSec and some UDP-based services make legitimate use of IP fragments.
-
Page 63: Access Control
GUI: Firewall Settings Access Control Introduction The HBR has an integrated access control list that allows you to block access to specific services on the Internet. You are able to configure: Which service has to be blocked (for example: no surfing on the Internet) ... - Page 64 GUI: Firewall Settings 3 In the Networked Computer / Device list, select: The device that you would like to block from using the service User Defined if the device is not listed, or you want to create a group of devices.
-
Page 65: Port Forwarding
GUI: Firewall Settings Port Forwarding Introduction In its default state, the HBR blocks all external users from connecting to, or communicating with the network, making it safe from hackers who may try to intrude on the network and damage it. However, the network can be exposed to the Internet in certain limited and controlled ways to enable some applications to work from the local network (game, voice, and chat applications, for example) and to enable Internet access to servers in... -
Page 66: Dmz Host
GUI: Firewall Settings DMZ Host Introduction The DMZ (De-Militarized Zone) host feature allows one device on the network to operate outside the firewall. To designate a DMZ host: To use an Internet service, such as an online game or video-conferencing program, not present in the Port Forwarding list and for which no port range information is available. -
Page 67: Port Triggering
GUI: Firewall Settings Port Triggering Introduction Port triggering can be used for dynamic port forwarding configuration. By setting port triggering rules, inbound traffic is allowed to arrive at a specific network host using ports different than those used for the outbound traffic. The outbound traffic triggers which ports inbound traffic is directed to. - Page 68 GUI: Firewall Settings 4 The Port Triggering page appears: Click: Add to create a new port triggering rule. to delete a port triggering rule. Adding a port triggering rule On the Port Triggering page: 1 On the bottom of the table, click the Add list at the bottom of the page. 2 In the Add list, select either of the following: ...
-
Page 69: Remote Aministration
GUI: Firewall Settings Remote Aministration WARNING Enabling Remote Administration puts your local network at risk from outside attacks. Introduction On the Remote Administration page, you can enable/disable: Incoming WAN Access to the Telnet Server. Incoming WAN Access to Web-Management. ... - Page 70 GUI: Firewall Settings 4 The Remote Administration page appears. 5 Select the services that you want to allow. 6 Click Apply. DMS-CTC-20110909-0007 v2.0...
-
Page 71: Static Nat
GUI: Firewall Settings Static NAT Introduction Static NAT allows you to direct traffic coming from the Internet to a specific local device. For example: if you are running a web server, you want all incoming web requests to be directed to your web server. Accessing the Static NAT page Proceed as follows: 1 On the top menu, click Firewall Settings. -
Page 72: Advanced Filtering
There are numerous rules automatically inserted by the firewall to provide improved security and block harmful attacks. The pre-populated rules displayed here are required for operation on the Verizon Network. Two sets of rules can be configured: Input Rule Sets allow you to create rules for inbound traffic. - Page 73 GUI: Firewall Settings Adding a rule On the Advanced filtering page: 1 Click Add next to the interface for which your want to create a rule. 2 The Add Advanced Filter page appears. The following sections are available for configuration: ...
- Page 74 GUI: Firewall Settings User Defined if the rule will only be active at certain selected times. Then click Add to add a schedule rule. The procedure is similar to the one described in “8.1.20 Scheduler Rules” on page 108. 3 Click Apply.
-
Page 75: Security Log
GUI: Firewall Settings Security Log Introduction The security log displays a list of firewall-related events, including attempts to establish inbound and outbound connections, attempts to authenticate at an administrative interface (GUI or Telnet terminal), firewall configuration, and system start-up. Accessing the Security Log page Proceed as follows: 1 On the top menu, click Firewall Settings. -
Page 76: Gui: Parental Control
GUI: Parental Control... -
Page 77: Parental Control
Block all Internet access. Users will not be able to access the internet unless you define exceptions to this rule (for example: allows www.verizon.com). Block websites: When the user tries to access the blocked page, he will get the standard page announcing that this page has been blocked. - Page 78 GUI: Parental Control 4 Under Step 2, complete the following steps: a Select either of the following: Block the following Websites and Embedded Keywords within a Website to create a new blocking rule. Allow the following Websites and Embedded Keywords within a Website to specify an exception on a blocking rule.
-
Page 79: Rule Summary
GUI: Parental Control Rule Summary Introduction The Rule Summary page allows you to view or change the existing parental control rules. Changing a parental control rule Proceed as follows: 1 On the Parental Control menu, click Rule Summary. 2 The Rule Summary page appears. 3 Click: ... -
Page 80: Gui: Advanced Settings
GUI: Advanced Settings... - Page 81 GUI: Advanced Settings Introduction The Advanced page allows you to configure the more advanced services of both the HBA and the HBR. To access the Advanced page, proceed as follow: 1 On the top menu, click Advanced. 2 The Advanced page appears. 3 On the bottom of this page, click: ...
-
Page 82: Hba Advanced
GUI: Advanced Settings HBA Advanced Pages Introduction The Advanced HBA page contains links to the different configuration pages. These pages are grouped by topic: Utilities DNS Servers Configuration Upgrade Network services Date and time ... - Page 83 GUI: Advanced Settings Configuration Click: Configuration File to save or restore a configuration. For more information, see “8.1.10 Configuration File” on page 93 System Settings to change the system settings of the HBA. For more information, see “8.1.11 System Settings” on page Upgrade Click Firmware Upgrade to upgrade your HBA with the latest software.
-
Page 84: Diagnostics
GUI: Advanced Settings 8.1.1 Diagnostics Introduction The Diagnostics page allows you to let the HBA ping a device or website. Ping is used to test if a host (for example, a website or a computer) is reachable. Procedure To diagnose network connectivity: 1 On the top menu, click Advanced. - Page 85 GUI: Advanced Settings Round trip time, you can see the amount of time it took for the packet to get back to the HBA. DMS-CTC-20110909-0007 v2.0...
-
Page 86: Restore Defaults
“1.1 Basic Concepts” on page 3, both the HBR and the HBA are responsible for bringing the Verizon services into your home. It is therefore important to know that a reset to defaults may influence specific services. If you reset: ... - Page 87 GUI: Advanced Settings 8 The HBA restores the factory defaults and restarts. DMS-CTC-20110909-0007 v2.0...
-
Page 88: Reboot The Router
GUI: Advanced Settings 8.1.3 Reboot the Router Introduction The Reboot the Router page allows you to restart your HBA. WARNING During the reboot, all services provided by the HBA will be unavailable. Procedure To reboot the HBA: 1 On the top menu, click Advanced. 2 The Advanced page appears. -
Page 89: Arp Table
GUI: Advanced Settings 8.1.4 ARP Table The Address Resolution Protocol is a protocol that translates the IP address of a network device into its MAC address. The ARP table page The ARP Table page provides you a mapping between the IP address and the MAC address of the device that is using this IP address. -
Page 90: Quality Of Service (Qos)
GUI: Advanced Settings 8.1.5 Quality of Service (QoS) Quality of Service (QoS) is a system that allows you to assign a higher or lower priority to specific types of data. For example: Data destined for your Setup Box must have higher priority than normal traffic. -
Page 91: Local Administration
GUI: Advanced Settings 8.1.6 Local Administration Introduction The Local Administration page allows you to configure telnet access to your HBA. Accessing the QoS pages Proceed as follows: 1 On the top menu, click Advanced. 2 The Advanced page appears. Click HBA Advanced Settings on the bottom of the page and then click Yes t o confirm that you want to access the advanced settings. -
Page 92: Remote Administration
GUI: Advanced Settings 8.1.7 Remote Administration WARNING Enabling Remote Administration puts your local network at risk from outside attacks. Introduction On the Remote Administration page, you can enable/disable: Incoming WAN Access to the Telnet Server. Incoming WAN Access to Web-Management. ... - Page 93 GUI: Advanced Settings Accessing the remote administration page Proceed as follows: 1 On the top menu, click Advanced. 2 The Advanced page appears. Click HBA Advanced Settings on the bottom of the page and then click Yes t o confirm that you want to access the advanced settings.
-
Page 94: Dynamic Dns
GUI: Advanced Settings 8.1.8 Dynamic DNS Introduction The Dynamic DNS service allows you to assign a dynamic DNS host name (for example mywebpage.dyndns.org) to a broadband connection even if it is using a dynamic IP address. As soon as the device gets a new IP address, the dynamic DNS server updates its entry to the new IP address. - Page 95 GUI: Advanced Settings 2 The Dynamic DNS Host Entry page appears. 3 In the Host Name box, type the host name that you purchased at the Dynamic DNS provider (for example: myhbr.dyndns.org). 4 In the User Name box type the user name of your Dynamic DNS account. 5 In the Password box, type the password of your Dynamic DNS account.
-
Page 96: Dns Server
GUI: Advanced Settings 8.1.9 DNS Server Introduction The Domain Name System (DNS) translates domain names into IP addresses and vice versa. The HBA’s DNS server is an auto-learning DNS, which means that when a new computer is connected to the network, the DNS server learns its name and automatically adds it to the DNS table. - Page 97 GUI: Advanced Settings to edit an existing DNS entry. to delete an existing DNS entry. Adding a DNS entry On the DNS Server page: 1 Click Add DNS Entry at the bottom of the page. 2 The DNS Entry page appears. 3 Enter a DNS name for the host in the Host Name box.
-
Page 98: Configuration File
GUI: Advanced Settings 8.1.10 Configuration File Backing up your current configuration Once have successfully configured your HBA, it is recommended that you backup your configuration. This allows you to return to this configuration whenever you need it (for example after misconfiguration, or a reset to the factory defaults). Backing up your current configuration Proceed as follows: 1 On the top menu, click Advanced. - Page 99 GUI: Advanced Settings 3 The Configuration File page appears. 4 Click the Load Configuration File. 5 The Load Configuration File page appears. 6 A window appears to prompt you to save your file. Save your file to the location of your choice. DMS-CTC-20110909-0007 v2.0...
-
Page 100: System Settings
So if you change the host name to router and the local domain to home, you will have to access the GUI using http://router.home. HomeFusion Broadband Antenna Under HomeFusion Broadband Antenna, the following properties are available: Automatic Refresh of System Monitoring Web Pages ... - Page 101 GUI: Advanced Settings Primary/secondary HTTP ports Primary/secondary HTTPS ports Primary/secondary Telnet ports Secure Telnet over SSL ports System Logging Under System Logging, you can configure the following items: Enable Logging Click in this check box to activate system logging. ...
- Page 102 GUI: Advanced Settings Server Enter the host name of the outgoing (SMTP) server in this text box. From Email Address Email notifications require a “from” address. Enter a “from” email address in this text box. Port Enter the port number of the email server in this text box. ...
-
Page 103: Firmware Upgrade
Introduction The Firmware Upgrade page allows you to update your HBA with the latest software. Verizon Wireless automatically updates the software of your HBA. So you normally do not need to use this page. Update mechanisms You are able to upgrade your HBA: ... -
Page 104: Network Objects
GUI: Advanced Settings 8.1.13 Network Objects Introduction A network object is used to define a part of the HBA’s network (a group of computers, for example) by MAC addresses, IP addresses, and/or host names. The defined part becomes a “network object, ” and settings, such as configuring system rules, can be applied to all the devices defined as part of the network object at once. - Page 105 GUI: Advanced Settings 8 The Edit Item screen appears. Select the type of network object type from the Network Object Type list box. Options include: IP address MAC Address Host Name Click Apply. DMS-CTC-20110909-0007 v2.0...
-
Page 106: Universal Plug And Play
GUI: Advanced Settings 8.1.14 Universal Plug and Play Introduction UPnP is designed to automate the installation and configuration of a (small) network as much as possible. This means that UPnP-capable devices can join and leave a network without any effort of a network administrator. Configuring UPnP 1 On the top menu, click Advanced. -
Page 107: Sip Alg
GUI: Advanced Settings 8.1.15 SIP ALG Introduction The SIP ALG page allows you to enable the SIP ALG on your HBA. Accessing the SIP ALG page 1 On the top menu, click Advanced. 2 The Advanced page appears. Click HBA Advanced Settings on the bottom of the page and then click Yes t o confirm that you want to access the advanced settings. -
Page 108: Mgcp Alg
GUI: Advanced Settings 8.1.16 MGCP ALG Introduction The MGCP ALG page allows you to enable the MGCP ALG on your HBA. Accessing the MGCP ALG page 1 On the top menu, click Advanced. 2 The Advanced page appears. Click HBA Advanced Settings on the bottom of the page and then click Yes t o confirm that you want to access the advanced settings. -
Page 109: Igmp Proxy
GUI: Advanced Settings 8.1.17 IGMP Proxy Introduction The IGMP Proxy page allows you to change the IGMP Proxy settings. Accessing the IGMP Proxy Settings page 1 On the top menu, click Advanced. 2 The Advanced page appears. Click HBA Advanced Settings on the bottom of the page and then click Yes t o confirm that you want to access the advanced settings. -
Page 110: Port Forwarding Rules
GUI: Advanced Settings 8.1.18 Port Forwarding Rules Introduction The Port Forwarding Rules page allows you to define translation rules for specific protocols. This avoids having to re-enter all the port numbers each time you need to configure something for this service. These definitions can then be used for services like: ... - Page 111 GUI: Advanced Settings Delete an existing rule, click View a full list of rules, click the Advanced button under the table. DMS-CTC-20110909-0007 v2.0...
-
Page 112: Date And Time
GUI: Advanced Settings 8.1.19 Date and Time Introduction The Date and Time page allows you to configure the date and time that the HBA will be using for: Scheduler Rules For more information, see “8.1.20 Scheduler Rules” on page 108. -
Page 113: Scheduler Rules
GUI: Advanced Settings 8.1.20 Scheduler Rules Introduction The Scheduler Rules page allows you to limit the activation of firewall rules to specific time periods, either for days of the week, or for hours of each day. Creating a scheduler rule To define a rule: 1 Make sure the HBA’s date and time are set correctly. - Page 114 GUI: Advanced Settings 9 Click Add Rule Schedule. 10The Edit Rule Schedule screen appears. 11Select active or inactive days of the week by clicking in the corresponding check boxes. 12Click New Hours Range Entry to define start and end time for this rule. 13Click Apply.
-
Page 115: Routing
GUI: Advanced Settings 8.1.21 Routing Accessing the Routing page Proceed as follows: 1 On the top menu, click Advanced. 2 The Advanced page appears. Click HBA Advanced Settings on the bottom of the page and then click Yes t o confirm that you want to access the advanced settings. - Page 116 GUI: Advanced Settings IGMP (Internet Group Management Protocol) Multicasting The HBA provides support for IGMP multicasting, which allows hosts connected to a network to be updated whenever an important change occurs in the network. A multicast is simply a message that is sent simultaneously to a pre-defined group of recipients.
-
Page 117: Ip Address Distribution
GUI: Advanced Settings 8.1.22 IP Address Distribution Introduction The HBA’s DHCP server makes it possible to easily add computers configured as DHCP clients to the network. It provides a mechanism for allocating IP addresses to these hosts and for delivering network configuration parameters to them. For example, a client (host) sends out a broadcast message on the network requesting an IP address for itself. - Page 118 GUI: Advanced Settings 4 The Routing page appears. Click: or the name of the entry to change the settings. Connection List to see the current DHCP connections. Access Control to allow/deny access for specific client based on their MAC address of the client.
-
Page 119: Hbr Advanced
GUI: Advanced Settings HBR Advanced Pages Introduction The Advanced HBR page contains links to the different configuration pages. These pages are grouped by topic: Utilities DNS Server Configuration Date and time IP Address Distribution Utilities Click: ... - Page 120 GUI: Advanced Settings Date and time Click Date and Time to configure the HBR clock and calendar of the HBR. For more information, see “8.2.9 Date and Time” on page 124. IP Address Distribution Click IP Address Distribution to manage the IP addresses of devices on the network.
-
Page 121: Diagnostics
GUI: Advanced Settings 8.2.1 Diagnostics Introduction The Diagnostics page allows you to let the HBR ping a device or website. Ping is used to test if a host (for example, a website or a computer) is reachable. Procedure To diagnose network connectivity: 1 On the top menu, click Advanced. -
Page 122: Restore Hbr Defaults
GUI: Advanced Settings 8.2.2 Restore HBR Defaults Introduction The Restore Defaults page allows you to return to the factory defaults of your HBR. For more information, see “8.1.2 Restore Defaults” on page DMS-CTC-20110909-0007 v2.0... -
Page 123: Reboot Hbr
GUI: Advanced Settings 8.2.3 Reboot HBR Introduction The Reboot HBR page allows you to restart your HBR. WARNING During the reboot, all services provided by the HBR will be unavailable. Procedure To reboot the HBR: 1 On the top menu, click Advanced. 2 The Advanced page appears. -
Page 124: Arp Table
GUI: Advanced Settings 8.2.4 ARP Table The Address Resolution Protocol is a protocol that translates the IP address of a network device into its MAC address. The ARP table page The ARP Table page provides you a mapping between the IP address and the MAC address of the device that is using this IP address. -
Page 125: Users
GUI: Advanced Settings 8.2.5 Users Introduction The Users page allows you to manage the user accounts for access to the HBR GUI. 1 On the top menu, click Advanced. 2 The Advanced page appears. Click HBR Advanced Settings on the bottom of the page and then click Yes t o confirm that you want to access the advanced settings. -
Page 126: Dns Server
GUI: Advanced Settings 8.2.6 DNS Server Introduction The configuration of the HBR DNS Server page is similar to the configuration of the HBA DNS Server page. For more information, see “8.1.9 DNS Server” on page DMS-CTC-20110909-0007 v2.0... -
Page 127: System Settings
Local Domain Specify the network’s local domain by entering it into this text box. The Local Domain is used in combination with the HomeFusion Broadband Router’s Hostname to access the HBR. So if you change the host name to gateway and the local domain to home, you will have to access the GUI using http://gateway.home. -
Page 128: Port Configuration
GUI: Advanced Settings 8.2.8 Port Configuration Introduction The Port Configuration page allows you to set up the HBR’s Ethernet ports. Supported speeds The HBR supports the following speeds: 100 Megabits per second (Mbps) 10 Megabits per second The HBR also has an Auto setting where it automatically selects the highest speed supported by the connected device. -
Page 129: Date And Time
GUI: Advanced Settings 8.2.9 Date and Time Introduction The Date and Time page allows you to configure the date and time that the HBR will be using for System logging. For more information, see “9.2.1 System Log” on page 130. Accessing the Date and Time page Proceed as follows: 1 On the top menu, click Advanced and then click Yes t o confirm that you want to... -
Page 130: Ip Address Distribution
GUI: Advanced Settings 8.2.10 IP Address Distribution Introduction The IP Address Distribution page offers the same functions as the IP Address Distribution page of the HBA. For mor information, see “8.1.22 IP Address Distribution” on page 112. Accessing the IP Address Distribution page To view a summary of the services currently being provided by the DHCP server: 1 On the top menu, click Advanced and then click Yes t o confirm that you want to access the advanced settings. -
Page 131: Gui: System Monitoring
GUI: System Monitoring... - Page 132 GUI: System Monitoring Introduction The System Monitoring menu consists of the following items: HBR Status For more information, see “9.1 HBR Status” on page 128. Advanced HBR Status For more information, see “9.2 Advanced HBR Status” on page 129.
-
Page 133: Hbr Status
GUI: System Monitoring HBR Status Introduction The HBR Status page provides basic information about your HBR. Accessing the HBR Status page On the top menu, click System Monitoring. DMS-CTC-20110909-0007 v2.0... -
Page 134: Advanced Hbr Status
GUI: System Monitoring Advanced HBR Status Introduction The Advanced Status page contains more advanced status information that is bundled in the following groups: System Logging: For more information, see “9.2.1 System Log” on page 130. Full Status/System wide Monitoring of Connections: For more information, see “9.2.2 Full Status/System wide Monitoring of Connections”... -
Page 135: System Log
GUI: System Monitoring 9.2.1 System Log Introduction The System Logging page summarizes the last events recorded on your HBR. Accessing the System Logging page Proceed as follows: 1 On the top menu, click System Monitoring. 2 The HBR Status page appears. On the left menu, click Advanced HBR Status and then click Yes t o confirm that you want to access the advanced settings. -
Page 136: Full Status/System Wide Monitoring Of Connections
GUI: System Monitoring 9.2.2 Full Status/System wide Monitoring of Connections Introduction The Full Status/System wide Monitoring of Connections page provides an overview of all network connections. Accessing the Full Status/System wide Monitoring of Connections page Proceed as follows: 1 On the top menu, click System Monitoring. 2 The HBR Status page appears. -
Page 137: Traffic Monitoring
GUI: System Monitoring 9.2.3 Traffic Monitoring Introduction The HBR constantly monitors traffic within the local network, and between the local network and the Internet. The Traffic Monitoring page allows you to view up-to- the-second statistical information about data received from and transmitted to the Internet, and about data received from and transmitted to computers in the local network. -
Page 138: Advanced Hba Status
GUI: System Monitoring Advanced HBA Status Introduction The Advanced HBA Status page contains more advanced status information that is bundled in the following groups: System Logging: This page is similar to the HBR’s System Logging page. For more information, see “9.2.1 System Log”... -
Page 139: Bandwidth Monitoring
GUI: System Monitoring 9.3.1 Bandwidth Monitoring Introduction The Bandwidth Monitoring page allows you to view the traffic sent or received by the HBR during a specific time slot. Accessing the Bandwidth Monitoring page Proceed as follows: 1 On the top menu, click System Monitoring. 2 The HBR Status page appears. -
Page 140: Igmp Proxy
GUI: System Monitoring 9.3.2 IGMP Proxy Introduction The IGMP Proxy task allows you to view IGMP Proxy multicast group memberships and statistics. Viewing the IGMP Proxy Multicast Group Membership page Proceed as follows: 1 On the top menu, click System Monitoring. 2 The HBR Status page appears. -
Page 141: Support
Support... - Page 142 Support Call Customer Care If this Troubleshooting section does not provide a solution to your problem, please call Customer Care at 800-922-0204. DMS-CTC-20110909-0007 v2.0...
-
Page 143: General Troubleshooting
Support 10.1 General Troubleshooting Check the LEDs If the HBR does not work as expected, the status LEDs on the front panel may provide you enough information to locate the problem. For more information, see “1.3.1 Front Panel” on page DMS-CTC-20110909-0007 v2.0... -
Page 144: Troubleshooting Your Wireless Connection
Support 10.2 Troubleshooting Your Wireless Connection WPA2 encryption not available on Windows XP If you want to configure WPA2 on the built-in wireless utility of Windows XP Service Pack 2 (SP2), you first have to: Upgrade your Windows XP to Service Pack 3. - or - ... - Page 145 Support b Browse to the GUI. For more information, see “Accessing the GUI” on page c On the Wireless Settings menu, click Basic Security Settings. d Under 3. Channel, select another channel. e Click Apply. Check the signal strength, indicated by the wireless client manager. If the signal is low, try to move the HBR for optimal performance.
- Page 146 Support 10.3 Resetting your HBR Resetting your HBR If at some point you can no longer connect to the HBR or you want to make a fresh install, it may be useful to perform a reset to factory defaults. Warning A reset to factory default settings deletes all configuration changes you made.
- Page 147 Support Reset the HBR via the Reset button Proceed as follows: 1 Make sure the HBR is turned on. 2 Use a pen or an unfolded paperclip to push the recessed Reset button for at least 10 seconds and then release it. Reset 3 The HBR restarts with the factory default settings DMS-CTC-20110909-0007 v2.0...
- Page 148 Support 10.4 Configuring Dynamic IP Addressing on Windows Windows 7/Vista 1 Select Network and Sharing in the Control Panel. 2 Click View Status, then click Properties. 3 Click Continue in the User Account Control window. 4 In the General tab of the Local Area Connection Properties window select Internet Protocol Version 4 (TCP/IPv4), then click Properties.
Need help?
Do you have a question about the HomeFusion Broadband and is the answer not in the manual?
Questions and answers