Verizon ellipsis JETPACK MHS900L User Manual
Hide thumbs
Also See for ellipsis JETPACK MHS900L:
- User manual (8 pages) ,
- Information manual (3 pages)
Table of Contents
Advertisement
Advertisement
Table of Contents

Related Manuals for Verizon ellipsis JETPACK MHS900L


Summary of Contents for Verizon ellipsis JETPACK MHS900L
- Page 1 MHS900L...
-
Page 2: Table Of Contents
Contents Getting Started ..................1 Overview ..........................2 Components ......................... 3 Device Display ........................5 Battery Management ......................6 Using Your Jetpack ..................7 Accessing the Network ......................8 Mobile Broadband with 4G LTE* ..................8 Wi-Fi 802.11b/g/n** ......................8 Using Your Jetpack for the First Time .................. - Page 3 About Jetpack ........................36 Internet Status ....................... 36 Jetpack Info ........................37 Diagnostics ........................37 Logs ..........................38 Jetpack Support ......................38 Troubleshooting ..................39 Overview ..........................40 First Steps .......................... 40 Common Problems and Solutions ..................40 Technical Support ......................42 Regulatory Information ................
-
Page 4: Getting Started
Getting Started Overview Components Device Display Battery Management... -
Page 5: Overview
Thank you for choosing the Ellipsis Jetpack! Having the Ellipsis Jetpack at your fingertips will allow you to access Verizon’s 4G LTE network for fast uploads and downloads. You can also connect up to eight Wi-Fi capable devices to the Internet at once –... -
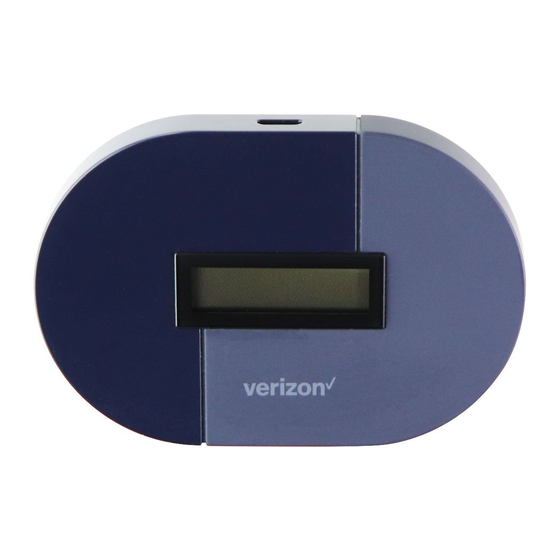
Page 6: Components
Components 1. Power/Menu Button – Turn on/off the Jetpack. Shows the Jetpack menu and information Operation Status Operations Actions Turn On Press and hold the Power button for 2 seconds. Press and hold the Power button until “Goodbye” Turn Off message appears. - Page 7 2. Power Indicator Colors Charging Status The Jetpack is off. White/Blinking The Jetpack is on. 3. Display – Provides connection and battery status, network signal strength, roaming status, and the number of users connected with Wi-Fi. 4. Charger Port – The USB charger connects here. 5.
-
Page 8: Device Display
Device Display Display Icon... -
Page 9: Battery Management
Battery Management Your Jetpack is equipped with a replaceable rechargeable battery. It will work from its charged battery alone, or when the device is plugged into a power source. Note: Please do not attempt to open or disassemble your Jetpack and the battery pack. Doing so may cause damage that voids your warranty. -
Page 10: Using Your Jetpack
Using Your Jetpack Accessing the Network Using Your Jetpack for the First Time Connecting to Your Jetpack Using Your Jetpack After Setup is Complete... -
Page 11: Accessing The Network
802.11n uses the 2.4 GHz frequency with a bandwidth of 150 Mbps. • * Speeds shown are those published by Verizon Wireless, Inc. and are theoretical in nature. Actual throughput speed and coverage may vary. Speed claims not applicable when roaming. -
Page 12: Using Your Jetpack For The First Time
1. Remove the back cover of your device and take the battery out. 2. Lift the “LIFT” tab and slide your SIM card in the SIM card slot with Verizon logo facing up. After installation, secure the “LIFT” tab back into place. -
Page 13: Charging The Battery
NOTE: Should your 4G SIM card be lost or damaged, contact Verizon Customer Care for a replacement. Charging the Battery Before using your Jetpack, ensure that the battery is fully charged. Be sure to use the charger that came with your Jetpack. -
Page 14: Connecting To Your Jetpack
Power On Press and hold the Power/Menu button for 2 seconds. Power Off Press and hold the Power/Menu button until “Goodbye” message displays. NOTE: Your Jetpack is normally ready to use within one minute of powering on. However, depending on network signal strength, it is also normal for the device to take longer to connect to the wireless network. -
Page 15: Connecting To The Internet
Connecting to the Internet Open the Wi-Fi application or controls on your laptop or Wi-Fi capable device that you want to connect to your Jetpack, and find your Jetpack’s Wi-Fi name “Ellipsis Jetpack xxxx”. Click Connect and enter the Password when prompted. NOTE: The last four characters of your Wi-Fi Name is unique for your Jetpack. -
Page 16: Jetpack Settings
Jetpack Settings Managing Your Jetpack My Jetpack Home Data Usage Connected Devices Jetpack Settings Messages About Jetpack... -
Page 17: Managing Your Jetpack
Managing Your Jetpack Using the My Jetpack Home page You can connect to your my Jetpack Home page and customize your Jetpack settings. Connect your Wi-Fi capable device to the Jetpack. Open a web browser on your connected device and enter either of these URLs: http://my.jetpack, orhttp://192.168.1.1. -
Page 18: My Jetpack Home
My Jetpack Home The My Jetpack Home page allows you to quickly access commonly used links and all available menu options for your Jetpack. The My Jetpack Home page contains the following quick link menu options: Manage My Jetpack • My Account &... -
Page 19: My Account & Tools
Register at http://verizonwireless.com/myverizon. Click on Coverage Map to access the Verizon Wireless Coverage map. Click on Data Calculator to calculate your data usage and select the best plan to meet your data requirements. -
Page 20: Data Usage
Data Usage The Data Usage page allows you to obtain data usage and billing cycle information for your mobile broadband plan. From the My Jetpack Home page, select Data Usage to see usage information for your mobile data plan, and when your billing cycle ends. The following information displays per your plan. -
Page 21: Connected Devices
Connected Devices The Connected Devices page allows you to view and edit devices that are currently connected to your Jetpack. You can also block and unblock device connections. Any devices blocked from connecting with the Jetpack can also be viewed. The Connected Devices page contains: Connected Devices –... -
Page 22: Edit A Connected Device
Max Device– Clicking it allows you to go to the Wi-Fi Settings menu to change the • maximum number of connected devices. Edit a Connected Device To Edit a Connected Device: 1. Click the pencil tool . A page opens, allowing you to edit the name of the device. 2. - Page 23 Blocked Devices – This list reflects any devices that you have blocked. Note that, since • these devices are not currently connected, and are blocked from connecting, they do not have an IP address. Instead, they are identified by MAC address. You can enter name to identify the device blocked by clicking the pencil icon.
-
Page 24: Jetpack Settings
Jetpack Settings The Jetpack Settings page allows you to make device setting changes, Jetpack • Wi-Fi • Advanced • Jetpack The Jetpack menu contains the following options: Jetpack Admin Password • Preferences • Software Update • Factory Reset • Jetpack Admin Password You can change your my Jetpack Home Admin Password. - Page 25 NOTE: Ensure you record your Admin Password. If you forget your Admin Password and Security Question, you will need to contact Verizon Customer Care. TIP 1: By default, your Jetpack has the same password for Wi-Fi connection and my Jetpack Home (http://my.jetpck...
- Page 26 Preferences The Preferences menu contains the following options: Automatic shutdown – Select the length of time before the Jetpack will automatically turn off if • it is running on battery power and no wireless devices are connected. To turn off the automatic shutdown feature, select "Never"...
- Page 27 Power Indicator (LED) – If turned "On", the white light under your Jetpack's power button • blinks, indicating the Jetpack is powered on. This Indicator will let you know if the Jetpack is on or off without having to wake up the display. Blink Delay –...
- Page 28 Software Update The Software Update menu contains the following sections: Current Software – Displays information for the current System software version and • Firmware version. From this section, you can check to see if new software updates are available by clicking on the Check for update button. Last Update –...
-
Page 29: Wi-Fi
NOTE: Please note that performing a Factory Reset is a different process than performing a Power Reset. Factory Reset – returns device to factory default settings. • Power Reset – restarts the device. (Please refer to Section 4: Troubleshooting for more •... -
Page 30: Advanced
Wi-Fi Name – The Wi-Fi Network Name (SSID) for the Wi-Fi network broadcasted by your • Jetpack. Wi-Fi Password – Use this setting to enter your desired Wi-Fi password. • 802.11 Mode – Use this setting to change the Wi-Fi mode. The Jetpack allows devices •... - Page 31 Click Continue on the Advanced menu warning screen to access the Advanced options: Manual DNS (Domain Name Server) • SIM (Subscriber Identity Module) • Firewall • LAN (Local Area Network) • Port Filtering • Manual DNS The Jetpack automatically selects a Domain Name Server (DNS). The Manual DNS option allows you to manually select up to two DNS IP addresses.
- Page 32 The SIM menu allows you to lock the SIM (Subscriber Identity Module) card in your Jetpack. The SIM card inside your Jetpack can be locked with a PIN code for additional security. If locked, the PIN code must be entered before the Jetpack can connect to the Internet whenever you turn on your Jetpack.
- Page 33 To change SIM PIN, 1. You can change SIM PIN only when PIN Lock Turned On status. 2. Select Change SIM PIN from Desired Action menu. 3. Enter current SIM PIN and enter new SIM PIN twice. 4. Click Save Changes button. To unlock SIM, 1.
- Page 34 You will be given 3 attempts to enter a right PIN code. If you entered a wrong PIN three times, your SIM becomes completely locked. You will need to contact Verizon Customer Care to get a PUK code to unlock the SIM.
- Page 35 The LAN page gives you settings and information about the Jetpack’s network. The LAN menu contains the following information and options: IPv4 (Internet Protocol version 4) IP address – The IP address for the Jetpack • Subnet mask – The Subnet mask network setting for the Jetpack. The default value •...
- Page 36 Port Filtering Port Filtering allows you to block outgoing Internet connections and permit only allowed applications to access the Internet. You can also customize a list of allowed applications which permits only certain programs to connect to the Internet. Be sure to click Save Changes button to ensure that your new settings are saved. The Port Filtering menu contains the following options: DMZ –...
- Page 37 You can add Custom Applications by following these steps, but only when Port Filtering is turned ON: Click Add Custom Application to add a new custom application to the list of allowed applications. Enter the beginning range of port numbers used by outgoing traffic for the custom application being added in the Start Port field.
-
Page 38: Messages
Messages Messages page displays SMS messages sent to you by Verizon Wireless. On the Jetpack The status indicator on the Home screen displays the number of messages to the right of the message icon. When a new message arrives, the message counter increases and “To view messages:http://my.jetpack”... -
Page 39: About Jetpack
About Jetpack The About Jetpack page allows you to view detailed information about Jetpack Internet status, device specific information, diagnostics, troubleshooting, and support. The About Jetpack page contains the following menu options: Internet Status • Jetpack Info • Diagnostics • Logs •... -
Page 40: Jetpack Info
Jetpack Info The Jetpack Info page contains detailed information about your Jetpack: Manufacturer • Model • My Jetpack version • Diagnostics The Diagnostics page is used primarily for troubleshooting and reflects system level information about your Modem and the 4G LTE network. -
Page 41: Logs
Logs The Logs page allows you to turn system logging ON or OFF and to delete system logs as needed. These logs record various operations and are used primarily for troubleshooting. Default setting is OFF. To enable logging, select ON, then click Save Changes button. Jetpack Support The Jetpack Support page contains the following sections: Quick Links... -
Page 42: Troubleshooting
Troubleshooting Overview First Steps Common Problems and Solutions Technical Support... -
Page 43: Overview
IMPORTANT! If the power button will not start your Jetpack, please try Power Reset (see How do I perform a Power Reset on my Jetpack? below) before contacting Verizon Customer Care. What is the difference between a Power Reset and a Factory Reset? Power Reset simply resets (or, restarts) your Jetpack and keeps all your personal settings. - Page 44 By replacing battery: If pressing and holding the power button for 10 seconds does not restart the Jetpack, open the battery cover, take out the battery and re-install the battery after 5 seconds. Put the battery cover back and turn on the Jetpack by pressing the power button. How do I perform a Factory Reset? Using the factory reset button: Remove the back cover.
-
Page 45: Technical Support
Technical Support For additional information and technical support, Contact Verizon Customer Care at 1.800.922.0204, or go to any Verizon Wireless store. IMPORTANT! Before contacting Verizon Customer Care, be sure to restart both your Jetpack and any device that is currently connected. -
Page 46: Regulatory Information
Regulatory Information Regulatory Statements Safety Hazards Limited Warranty and Liability Trademark... -
Page 47: Regulatory Statements
Regulatory Statements FCC Equipment Authorization ID: XHG-R900 This device complies with Part 15 of the FCC Rules. Operation is subject to the following two conditions: (1) this device may not cause harmful interference, and (2) this device must accept any interference received, including interference that may cause undesired operation. SAR Information The exposure standard for your device uses a unit of measurement called the Specific Absorption Rate (“SAR”). -
Page 48: Safety Hazards
correct the interference by one or more of the following measures: - Reorient or relocate the receiving antenna. - Increase the separation between the equipment and receiver. - Connect the equipment into an outlet on a circuit different from that to which the receiver is connected. -
Page 49: Limited Warranty And Liability
When some wireless devices are used with certain hearing devices (including hearing aids and cochlear implants) users may detect a noise which may interfere with the effectiveness of the hearing device. Use of Your Device while Operating a Vehicle Please consult the manufacturer of any electronic equipment that has been installed in your vehicle as RF signals may affect electronic systems in motor vehicles. - Page 50 In order to be referred to an authorized service center in your area, please contact Verizon Wireless Customer Service at (800) 922-0204 or visit www.verizonwireless.com/support The extent of the Company’s liability under this warranty is limited to the repair or replacement...
-
Page 51: Trademark
Franklin Wireless Corp. 9707 Waples Street, Suite 150 San Diego, CA 92121 Trademark ©2016 Franklin Wireless, Inc. All rights reserved. The information contained in this document should not be construed as a commitment by Franklin Wireless and is subject to change without notice by Franklin Wireless. -
Page 52: Glossary
Glossary... -
Page 53: Glossary
Glossary Term Definition 4G LTE Fourth Generation, Long-Term Evolution 802.11(b/g/n) A set of WLAN communication standards in the 2.4GHz frequency band. Bits per second Broadband High capacity, high speed transmission channel with a wider bandwidth than conventional modem lines. DHCP Dynamic Host Configuration Protocol DHCP Server A server or service with a server that assigns IP addresses.
Need help?
Do you have a question about the ellipsis JETPACK MHS900L and is the answer not in the manual?
Questions and answers
Keeps saying please wait