Table of Contents
Advertisement
Quick Links
Advertisement
Table of Contents

Related Manuals for Agatec LT300


Summary of Contents for Agatec LT300
- Page 1 LT300 Laser Level Owner's Manual...
-
Page 2: General Information
GENERAL INFORMATION Thank you for buying the LT300! Although it is very simple to use, we recommend that you read this manual before operating the laser. Description The LT300 is a visible laser that can be used for leveling, vertical alignment &... -
Page 3: Laser Overview
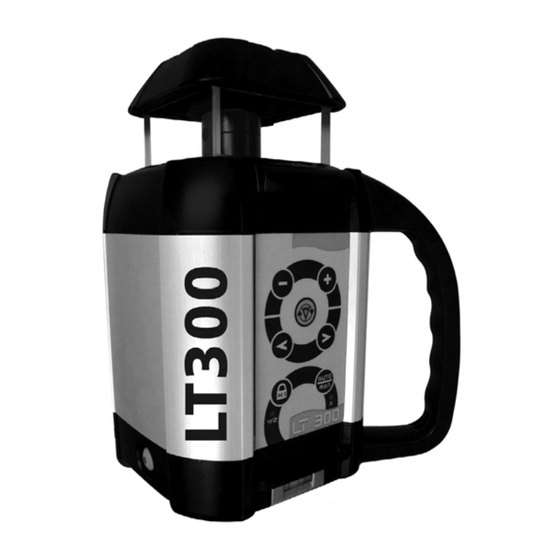
Laser Overview 1. Rotating laser beam (head enclosed in glass lighthouse) Caution/Certification Label (see previous page) 7. Laser keypad 3. Charger jack 6. Adjustable feet for vertical setup 4. Bubble vial for 5. On/Off vertical setup Keypad Overview 5. Decrease rotation speed / scanning angle 4. -
Page 4: Turning On The Laser
(4). The LT300 has a wide self-leveling range; however, if the laser is set up out of the leveling range, laser beam will continue to blink and rotation will not start. - Page 5 H.I. Alert H.I. (height of instrument) Alert stops the laser automatically if the laser is disturbed or moved, preventing inaccurate readings. It will function only when selected. To activate this safeguard feature, press the H.I. key (1). The LED indicator (9) will blink rapidly while the laser is self-leveling.
-
Page 6: Slope Match
Scanning Scanning mode allows you to see the beam easier at a distance. To switch from rotation to scan, press the scanning key (3). Use the + or - keys on the keypad to change scan lengths. Hold down the < or > arrows to move the scan left or right. To stop scanning, press again on the scanning key (3). - Page 7 3) Charge for 15 hours. When the charger is plugged in, a red light will illuminate on the charger. The LT300 can be charged while working. If electricity is available on the job site, simply plug in the charger and keep on working.
-
Page 8: Checking And Adjusting The Lt300
Checking and Adjusting the LT300 THIS CHAPTER IS VERY IMPORTANT: Here are a few simple instructions to check your laser for calibration. Remember that the laser is a precision instrument and it is important that you keep it calibrated and in proper condition. The accuracy of your work is completely your responsibility and you should regularly check your instrument, especially prior to important jobs. -
Page 9: Calibration Overview
Calibration Overview Calibration is electronic, using the optional detector/remote control or the small remote control (preferred method). If you do not have a remote, the laser keypad may also be used. This method will take longer due to the laser making self-adjustments during movement. Be very careful not to jar or move the laser when pushing the laser keys, or your calibration will not be accurate. - Page 10 Checking & Calibrating X & Y Axes 1) Place the laser on a flat surface or tripod 100 ft. (30 m) away from a wall. If too bright to see the beam, use a detector with a pole or grade rod.
-
Page 11: Checking Z Axis
8) Check Y calibration: a) With detector, mark center of the beam (-Y). b) Rotate laser 180° so +Y is facing wall. c) With detector, mark the center of the beam (+Y). d) At 100 ft., the two marks should be no more than 1/4" apart. (At 30 m, no more than 6 mm apart.) If the marks are close enough, Y axis is within calibration;... -
Page 12: Calibrating Z Axis
7) Move the scan up and down the entire length of the plumb line. If the beam is slanted, and not vertical like the plumb line, the Z axis needs to be calibrated. Calibrating Z Axis The laser must be calibrated to bring the rotating Z beam parallel to the plumb line. -
Page 13: Cone Error Checking
Cone Error Checking 1) Set up the laser about 2 ft. (60 cm) away from a wall (a) or pole and 100 ft. (30 m) from another wall (b) or pole. 2) Turn the laser on. After it has self-leveled, mark the location of the beam on the near wall (a). -
Page 14: Care And Handling
Warranty Your LT300 laser is guaranteed to be free of manufacturing defects for a period of one year. Any abnormal usage, or if the instrument has been subjected to shock, will void this warranty. Under no circumstances will the liability of the manufacturer exceed the cost of repairing or replacing the instrument. -
Page 17: Using The Detector
Using the Detector 1) Press the On/Off key to turn on the detector. 2) Press the middle key to select the accuracy (deadband). 3) Press the top key to select the sound level. 4) Turn the detection window towards the laser beam, and move the detector up or down according to the information given on the LCD display. -
Page 18: Specifications
Specifications: Range* 500 ft. (150 m) in detection mode; 100 ft. (30 m) in remote mode Accuracy* Fine: ± < 1/16” (1 mm) Standard: ± 1/8” (2.5mm) Battery life 50 hrs; 9V alkaline Environmental Waterproof (IP66+) Size 6” x 3.25” x 1.5”; .35 lbs. (15 x 8 x 3.5 cm;... - Page 19 WARRANTY The manufacturer warrants its measuring instruments against all manufacturing defects for a period of one year from date of purchase. If during the warranty period, the product is considered as defective by the manufacturer, the latter will decide whether to repair or exchange the product.
- Page 20 2202 Redmond Rd., Jacksonville, AR 72076 Toll Free: 800.643.9696 Phone: 501.982.4433 . Fax: 501.982.0880 sales@agl-lasers.com www.agatec.com AM1032 Printed in USA 7/2007...
Need help?
Do you have a question about the LT300 and is the answer not in the manual?
Questions and answers