Table of Contents
Advertisement
Advertisement
Table of Contents

Related Manuals for Sim2 D10


Summary of Contents for Sim2 D10
- Page 1 Multimedia User's Manual www.sim2.com www.sim2.com...
- Page 2 SIM2 Multimedia S.p.a. • Viale Lino Zanussi, 11 • 33170 Pordenone - ITALY Phone +39.0434.383.256 • Fax +39.0434.383.260 www.sim2.com • e-mail: info@sim2.it SIM2 USA Inc. • 10108 USA Today Way • 33028 Miramar FL - USA Phone +1.954.4422999 • Fax +1.954.4422998 www.sim2usa.com • e-mail: sales@sim2usa.com SIM2 Deutschland GmbH •...
-
Page 3: Important Safety Information
Copyright This publication, including all photographs, illustrations and software, is protected under international copyright laws, with all rights reserved. Neither this manual, nor any of the material contained herein, may be reproduced without written consent of the author. © Copyright March, 2007 Disclaimer The information in this document is subject to change without notice. -
Page 4: General Safety Information
General Safety Information • Do not open the unit case. Aside from the projection lamp, there are no user-serviceable parts in the unit. For servicing, contact qualified service technician. • Follow all warnings and cautions in this manual and on the unit case. •... -
Page 5: Main Features
Regulatory Warnings Before installing and using the projector, read the regulatory notices in the “Regulatory Compliance” section 8 on page 42. Main Features • Theater image right at home • Compatible with all major video standards including NTSC, PAL, and SECAM •... -
Page 6: Table Of Contents
Table of Contents 1. G ettinG tarted Packing Checklist ..............................7 A Tour of the Projector ............................8 Remote Control Functions ..........................12 Remote Control Operating Range ........................13 Projector and Remote Control Buttons ......................13 2. S etup and peratiOn Inserting the Remote Control Batteries ...................... -
Page 7: G Etting S Tarted
Power Cord (UK) Power Cord (with two AA batteries) (Europe) Multimedia Quick Start Guide www.sim2.com www.sim2.com CD-ROM RCA Cable Quick start Guide (This User’s Manual) Contact your dealer immediately if any items are missing, appear damaged, or if the unit... -
Page 8: A Tour Of The Projector
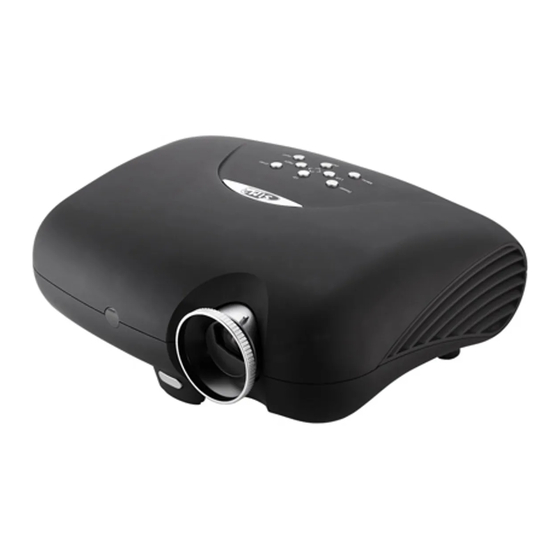
A Tour of the Projector Front-right View abel eScriptiOn Operates the onscreen display. Refer to the next page for a description Control panel of the buttons Lens zoom Enlarges the projected image Focus Focuses the projected image Front IR receiver Receiver for IR signal from remote control Height adjuster Press button to adjust height... - Page 9 On-screen Display (OSD) Buttons Power Enter Right Left Menu Input Down abel eScriptiOn Power Turns the projector on or off Left Navigates and changes settings in the OSD Menu Opens and exits the OSD Navigates and changes settings in the OSD Enter Changes settings in the OSD Right...
- Page 10 Rear Ports DVI-D REMOTE TRIG 1 GRAPHIC RGB RS-232 HDMI S-VIDEO YPrPb VIDEO 100/240 V POWER abel eScriptiOn DVI-D Connect the computer cable from a computer or video source Connect a High-Definition Multimedia Interface cable from home HDMI theater and consumer electronics equipment Graphic RGB Connect a VGA cable from a computer or a video device (YPrPb) RS-232...
-
Page 11: Bottom View
Bottom View abel eScriptiOn Ceiling support Contact your dealer for information on mounting the projector on a holes ceiling Height adjuster Push to release height adjuster button Height adjuster Adjuster drops down when adjuster button is pushed... -
Page 12: Remote Control Functions
Remote Control Functions abel eScriptiOn Turns projector power on POWER Turns projector power off Composite video source source S-Video video source Component video source RGB video source DVI video source HDMI video source Up cursor Navigates and changes settings in the OSD Left cursor ENTER Enter... -
Page 13: Remote Control Operating Range
Remote Control Operating Range The remote control uses infrared transmission to control the projector. It is not necessary to point the remote directly at the projector. Provided you are not holding the remote control perpendicular to the sides, the remote control functions within a radius of about 10 meters (33 feet) and 30 degrees above or below the projector level. -
Page 14: S Etup And O Peration
2. S etup and peratiOn Inserting the Remote Control Batteries Remove the battery compart- ment cover by sliding the cover in the direction of the arrow. Insert the supplied batteries tak- ing note of the polarity (+/-) as shown here. Replace the cover. -
Page 15: Connecting Input Devices
Connecting Input Devices A PC or notebook computer as well as video devices can be connected to the projector at the same time. Video devices include DVD, VCD, and VHS players, as well as movie camcorders , digital still cameras and high definition sources. Check the user manual of the connecting device to confirm it has the appropriate output connector. -
Page 16: Starting And Shutting Down The Projector
Starting and Shutting down the Projector Remove the lens cover. Connect the power cord to the projector. Connect the other end to a wall outlet. Press the Power button. The Power LED on the projector turns on. Turn on the con- nected devices. -
Page 17: Adjusting The Projector Level
Adjusting the Projector Level Take note of the following when setting up the projector: • The projector table or stand should be level and sturdy. • Position the projector so that it is perpendicular to the screen. • Be sure cables are not in the way or can cause the projector to be knocked over. To raise the level of the projector, lift the projector and press the height-adjuster button [A]. -
Page 18: Adjusting The Focus And Zoom
Adjusting the Focus and Zoom Focus Zoom L o c a t e t h e i m a g e z o o m a n d f o c u s adjustment rings on the projector. Use the image zoom control to resize the projected image and screen size. -
Page 19: Osd Menu Controls
3. O (OSd) M creen iSplay ettinGS OSD Menu Controls The projector has an OSD that lets you make image adjustments and change various settings. When the projector is turned on, any connected devices are detected. If the connected device is a PC, press the appropriate keys on the computer keyboard to switch the display output to the projector. -
Page 20: Setting The Osd Language
Setting the OSD Language You may want to reference the OSD on your projector while reading this section. Set the OSD language to your preference before continuing. (The default language is English.) Press the Menu button. The Image menu appears. Press the cursor button until Language is highlighted. -
Page 21: Osd Menu Overview
OSD Menu Overview Use the following illustration to quickly find a setting or determine the range for a setting. (1) 0 (1) Black * (2) 25 (2) Blue (3) 50 * (3) Gray Settings (4) 75 (4) Red (5) 100 (5) Green Blank Color (1) 9300K... -
Page 22: Image Menu
Image Menu Press the Menu button to open the OSD menu. Press the cursor button to move to the ◄ ► Image menu. Press the cursor button to move up and down in the Image menu. Press ▲▼ ◄ ► to change values for settings, and then press Enter to confirm the new setting. - Page 23 eScriptiOn efault Auto source Press the cursor ◄ ► button to enable auto source selection. selection Press the cursor button ◄ ► to manually select the source. The following screen appears. Press the cursor button ▲▼ to move up and down the menu. Press the cursor button to select an input source: Video: select composite video as the input source.
- Page 24 OSD menu Functions Available for Connected Source OMpOnent OMpOSite hdMi unctiOn ideO ideO ideO Brightness Contrast Sharpness Color Temp Color Saturation Color Tint Gamma Color Space Video Standard x = available to video source...
-
Page 25: Options
Options Press the Menu button to open the OSD menu. Press the cursor button to move to the ◄ ► Options menu. Press the cursor button to move up and down in the Options menu. Press ▲▼ to change values for settings, and then press Enter to confirm the new setting. ◄... - Page 26 eScriptiOn efault Press the cursor ◄ ► button to set brilliant color On or Off. (Range: ON – OFF) Brilliant color Brilliant Color Technology allows for more vivid, rich color while in- creasing mid-tones and superior black levels. Press ◄ ► to enable or disable if the logo displays when the pro- Logo jector starts, and when no source is detected.
-
Page 27: Settings Menu
Settings Menu Press the Menu button to open the OSD menu. Press the cursor button to move to the ◄ ► Settings menu. Press the cursor button to move up and down in the menu. Press ▲▼ ◄ ► change values for settings, and then press Enter to confirm the new setting. eScriptiOn efault Press the cursor ◄... -
Page 28: Language Menu
eScriptiOn efault Press the cursor ◄ ► button to adjust the A/D sampling clock. Phase (Range: 0 - 100) Press the cursor ◄ ► button to adjust the A/D sampling number. Frequency (Range: 0 - 100) Press the cursor ◄ ► button to automatically synchronize the projector to the input source. -
Page 29: User Color Menu
User Color Menu Press the Menu button to open the OSD menu. Press the cursor button to move to the ◄ ► Picture menu. Press the cursor button to move up and down to Color Temperature menu. ▲▼ button to move up and down to User Color menu. Press the cursor Press the cursor ▲▼... -
Page 30: Info Menu
Info menu. menu. Press the cursor ▲▼ eScriptiOn efault Model name Displays the model name of the device (D10) Unit S/N Displays the serial number of the device. Software Displays information about the software version. version Active source Displays the active source. -
Page 31: M Aintenance And S Ecurity Replacing The Projection Lamp
Replacing the Projection Lamp Sim2 recommends changing the projection lamp after a warning message displays Warning: Lamp life time Over. It should only be replaced with a certified replacement part, which you can order from your local dealer. - Page 32 Remove the three screws from the lamp module. Lift the module handle up. Pull firmly on the module handle to remove the lamp module. Reverse steps 1 to 5 to install the new lamp module.
-
Page 33: Resetting The Lamp
Resetting the Lamp After replacing the lamp, you should reset the lamp hour counter to zero. Refer to the following: Press the Menu button to open the OSD menu. Press the cursor ◄ ► button to move to the Info menu. Press the cursor ▲▼... -
Page 34: T Roubleshooting
5. t rOubleShOOtinG These guidelines provide tips to deal with problems you may encounter while using the projector. If the problem remains unsolved, contact your dealer for assistance. Often after time spent troubleshooting, the problem is traced to something as simple as a loose connection. -
Page 35: Led Error Messages
LED Error Messages If there is an error status, the LED remains lit until the AC power cord is removed. An LED message is defined by its blinking sequence. A long blink is defined as 1 second. A short blink is defined as 0.3 seconds. -
Page 36: Common Problems And Solutions
Common Problems and Solutions This section describes some common problems and their solutions. Image Problems Problem: No image appears on the screen 1. Verify the settings on your notebook or desktop PC. 2. Turn off all equipment and power up again in the correct order. Problem: The image is blurred 1. -
Page 37: Remote Control Problems
Remote Control Problems Problem: The projector does not respond to the remote control 1. Direct the remote control towards remote sensor on the projector. 2. Ensure the path between remote and sensor is not obstructed. 3. Turn off any fluorescent lights in the room. 4. -
Page 38: S Pecifications
6. S pecificatiOnS Hardware Specifications Odel Display type TI DMD 0.65-inch x 1, 12 degrees, LVDS DMD with DDP3020 Resolution WXGA (1280x768) Color 16.7 Million (24-bits/pixel) Weight 4kg / 8.8lbs Projection distance 1.5 to 7 meters (59 to 275 inches) Projection screen size 0.98 to 5.25 meters (38 to 206 inches) Projection lens... - Page 39 D10 Projection distance and size table 1.53:1 creen Projection Distance Diagonal Width Height 1.27 50” 1.11 43.58” 0.62 24.51” 1.69 66.68” 1.52 1.33 0.75 2.03 80.01” 60” 52.29” 29.42” 1.78 70” 1.55 61.01” 0.87 34.32” 2.37 93.35” 2.03 1.77 1.00 2.71...
-
Page 40: T Iming M Ode T Able
○ – – ○ 1080P 67.5 Ο : Frequency supported — : Frequency not supported The native resolution for the D10 is 1280 x 768. Resolution other than native mode may be displayed with uneven size of text or lines. -
Page 41: Projector Dimensions
Projector Dimensions Top View Front View For ceiling installations, use approved mounting hardware and M4 screws with a maximum screw depth of 10 mm (0.39 inch). NOTE... -
Page 42: R Egulatory C Ompliance
8. r eGulatOry OMpliance FCC Warning This equipment has been tested and found to comply with the limits for a Class B digital device pursuant to Part 15 of the FCC Rules. These limits are designed to provide reasonable protection against harmful interference when the equipment is operated in a commercial environment. - Page 44 SIM2 Multimedia S.p.a. • Viale Lino Zanussi, 11 • 33170 Pordenone - ITALY Phone +39.0434.383.256 • Fax +39.0434.383.260 www.sim2.com • e-mail: info@sim2.it SIM2 USA Inc. • 10108 USA Today Way • 33028 Miramar FL - USA Phone +1.954.4422999 • Fax +1.954.4422998 www.sim2usa.com • e-mail: sales@sim2usa.com SIM2 Deutschland GmbH •...
Need help?
Do you have a question about the D10 and is the answer not in the manual?
Questions and answers