Table of Contents
Advertisement
Advertisement
Table of Contents

Related Manuals for M-Audio STUDIOPHILE DSM3


Summary of Contents for M-Audio STUDIOPHILE DSM3
-
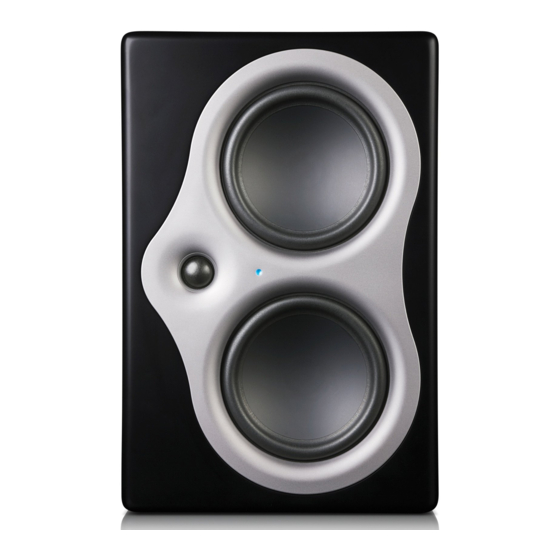
Page 1: User Guide
M-Audio Studiophile DSM3 Active Studio Monitors English User Guide... - Page 2 CAUTION ATTENTION: PRECAUCION: RISK OF ELECTRIC SHOCK RISQUE DE CHOC ELECTRIQUE RIESGO DE ELECTROCHOQUE DO NOT OPEN N’OUVRIR PAS NO ABRIR LA TAPA CAUTION: TO REDUCE THE RISK OF AFIN DEVITER UN CHOC ELECTRIQUE ET PARA REDUCIREL RIESGO DE ELECTRIC SHOCK, DO NOT REMOVE LES CONSEQUENCES GRAVES QUI SACUDIDAS ELECTRICAS, NO DEBERA COVER (OR BACK).
-
Page 3: Important Safety Instructions
Important Safety Instructions 1. READ INSTRUCTIONS 9. HEAT All the safety and operating instructions should be read before Do not install near any heat sources such as radiators, heat the appliance is operated. registers, stoves, or other apparatus (including amplifiers) that produce heat. -
Page 5: Table Of Contents
contents Chapter 1. Introduction ............1 What’s in the Box? . - Page 6 M-Audio Studiophile DSM3 Guide...
-
Page 7: Chapter 1. Introduction
Features Studiophile® DSM active reference speakers. DSM3 speakers have the following features: This guide provides installation and operation instructions for the M-Audio DSM3 speaker. • Self-powered, bi-amplified operation • Selectable analog and digital inputs DSM3 speakers feature high-end design ele- ments and precision control circuitry, engi- •... - Page 8 Inputs Drivers M-Audio DSM3 speakers allow analog or digital LF Drivers DSM3 speakers have two 6.5-inch LF inputs. Input type is selectable with the Input drivers with a steel frame and single-piece anod- Select switch on the back panel of the speaker.
-
Page 9: Chapter 2. Overview Of The Dsm3 Speaker
chapter 2 Overview of the DSM3 Speaker This chapter describes the connectors, controls and features of the DSM3 speaker. Back Panel Connectors and Controls Analog Input (XLR) Analog Input (TRS) Bass Reflex Port Analog Input Sensitivity switch Digital Input (S/PDIF) Digital Thru (S/PDIF) Digital Input (AES/EBU) Volume Trim knob... -
Page 10: Power Connections
–10 dBV and +4 dBu. This set- Digital Activates the digital inputs of the ting applies to both the XLR and 1/4-inch TRS speaker. analog inputs. For information on the appropri- ate operating level for your audio source, see the manufacturer’s specifications. M-Audio Studiophile DSM3 Guide... - Page 11 Digital Inputs EQ Settings The DSM3 speaker provides an AES/EBU Digital The DSM3 speaker has a series of 12 switches for In connector as well as S/PDIF Digital In and setting the following EQ controls: S/PDIF Digital Thru connectors. High-Frequency Shelf Sets an adjustable high fre- The digital inputs accept sample rates of 44.1, quency boost or cut using a built-in HF shelf- 48, 88.2, 96, 176.4 and 192 kHz (+/–...
-
Page 12: Front Panel
The LED indicator on the front of the DSM3 speaker indicates the following states: Front Panel LED States LED State Indication Blue Analog Input Digital Input: Lock Yellow Digital Input: No Lock Blue (flashing) Digital Standby Mode Clipping Red (flashing) Hardware failure M-Audio Studiophile DSM3 Guide... -
Page 13: Chapter 3. Setup And Operation
chapter 3 Setup and Operation This chapter provides instructions for placing, Setting Up the Speakers connecting and configuring DSM3 speakers. Speakers should always be placed to provide bal- Correct placement, connection, and configura- anced, accurate sound in your preferred mixing tion ensures optimal performance and safe oper- position. -
Page 14: Speaker Orientation
When placing the DSM3 in a horizontal orienta- tion, it is recommended to have the HF driver on the top to avoid interference from boundary reflections. DSM3 horizontal orientation (stereo) M-Audio Studiophile DSM3 Guide... -
Page 15: Configuring And Connecting Ac Power
Stereo Positioning Configuring and Connecting The following diagram shows the recommended AC Power setup for stereo monitoring. Be sure to follow the instructions in this section for the proper configuration of fuses and voltage settings. DSM3 speakers must be manually config- ured for the voltage in your area. -
Page 16: Power Up And Power Down
Always power up your speaker system last (al- lowing mixers, recorders and other devices to fully power up first). Conversely, always mute (or power off) your speaker system first, before powering off other devices in your studio. M-Audio Studiophile DSM3 Guide... -
Page 17: Connecting Audio
Connecting Digital Inputs Connecting Audio This section explains how to make analog and digital audio connections to DSM3 speakers. S/PDIF Input Connecting Analog Inputs S/PDIF Thru AES/EBU Input Analog Input (XLR) Digital input section Analog Input (TRS) DSM3 speakers accept digital input at the AES/EBU Digital Input (XLR connector) and the S/PDIF Digital Input. - Page 18 Channel Assign When using digital input, you must configure switch the Channel Assign switches on the back of each speaker to set whether that speaker plays the Left or Right signal channel, accordingly. Channel Assign switch M-Audio Studiophile DSM3 Guide...
-
Page 19: Configuring Speaker Settings
EQ Settings Configuring Speaker Settings The EQ controls on DSM3 speakers let you ad- just the response of the speaker to match your Volume Trim Settings monitoring environment and studio equip- ment. For EQ frequency graphs for each of these The Volume Trim control lets you match the in- settings, see “Reference Diagrams”... - Page 20 To adjust the LF Shelf EQ: Set switches 5 and 6 to the positions shown below to activate the corresponding EQ levels. 0 dB – 1.5 dB – 3.0 dB – 4.5 dB LF Shelf EQ switches and settings M-Audio Studiophile DSM3 Guide...
- Page 21 Setting the High-Pass Filter To adjust the Desktop 220 Hz Filter: Set switches 9 and 10 to the positions shown The High Pass Filter lets you adjust the bass roll- below to activate the corresponding EQ levels. off of your DSM3 speakers. Start with the filter all the way open (40 Hz setting) and only raise the cutoff frequency in order to protect the LF 0 dB...
-
Page 22: Tips For Best Performance
If the thermal shutdown activates a second failure under normal usage. Keep in mind the time, contact M-Audio customer service. following: Overdriving the units for prolonged periods If the LED is unlit and there is no sound: or not observing the warnings set out in this Check fuse and power connection. -
Page 23: Appendix A. Specifications
appendix a Specifications Technical Specifications DSM3 Specifications LF Driver (2) 6.5-inch inverted anodized aluminum cone woofers with cone edge reinforcement 35mm voice coil with symmetrical force motor and flux stabilization rings HF Driver 1-inch soft teteron dome tweeter with neodymium magnet and ferrofluid cooling Frequency Response 45 Hz–27 kHz +/–3 dB Crossover... -
Page 24: Reference Diagrams
Reference Diagrams HF Shelf EQ levels Mid-Range EQ levels M-Audio Studiophile DSM3 Guide... - Page 25 LF Shelf levels High-Pass Filter levels Appendix A: Specifications...
- Page 26 Desktop EQ (220 Hz) levels Desktop EQ (175 Hz) levels M-Audio Studiophile DSM3 Guide...
- Page 27 Desktop EQ (200 Hz) levels Appendix A: Specifications...
- Page 28 M-Audio Studiophile DSM3 Guide...
- Page 29 © 2008 Avid Technology, Inc. All rights reserved. Product features, specifications, system requirements and availabil- ity are subject to change without notice. Avid, M-Audio and Studiophile DSM are either trademarks or registered trade- marks of Avid Technology, Inc. All other trademarks contained herein are the property of their respective owners.
- Page 30 ML07-244A0_DSM3_UG_EN_08/08...
Need help?
Do you have a question about the STUDIOPHILE DSM3 and is the answer not in the manual?
Questions and answers