Table of Contents
Advertisement
Quick Links
FREEVIEW
HD TV receiver
™
T2-HD115 Zapper
Part No. 305200
OPERATING MANUAL
Check you can get FREEVIEW HD in your area. Text your postcode,
followed by your house number or name to 80560*. Or visit www.FREEVIEW.co.uk
*e.g. NW9 6NY 1 (Costs no more than a normal text.)
The FREEVIEW service is subject to coverage. An aerial upgrade may be required.
The FREEVIEW, FREEVIEW+, FREEVIEW HD and FREEVIEW+ HD words and logos are trade
marks of DTV Services LTD. DTV Services Ltd 2002, 2008.
Advertisement
Table of Contents

Subscribe to Our Youtube Channel
Related Manuals for Triax Zapper T2-HD115


Summary of Contents for Triax Zapper T2-HD115
- Page 1 FREEVIEW HD TV receiver ™ T2-HD115 Zapper Part No. 305200 OPERATING MANUAL Check you can get FREEVIEW HD in your area. Text your postcode, followed by your house number or name to 80560*. Or visit www.FREEVIEW.co.uk *e.g. NW9 6NY 1 (Costs no more than a normal text.) The FREEVIEW service is subject to coverage.
-
Page 2: Table Of Contents
The examples used throughout this manual are based on the T2-HD115 model. Dear Triax customer Thank you for purchasing the TRIAX T2-HD115 (FREEVIEW™ HD TV receiver). To ensure safety and many years of trouble-free operation, please read the Important Safety Precautions carefully before using this product. -
Page 3: Introduction
Introduction Important Safety Precautions • Cleaning - Unplug the AC power adapter from the AC outlet before cleaning the product. Use a damp cloth to clean the product. Do not use liquid cleaners or aerosol cleaners. • Use a soft damp cloth to gently wipe the product when it is dirty. To protect the product, do not use a chemical cloth to clean it. -
Page 4: Remote Control Unit
Introduction Remote Control Unit HDMI Select HDMI resolution 576p, 720p, 1080i and 1080p (Page 17). MENU “MENU” screen on/off (Page 16). TEXT Display Digital Text (Page 12). CH LIST Opens the “CHANNELS” screen (Page 11). GUIDE / ELECTRONIC PROGRAMME GUIDE Display the EPG (Page 12). -
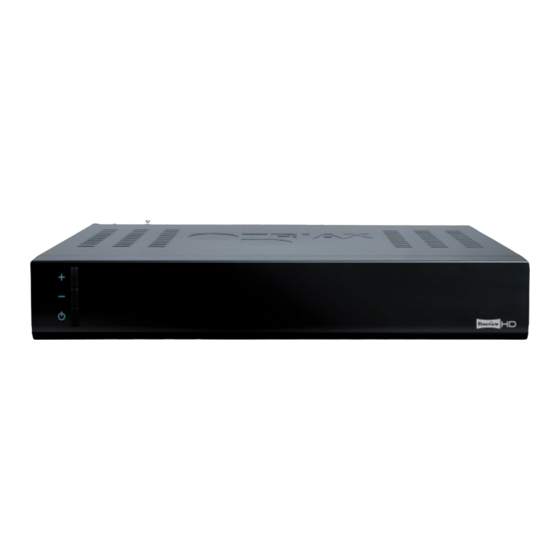
Page 5: Receiver (Front View)
Introduction Receiver (Front View) CHANNEL UP CHANNEL DOWN STANDBY BUTTON Receiver (Rear View) RF IN (Antenna in) terminal USB terminal - For service only RF OUT (Antenna out) terminal ETHERNET terminal - for future services SPDIF (Digital audio output) terminal HDMI terminal VCR (SCART) terminal TV (SCART) terminal... -
Page 6: Supplied Accessories
Introduction Supplied Accessories Remote Control Unit (x1) HDMI Cable (x1) Power Adaptor (x1) RF Cable (x1) Page 4 Page 9 Page 9 Page 9 • Triax T2-HD115 Operating Manual • “AAA” size zinc-carbon battery (x2) - Page 7... -
Page 7: Preparation
Preparation Inserting the batteries Before using the Receiver for the first time, insert the two supplied “AAA” size zinc-carbon batteries. When the batteries become depleted and the remote control unit fails to operate, replace the batteries with new “AAA” size batteries. Open the battery cover. -
Page 8: Quick Guide
Quick Guide Initial installation overview Follow the steps below one by one when using the Receiver for the first time Run the Preparation Watch TV Initial Settings Connect the antenna Turn on the standy button Congratulations! cable to the RF IN on the Receiver (Page 10) You can now watch TV terminal (Page 9) -
Page 9: Before Turning On The Power
Place the TV close to the AC outlet, and keep the power plug within reach. Connect the antenna (IEC 169-2) 75 Ω coaxial cable, CAI Benchmarked cable such as Triax TX100 Connect the HDMI cable Connect the power adaptor Initial auto installation When the Receiver is powered on for the first time after purchase, the first time installation screen appears. -
Page 10: Watching Tv
Watching TV Daily operation Switching On / Off Switching Between Channels Standby mode Switch between the current channel and the previous channel by pressing LAST. Each press • Select Standby mode of the LAST button will toggle between the current channel and the previous channel If the receiver is switched on, you can switch it to standby by pressing on the... -
Page 11: Channel List
Watching TV Channel list Basic Operation Set a channel as a favourite. You can set a channel as a favourite for quick access. All favourite channels will be Standby mode displayed in the favourites list. • Display / Close the Channel List Press / to select the channel you want Press CH.LIST to add to the favourites list. -
Page 12: Selecting A Programme Using The Epg
Watching TV Selecting a programme using the EPG Watch a Programme Basic Operation • Press GUIDE Watch a programme now. to display EPG Press / to select a programme. Press OK to watch the programme. Set a reminder for a programme. Press ///... -
Page 13: Connecting External Devices
Connecting External Devices • Before connecting... • Be sure to turn off the Receiver and any external equipment before making connections. • Firmly connect a cable to the external device. • Refer to the operation manual of each device for full instructions regarding connection types. This will also help ensure you get the best possible audio / visual quality from the Receiver and connected device. NOTE • The cables illustrated in pages 13 to 15 are commercially available items. Video Connections HDMI Connection Example of connectable devices... -
Page 14: Scart Connections
Connecting External Devices SCART Connection Example of connectable devices • NON-HD Ready TV Sets • DVD Recorders SCART OUTPUT HDMI... -
Page 15: Audio Connections
Connecting External Devices Audio connections SPDIF Connection Example of connectable devices • Dolby Digital Surround System AUDIO INPUT DIGITAL INPUT COAX 1 OPTICAL COAX 2 SPEAKER OUTPUT FUSE POWER T2AL/250V AC 230V - 50Hz After connecting Digital audio output setting After connecting to a surround sound system with a SPDIF cable, you should set an audio output format compatible with the programme you are watching or the device connected (Page 17). -
Page 16: Menu Operation
Menu Operation What is the Main Menu? • You need to call up the On Screen Display (OSD) to perform settings for the Receiver. The OSD for the settings is called “MAIN MENU” • The “MAIN MENU” enables various settings and adjustments. Basic Operation Display the Selecting a menu MAIN MENU screen or sub menu Press MENU and the Press /... -
Page 17: Basic Adjustment
Basic Adjustment AV Settings AV Settings SCART Output Adjusts the video signal type when the Receiver is connected to your TV using a SCART cable. Item This selects an RGB video signal type. The video signal will be split into separate red, green and blue signals to provide the best picture AV Settings quality. -
Page 18: Audio Description
Basic Adjustment AV Settings Audio Description Some programmes are broadcast with audio AV Settings Menu Transparency descriptions (AD) which provides a voice-over describing visual information such as scenery, body language and facial expressions. This function allows you to adjust the Press AD on the remote control unit to toggle transparency of the OSD’s. -
Page 19: Languages
Basic Adjustment Languages Languages Audio Language This function allows you to set the default audio language to English, Welsh, Gaelic or Irish. Selecting Audio Languages Press AUDIO on the remote control unit to toggle switch between the available Languages audio languages. Subtitle Language NOTE •... -
Page 20: Parental Control
Basic Adjustment Parental control Parental Control Parental Settings PIN Change PIN The Parental Control feature allows you to prevent accidental changes being made to the Receiver. In addition channels can be locked to prevent children viewing scenes of an adult nature. -
Page 21: General
Basic Adjustment General General Upgrade Software This function allows you to control when software upgrades are installed. Item Automatic The receiver will automatically install software upgrades when available Manual The receiver will display a message allowing you to confirm or cancel the software upgrade General Auto Standby... -
Page 22: Manually Tuning Channels
Basic Adjustment Manually tuning channels General General Manual Tune First Time Installation You can manually tune new services after the first This function allows you to perform a first time time installation has been completed. installation. Press Menu on your remote control From the Menu options on screen, select Settings Then select General... -
Page 23: Appendix
Helpline on 01443 778908 + Option 5 to obtain service or advice (Normal operator charges apply). Alternatively you can email us at: technical@triax.co.uk. In the unlikely event of this equipment requiring repair during the guarantee period, you will need to provide proof of purchase to your point of sale. -
Page 24: Specifications
Appendix Specifications Item T2 HD 115 Digital Terrestrial HD Receiver All combinations of the below parameters can be received and automatically detected (Except bandwidth) Channel Bandwidth 7, 8 MHz Selectable Receiving Signal Type (DVB-T) Modulation Type QPSK, 16QAM, 64QAM FFT Mode COFDM System 2K, 8K Tuner / Demodulator... -
Page 25: Pin Code Reminder
42 x 257 x 157 (mm) (H x W xD) Triax reserves the right to change the specifications without prior notification. Triax accept no liability in respect of loss arising from errors in or changes to the information provided. PIN CODE Reminder NOTE You need to insert the PIN code here and refer it to the pages in the manual where this is covered. -
Page 26: Trademarks
The copyrights for the software components and various relevant documents included with this product that were developed or written by TRIAX are owned by TRIAX UK LTD and are protected by the Copyright Act, international treaties, and other relevant laws. This product also makes use of freely distributed software and software components whose copyrights are held by third parties. -
Page 27: End Of Life Disposal
Appendix End of life disposal A. Information on Disposal for Users (private households) In the European Union Attention: If you want to dispose of this equipment, please recycle. Used electrical and electronic equipment must be treated separately and in accordance with legislation that requires proper treatment, recovery and Attention: recycling of used electrical and electronic equipment. -
Page 28: Important Notice
Important Notice Digital switchover and your TV equipment By 2012, television services in the UK will go completely digital. This process is happening TV region by TV region. To continue using this HD TV receiver during and following digital switchover you will need to ‘re-tune’ your T2-HD115 receiver. -
Page 29: Terms Of Guarantee
The product must be correctly installed and operated in accordance with the instructions contained in this operating manual. Triax UK Ltd disclaims any liability for incidental or consequential damages. This guarantee is in addition to, and does not diminish your statutory or legal rights. -
Page 30: Declaration Of Conformity
Company Address: Abergorki Industrial Estate, Treorchy, Rhondda-Cynon-Taff CF42 6DL, UK Triax T2-HD 115 Zapper, Part Number 305200. Object of the Declaration: The object of the declaration described above is in conformity with the requirements of the following documents: Low voltage directive 2006/95/EC... -
Page 31: Notes
Notes... - Page 32 The FREEVIEW service is subject to coverage. An aerial upgrade may be required. The FREEVIEW, FREEVIEW+, FREEVIEW HD and FREEVIEW+ HD words and logos are trade marks of DTV Services LTD. DTV Services Ltd 2002, 2008.
Need help?
Do you have a question about the Zapper T2-HD115 and is the answer not in the manual?
Questions and answers