Table of Contents
Advertisement
Quick Links
Download this manual
See also:
User Manual
Advertisement
Table of Contents

Related Manuals for Lantronix PremierWave XN


Summary of Contents for Lantronix PremierWave XN
-
Page 1: User Guide
PremierWave User Guide Part Number 900-606 ReRevision B January 2013... -
Page 2: Revision History
Technical Support Online: www.lantronix.com/support Sales Offices For a current list of our domestic and international sales offices, go to the Lantronix web site at www.lantronix.com/about/contact. Disclaimer The information in this guide may change without notice. The manufacturer assumes no responsibility for any errors that may appear in this guide. -
Page 3: Table Of Contents
To Start WPS _________________________________________________________ 22 To Cancel WPS _______________________________________________________ 23 To Show WPS Status ___________________________________________________ 23 Installing the PremierWave XN ______________________________________________ 23 4: Using DeviceInstaller Accessing PremierWave XN Using DeviceInstaller _______________________________ 25 Device Detail Summary _____________________________________________________ 25 PremierWave XN User Guide... - Page 4 To Configure Tunnel Packing Mode Settings _________________________________ 50 Accept Mode __________________________________________________________ 50 To Configure Tunnel Accept Mode Settings __________________________________ 52 Connect Mode ________________________________________________________ 52 To Configure Tunnel Connect Mode Settings ________________________________ 54 Disconnect Mode ______________________________________________________ 54 PremierWave XN User Guide...
- Page 5 Certificate and Key Generation ___________________________________________ 70 To Create a New Credential ______________________________________________ 70 Certificate Upload Settings _______________________________________________71 To Configure an Existing SSL Credential ____________________________________ 71 Trusted Authorities _____________________________________________________ 72 To Upload an Authority Certificate _________________________________________ 72 PremierWave XN User Guide...
- Page 6 To View Memory Usage _________________________________________________ 80 Processes ____________________________________________________________ 81 To View Process Information _____________________________________________ 81 Threads _________________________________________________________________ 81 To View Thread Information ______________________________________________ 81 System Settings __________________________________________________________ 82 To Reboot or Restore Factory Defaults _____________________________________ 82 PremierWave XN User Guide...
- Page 7 TLS (SSL) _______________________________________________________________ 92 Digital Certificates _________________________________________________________ 92 Trusted Authorities ________________________________________________________ 92 Obtaining Certificates ______________________________________________________ 93 Self-Signed Certificates _____________________________________________________ 93 Certificate Formats ________________________________________________________ 93 OpenSSL ________________________________________________________________ 93 Steel Belted RADIUS ______________________________________________________ 94 Free RADIUS ____________________________________________________________ 94 PremierWave XN User Guide...
- Page 8 To View VIP Status _____________________________________________________ 96 Virtual IP (VIP) Counters ____________________________________________________ 97 To View VIP Counters __________________________________________________ 97 17: Branding the PremierWave XN Web Manager Customization ________________________________________________ 98 Short and Long Name Customization __________________________________________ 99 To Customize Short or Long Names _______________________________________ 99...
-
Page 9: List Of Figures
Figure 3-2 PremierWave XN Male DB9 DTE Serial Ports _________________________________ 18 Figure 3-3 PremierWave XN Pinout Configuration for RS-232 ______________________________ 18 Figure 3-4 PremierWave XN Pinout Configuration for Full Duplex RS-422/485 (4-wire) __________ 19 Figure 3-5 PremierWave XNXC Pinout Configuration for Half Duplex RS-422/485 (2-wire) _______ 19... -
Page 10: List Of Tables
List of Tables Table 3-6 PremierWave XN LEDs and Descriptions _____________________________________ 19 Table 3-7 WLAN Signal Strength Indicator at 5 GHz _____________________________________ 20 Table 3-8 WLAN Signal Strength Indicator at 2.4 GHz ___________________________________ 20 Table 3-9 WPS Status Indicator _____________________________________________________ 20... - Page 11 Table 12-7 Import Configuration from Filesystem Settings ________________________________ 88 Table 13-1 Bridge Settings _________________________________________________________ 90 Table 16-1 VIP Configuration _______________________________________________________ 96 Table 16-2 VIP Counters __________________________________________________________ 97 Table 17-1 Short and Long Name Settings ____________________________________________ 99 Table B-1 Binary to Hexadecimal Conversion _________________________________________ 101 PremierWave XN User Guide...
-
Page 12: 1: Using This Guide
Using This Guide Purpose and Audience This guide provides the information needed to configure, use, and update the PremierWave XN. It is intended for software developers and system integrators who are installing this product into their designs. Summary of Chapters... -
Page 13: Additional Documentation
Instructions for getting the PremierWave up and running. Guide DeviceInstaller Online Help Instructions for using the Lantronix Windows-based utility to locate the PremierWave and to view its current settings. Com Port Redirector Quick Start Instructions for using the Lantronix Windows-based utility to create and Online Help virtual com ports. -
Page 14: 2: Introduction
Temperature Range: Operates over a temperature range of -40°C to +70°C (-40°F to 158°F). The storage temperature range is -40°C to 85°C (-40°F to 185°F). Applications The PremierWave XN device server connects serial devices such as those listed below to Ethernet networks using the IP protocol family. Patient Monitoring Devices ... -
Page 15: Troubleshooting Capabilities
DeviceInstaller: Configure the IP address and related settings and view current settings on the PremierWave XN using a Graphical User Interface (GUI) on a PC attached to a network. You will need the latest version of DeviceInstaller. (See “Using DeviceInstaller” on page 25.) -
Page 16: Ip Address
TCP Port 80: HTTP (Web Manager configuration) TCP Port 21: FTP UDP Port 30718: LDP (Lantronix Discovery Protocol) port TCP/UDP Port 10001: Tunnel 1 (see note below) Note: Additional TCP/UDP ports and tunnels will be available, depending on the product type. -
Page 17: 3: Installation Of Premierwave Xn
Installation of PremierWave XN This chapter describes how to install the PremierWave XN device server. It contains the following sections: Package Contents User-Supplied Items Hardware Components Wi-Fi Protected Setup (WPS) Installing the PremierWave XN Package Contents... -
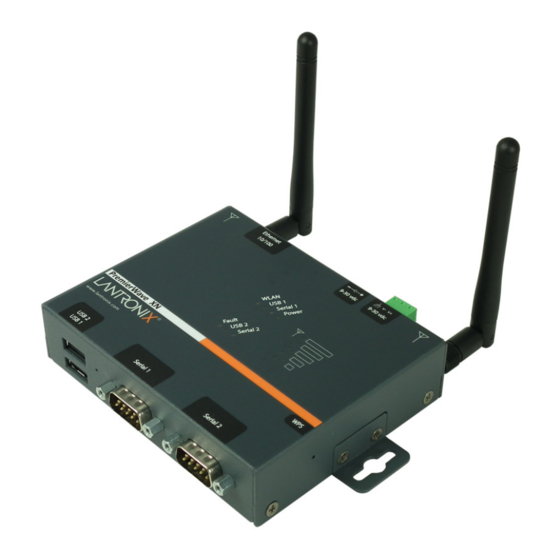
Page 18: Figure 3-1 Premierwave Xn Top/Front View
LEDs Button (pin hole) The PremierWave XN has two male DB9 serial ports that support RS-232/422/485. Figure 3-2 shows the front view of the device. The default serial port settings are 9600 baud, 8 bits, no parity, 1 stop bit, no flow control. -
Page 19: Figure 3-4 Premierwave Xn Pinout Configuration For Full Duplex Rs-422/485 (4-Wire)
3: Installation of PremierWave XN Figure 3-4 PremierWave XN Pinout Configuration for Full Duplex RS-422/485 (4-wire) Figure 3-5 PremierWave XN Pinout Configuration for Half Duplex RS-422/485 (2-wire) Ethernet LEDs The Ethernet Port has two LEDs that indicate the status of the connection as follows:... -
Page 20: Table 3-7 Wlan Signal Strength Indicator At 5 Ghz
3: Installation of PremierWave XN LED (continued) Description USB 1 GREEN - displays a solid light when a USB device is connected to USB 1 Host port and is functioning properly. OFF- when no USB device is connected to USB 1 Host port. -
Page 21: Back Panel
2. Remove the paper clip to release the button. The unit will continue the boot process restoring it back to the original factory default settings. Back Panel On the PremierWave XN is a Power 1 Plug, 3-Pin Terminal Connector for Backup Power, and RJ- 45 Ethernet port as shown in Figure 3-11. -
Page 22: Wifi-Protected Setup (Wps)
3: Installation of PremierWave XN Figure 3-11 PremierWave XN Bottom/Back Panel View Antenna Terminal Barrel Ethernet Antenna Block Plug Power Power (3-pin) Wi-Fi Protected Setup (WPS) Using WPS, you have the option of connecting to PremierWave devices with a router or access point in a single operation instead of manually creating a profile with a network name (SSID), setting up wireless security parameters and updating the choice list. -
Page 23: To Cancel Wps
Antennas must be installed prior to powering on the unit. Do not remove or connect the antennas while the unit power is on. 4. Plug the PremierWave XN into the power outlet by using the included power supply. PremierWave XN User Guide... -
Page 24: Figure 3-13 Premierwave Xn Dimensions In Millimeters (Mm)
3: Installation of PremierWave XN Figure 3-13 PremierWave XN Dimensions in Millimeters (mm) PremierWave XN User Guide... -
Page 25: 4: Using Deviceinstaller
3. When DeviceInstaller starts, it will perform a network device search. To perform another search, click Search. 4. Expand the PremierWave XN folder by clicking the + symbol next to the folder icon. The list of available Lantronix PremierWave XN devices appears. - Page 26 Indicates whether Web Manager access is enabled on this Web Enabled PremierWave. Shows the PremierWave port for Web Manager configuration (if Web Web Port Enabled field is True). Shows True, indicating the PremierWave firmware is upgradable as Firmware Upgradable newer versions become available. PremierWave XN User Guide...
-
Page 27: 5: Configuration Using Web Manager
1. Open a standard web browser. Lantronix supports the latest version of Internet Explorer, Mozilla Suite, Mozilla Firefox, Safari, Chrome or Opera. 2. Enter the IP address or hostname of the PremierWave XN in the address bar. The IP address may have been assigned manually using DeviceInstaller (see the PremierWave XN Quick Start Guide) or automatically by DHCP. -
Page 28: Device Status Page
5: Configuration Using Web Manager Device Status Page The page is the first page that appears after you log into Web Manager. The Device Status page appears when you click Status in the Main Menu in Web Manager. PremierWave XN User Guide... -
Page 29: Web Manager Components
Links near the top of many pages, such as the one in the example above, enable you to link to additional subpages. On some pages, you must also select the item you are configuring, such as a line or a tunnel. PremierWave XN User Guide... -
Page 30: Navigating Web Manager
Note: There may be times when you must reboot the PremierWave XN for the new configuration settings to take effect. The chapters that follow indicate when a change requires a reboot. Anytime you reboot the unit, this operation will take some time to complete. - Page 31 Lets you configure Virtual IP addresses to be used in Tunnel Accept Mode and Tunnel Connect Mode. WLAN Profiles Lets you view, edit, delete and create a WLAN profile on a device. Lets you export XML configuration and status records, and import XML configuration records. PremierWave XN User Guide...
-
Page 32: 6: Network Settings
Link settings are related to the physical link connection, which carries the IP traffic. The PremierWave XN contains two network interfaces. Only one interface may be active at a time; however, if bridging is enabled, both interfaces will be activated and controlled by the bridging subsystem.The Ethernet interface is also called interface 1 or eth0, and the WLAN... -
Page 33: To Configure Network Interface Settings
This setting will be used if Static IP is active (both DHCP and BOOTP are Disabled). Changing this value requires you to reboot the device. When DHCP or BOOTP is enabled, the PremierWave XN tries to obtain an IP address from a DHCP or BOOTP server. If it cannot, the PremierWave XN generates and uses an Auto IP address in the range of 169.254.xxx.xxx, with a network... -
Page 34: To View Network Interface Status
AP, SmartRoam automatically switches to the new AP. This reduces interruptions in wireless connectivity and ensures optimal signal strength. Roaming happens automatically and is completely transparent to the user; no loss of network connectivity should occur. PremierWave XN User Guide... -
Page 35: Table 6-3 Network 2 (Wlan0) Link Settings
The range of values is 100 to 400 msec. Radio Band Selection Select the band(s) on which the radio will operate. Options are 2.4 GHz only, 5 GHz only or Dual band. PremierWave XN User Guide... -
Page 36: To Configure Network Link Settings
Commands Scan “<network SSID>” Perform a scan for devices within range of the PremierWave XN. Including the optional network SSID limits the scan to devices configured with the specified network SSID. Omitting the network SSID performs a scan for all devices in range. -
Page 37: To View Wlan Link Scan And Status Information
To scan the Wireless (wlan0) Link, click Network in the menu and select Network 2 -> Link - > Scan. To view the Wireless (wlan0) Link status information, click Network in the menu and select Network 2 -> Link -> Status. PremierWave XN User Guide... -
Page 38: Wlan Profiles
A WLAN profile defines all of the settings necessary to establish a wireless connection with either an access point (in infrastructure mode) or another wireless client (in Adhoc mode.) A maximum of eight profiles can exist on the PremierWave XN at a time. In PremierWave XN, all enabled profiles are active. -
Page 39: To Configure Wlan Profile Basic Settings
This setting only applies if scanning in the 5 GHz band is enabled. To Configure WLAN Profile Basic Settings Using Web Manager To view or edit an existing WLAN profile or to create a new profile, click WLAN Profiles on the menu and select an existing profile. PremierWave XN User Guide... -
Page 40: To Configure Wlan Profile Advanced Settings
TX Power Maximum Specify the maximum transmission output power in dBm. Antenna Diversity Select the antenna the radio will use or allow PremierWave XN to automatically make the selection. Enabled = allow the PremierWave to select the antenna. ... -
Page 41: Wlan Profile Security Settings
<configitem name=”security”> WLAN Profile Security Settings The PremierWave XN supports WEP, WPA, and WPA2/IEEE 802.11i to secure all wireless communication. WPA and WPA2/IEEE 802.11i are not available for Adhoc topology. The WPA2/IEEE 802.11i mode is compliant with the Robust Secure Network specified in the IEEE standard 802.11i. -
Page 42: Wlan Profile Wep Settings
Using the CLI To enter the wlan0 Profile WEP command level: enable -> config -> wlan <profile name or number> profiles -> edit -> advanced -> security -> wep Using XML Include in your file: PremierWave XN User Guide... -
Page 43: Wlan Profile Wpa And Wpa2/Ieee802.11I Settings
SSL configuration that is able to verify the RADIUS server’s certificate. In case of EAP-TLS, also a certificate and matching private key need to be configured to authenticate the PremierWave XN to the RADIUS server. For more information about SSL certificates see... -
Page 44: To Configure Wlan Profile Wpa And Wpa/Ieee802.11I Settings
EAP-MSCHAPv2 EAP-MD5 Username User ID for identifying the PremierWave XN to the RADIUS server in the network Password Select the password for identifying the PremierWave XN to the RADIUS server in the network. Validate Certificate Select to Enable or Disable. If enabled, the PremierWave XN will attempt to validate the certificate received from the RADIUS server. -
Page 45: Wlan Quick Connect
Enter a network name and click Scan to search for a network. Scan “<network SSID>” Perform a scan for devices within range of the PremierWave XN. Including the optional network SSID limits the scan to devices configured with the specified network SSID. Omitting the network SSID performs a scan for all devices in range. -
Page 46: 7: Line And Tunnel Settings
Line and Tunnel Settings The PremierWave XN The two lines . All lines use standard RS232/RS485 serial ports. All lines can be configured to operate in the following modes: RS232 RS485 Full Duplex (also compatible with RS-422) RS485 Half Duplex, with and without termination impedance ... -
Page 47: To Configure Line Settings
The following section describes the steps to view and configure Line 1 settings; these steps apply to other line instances of the device. Using Web Manager To configure a specific line, click Line in the menu and select Line 1 -> Configuration (Table 7-1). PremierWave XN User Guide... -
Page 48: To View Line Statistics
Protocol are displayed for informational purposes and must be configured from the Line settings. Table 7-3 Tunnel Serial Settings Tunnel Serial Description Settings Line Settings Line Settings information here is display only. Go to the section, To Configure Line Settings to modify these settings. PremierWave XN User Guide... -
Page 49: To Configure Tunnel Serial Settings
1450 bytes. Default is 512. Timeout Set the timeout value, in milliseconds, after the first character is received on the serial line, before data is sent on the network. Valid range is 1 to 30000 milliseconds. Default is 1000. PremierWave XN User Guide... -
Page 50: To Configure Tunnel Packing Mode Settings
Accept Mode In Accept Mode, the PremierWave XN listens (waits) for incoming connections from the network. A remote node on the network initiates the connection. The configurable local port is the port the remote device connects to for this connection. There is no report port or address. -
Page 51: Table 7-5 Tunnel Accept Mode Settings
Disabled = this is the default setting; incoming characters from the Serial Line are sent on into the network. Any buffered characters are sent first. PremierWave XN User Guide... -
Page 52: To Configure Tunnel Accept Mode Settings
(TCP or UDP). When established, Connect Mode is always on. Enter the remote station as an IP address or DNS name. The PremierWave XCPremierWave XNPremierWave ENEDS-MD4/8/16 will not make a connection unless it can resolve the address. PremierWave XN User Guide... -
Page 53: Table 7-6 Tunnel Connect Mode Settings
Serial Line. Instead, they will be buffered and will eventually flow off the network side. Disabled = this is the default setting; incoming characters from the network are sent on into the Serial Line. Any buffered characters are sent first. PremierWave XN User Guide... -
Page 54: To Configure Tunnel Connect Mode Settings
Enter the number of milliseconds a tunnel may be idle before disconnection. The value of zero disables the idle timeout. Flush Serial Data Set whether to flush the Serial Line when the Tunnel is disconnected. Choices are: Enabled Disabled (default) PremierWave XN User Guide... -
Page 55: Modem Emulation
OK is returned for unrecognized AT commands. Choices are: Enabled Disabled (default) Incoming Connection Set how and if requests are answered after an incoming RING (ATS0=2). Choices are: Disabled (default) Automatic Manual PremierWave XN User Guide... -
Page 56: To Configure Tunnel Modem Emulation Settings
To view statistics for a specific tunnel, click Tunnel in the menu and select the Tunnel 1 -> Statistics. Using the CLI To view Tunnel 1 statistics: enable -> tunnel 1, show statistics Using XML Include in your file: <statusgroup name=”tunnel” instance=”1”>s PremierWave XN User Guide... -
Page 57: 8: Terminal And Host Settings
Enabled Disabled Note: Applies only to Connect Mode Telnet connections, not to Accept Mode. Only disable Echo if your terminal echoes, in which case you will see double of each character typed. Default is enabled. PremierWave XN User Guide... -
Page 58: To Configure The Terminal Network Connection
Menu. To leave a host out of the menu, leave this field blank. Protocol Select the protocol to use to connect to the host. Choices are: Telnet Note: SSH keys must be loaded or created in SSH for the SSH protocol to work. PremierWave XN User Guide... -
Page 59: To Configure Host Settings
To configure a particular Host, click Host on the menu and select Host 1 -> Configuration. Using the CLI To enter the Host command level: enable -> config -> host 1 Using XML Include in your file: <configgroup name=”host” instance=”1”> PremierWave XN User Guide... -
Page 60: 9: Services Settings
To configure DNS for cases where it is not supplied by a protocol, gclick Network in the menu and select Interface -> Configuration. Using the CLI To enter the DNS command level: enable -> dns Using XML Include in your file: <configgroup name=”interface” instance=”eth0”> PremierWave XN User Guide... -
Page 61: Ftp Settings
Enter the IP address of the remote server to which system logs are sent for storage. Remote Port Enter the number of the port on the remote server that supports logging services. The default is 514. PremierWave XN User Guide... -
Page 62: To View Or Configure Syslog Settings
A server certificate and associated private key need to be installed in the SSL configuration section to use HTTPS. Secure Credentials Specify the name of the set of RSA and/or DSA certificates and keys to be used for the secure connection. PremierWave XN User Guide... -
Page 63: To Configure Http Settings
To view HTTP statistics, click HTTP in the menu and select Statistics. Using the CLI To enter the HTTP command level: enable -> config -> http Using XML Include in your file: <configgroup name=”http server”> PremierWave XN User Guide... -
Page 64: To Configure Http Authentication
Select On or Off for RSS feed to be written to a file (cfg_log.txt) and to be available across reboots. The default setting is off. Max Entries Set the maximum number of log entries. Only the last Max Entries are cached and viewable. View Click the button to view RSS feeds. PremierWave XN User Guide... -
Page 65: To Configure Rss Settings
Using Web Manager To configure RSS, gclick RSS in the menu. Using the CLI To enter the RSS command level: enable -> config -> rss Using XML Include in your file: <configgroup name=”rss”> PremierWave XN User Guide... -
Page 66: 10: Security Settings
10: Security Settings The PremierWave XN device supports Secure Shell (SSH) and Secure Sockets Layer (SSL). SSH is a network protocol for securely accessing a remote device. SSH provides a secure, encrypted communication channel between two hosts over a network. It provides authentication and message integrity services. -
Page 67: Ssh Client Known Hosts
The user's Public Keys are optional and only necessary if public key authentication is wanted. Using public key authentication will allow a connection to be made without the password being asked at that time. Note: When uploading the security keys, ensure the keys are not compromised in transit. PremierWave XN User Guide... -
Page 68: Ssh Client Users
Enter the path and name of the existing public key you want to upload. In WebManager, you can also browse to the public key to be uploaded. Key Type Select a bit length for the key: PremierWave XN User Guide... -
Page 69: To Configure Ssh Settings
Self-signed certificates with associated private key can be generated by the device server itself. Note: blue text in the XML command strings of this chapter are to be replaced with a user-specified name. PremierWave XN User Guide... -
Page 70: Certificate And Key Generation
10: Security Settings Certificate and Key Generation The PremierWave XN can generate self signed certificates and their corresponding keys. This can be done for both the rsa and dsa certificate formats. Certificates can be identified on the PremierWave XN by a name provided at generation time. -
Page 71: Certificate Upload Settings
Certificate Upload Settings SSL certificates identify the PremierWave XN to peers, and can be used with some methods of wireless authentication. Certificate and key pairs can be uploaded to the PremierWave XN through either the CLI or XML import mechanisms. Certificates can be identified on the PremierWave XN by a name provided at upload time. -
Page 72: Trusted Authorities
-> ssl To enter the Trusted Authorities command level: enable -> ssl -> trusted authorities Using XML Include in your file: <configgroup name=”ssl”> and <configitem name=”trusted authority” instance =”1”> and <configitem name=”intermediate authority” instance=”1”> PremierWave XN User Guide... -
Page 73: 11: Maintenance And Diagnostics Settings
11: Maintenance and Diagnostics Settings Filesystem Settings Use the file system to list, view, add, remove, and transfer files. The PremierWave XN uses a flash file system to store. File Display It is possible to view the list of existing files, and to view their contents in the ASCII or hexadecimal formats. -
Page 74: File Modification
Format the file system and remove all data. File Transfer Files can be transferred to and from the PremierWave XN via the TFTP protocol. This can be useful for saving and restoring XML configuration files. Files can also be uploaded via HTTP. -
Page 75: To Transfer Or Modify Filesystem Files
To configure IP protocol settings, gclick Protocol Stack in the menu and select IP. Using the CLI To enter the command level: enable -> config -> ip Using XML Include in your file: <configgroup name=”ip”> PremierWave XN User Guide... -
Page 76: Icmp Settings
To configure ARP protocol settings, gclick Protocol Stack in the menu and select ARP. Using the CLI To enter the command level: enable -> config -> arp Using XML Include in your file: <configgroup name=”arp”> PremierWave XN User Guide... -
Page 77: Smtp Settings
To view Query Port settings or to switch the Query Port Server on or off, gclick Query Port in the menu. Using the CLI To enter the Query Port command level: enable -> config -> query port PremierWave XN User Guide... -
Page 78: Diagnostics
<configgroup name=”query port”> <configitem name=”state”> Diagnostics The PremierWave XN has several tools for diagnostics and statistics. Various options allow for the configuration or viewing of IP socket information, ping, traceroute, memory, and processes. Hardware To View Hardware Information Using Web Manager To view hardware information, gclick Diagnostics in the menu and select Hardware. -
Page 79: To Ping A Remote Host
Traceroute Here you can trace a packet from the PremierWave XN to an Internet host, showing how many hops the packet requires to reach the host and how long each hop takes. If you visit a web site whose pages appear slowly, you can use traceroute to determine where the longest delays are occurring. -
Page 80: Log
To view memory information, gclick Diagnostics in the menu and select Memory. Using the CLI To enter the command level: enable -> device, show memory Using XML Include in your file: <statusgroup name=”memory”> PremierWave XN User Guide... -
Page 81: Processes
11: Maintenance and Diagnostics Settings Processes The PremierWave XN Processes information shows all the processes currently running on the system. It shows the Process ID (PID), Parent Process ID (PPID), user, CPU percentage, percentage of total CPU cycles, and process command line information. -
Page 82: System Settings
11: Maintenance and Diagnostics Settings System Settings The PremierWave XN System settings allow for rebooting the device, restoring factory defaults, uploading new firmware and updating a system’s short and long name. Note: Anytime you reboot the unit, this operation will take some time to complete. -
Page 83: 12: Advanced Settings
To view Email statistics, click Email in the menu and select Email 1 -> Statistics. To configure basic Email settings, gclick Email in the menu and select Email 1 -> Configuration. To send an email, gclick Email in the menu and select Email 1 -> Send Email.\ PremierWave XN User Guide... -
Page 84: Command Line Interface Settings
Command Line Interface Settings The Command Line Interface settings allow you to control how users connect to and interact with the PremierWave XN's command line. It is possible to configure access via the Telnet and SSH protocols, in addition to general CLI options. -
Page 85: Include In Your File:
12: Advanced Settings Using XML Telnet Settings Include in your file: <configgroup name=”cli”> The telnet settings control CLI access to the PremierWave XN over the Telnet protocol. Table 12-3 Telnet Settings Telnet Settings Description Telnet State Enable or Disable CLI access via telnet...Telnet Settings -
Page 86: To Configure Ssh Settings
It can also be modified and imported to update the configuration on this PremierWave XN unit or another. The XML data can be dumped to the screen or exported to a file on the file system. -
Page 87: To Export Configuration In Xml Format
The list of available groups can be viewed with the “xcr list” command. To Export in XML Format Using Web Manager To export configuration format, gclick XML in the menu and select Export Status. Using the CLI To enter the XML command level: enable -> xml PremierWave XN User Guide... -
Page 88: Xml: Import Configuration
To Import Configuration in XML Format Using Web Manager To import configuration, gclick XML in the menu and select Import Configuration. Using the CLI To enter the XML command level: enable -> xml Using XML Not applicable. PremierWave XN User Guide... -
Page 89: 13: Bridging
4. Create the corresponding WLAN Profile(s) under WLAN Profiles. At this point, it is a good idea to ensure that the PremierWave XN can connect to your wireless network, before enabling bridging. Check your WLAN settings by continuing with the following steps: 5. -
Page 90: Bridging Operation
Using Web Manager To view the Bridge status, click Bridge on the menu, select a particular bridge and click Status. To configure Bridge settings, click Bridge on the menu, select a particular bridge and click Configuration. PremierWave XN User Guide... - Page 91 13: Bridging Using the CLI To enter the Bridge command level: enable -> config -> bridge 1 enable - > config -> bridge br0 Using XML Include in your file: <configgroup name=”bridge” instance=”br0”> PremierWave XN User Guide...
-
Page 92: 14: Security In Detail
Communication then proceeds with symmetric encryption, using this key. SSH and some wireless authentication methods on the PremierWave XN make use of SSL. The PremierWave XN supports SSLv2, SSlv3, and TLS1.0. -
Page 93: Obtaining Certificates
PEM. Certificate and key can be in the same file or in separate files. Additionally, the key can be either be encrypted with a password or left in the clear. However, the PremierWave XN currently only accepts separate PEM files, with the key unencrypted. -
Page 94: Steel Belted Radius
With SBR, when the identity information includes special characters such as dashes and periods, SBR changes the format it uses to store these strings and becomes incompatible with the current PremierWave XN release. Support may be added for this and other formats in future releases. -
Page 95: 15: Updating Firmware
(www.lantronix.com/support/downloads/) or by using anonymous FTP (ftp://ftp.lantronix.com/). Loading New Firmware through FTP Firmware may be updated by sending the file to the PremierWave XN over an FTP connection. The destination file name on the PremierWave XN must be "firmware.rom". The device will reboot upon successful completion of the firmware upgrade. -
Page 96: 16: Vip Settings
AccessMyDevice Gateway will be maintained at all times. To View VIP Status Using Web Manager Click VIP on the menu and select Status. Using the CLI To enter the VIP command level: enable -> config -> vip, show status PremierWave XN User Guide... -
Page 97: Virtual Ip (Vip) Counters
Using Web Manager Click VIP on the menu and select Counters. Using the CLI To enter the VIP command level: enable -> config -> vip, show counters Using XML Include in your file: <statusgroup name=”vip”> PremierWave XN User Guide... -
Page 98: 17: Branding The Premierwave Xn
The Web Manager files are hidden and are incorporated directly into the firmware image but may be overridden by placing the appropriate file in the appropriate directory on the PremierWave XN file system. Web Manager files can be retrieved and overridden with the following procedure: 1. -
Page 99: Short And Long Name Customization
17: Branding the PremierWave XN Short and Long Name Customization You can customize the short and long names in your PremierWave XN. The names display in the CLI show command and in the System web page in the Current Configuration table. The short name is used for the show command. -
Page 100: Appendix A: Technical Support
Check our online knowledge base or send a question to Technical Support at http://www.lantronix.com/support. Technical Support Europe, Middle East, Africa Phone: +33 13 930 4172 Email: eu_techsupp@lantronix.com or eu_support@lantronix.com Firmware downloads, FAQs, and the most up-to-date documentation are available at http://www.lantronix.com/support When you report a problem, please provide the following information: Your name, and your company name, address, and phone number ... -
Page 101: Appendix B: Binary To Hexadecimal Conversions
1. On the Windows Start menu, click Programs -> 1010 Accessories -> Calculator. 2. On the View menu, select Scientific. The 1011 scientific calculator appears. 1100 3. Click Bin (Binary), and type the number you want to convert. 1101 1110 1111 PremierWave XN User Guide... -
Page 102: Figure B-2 Windows Scientific Calculator
Appendix B: Binary to Hexadecimal Conversions Figure B-2 Windows Scientific Calculator 4. Click Hex. The hexadecimal value appears. Figure B-3 Hexadecimal Values in the Scientific Calculator PremierWave XN User Guide... -
Page 103: Appendix C: Compliance
EN 61000-4-5: 2006 EN 61000-4-6: 2009 EN 61000-4-8: 1994 + A1: 2001 EN 61000-4-11: 2004 Uses PremierWave XN module with the following: FCCID: R68PEN ICID: 3867A-PEN Japan-approved transmitter IDs: 006XWA0019, 006YWA0009, 006WWC0244 Safety IEC/EN 60950-1, UL ... - Page 104 Manufacturer's Contact: Lantronix, Inc. 167 Technology Drive, Irvine, CA 92618 USA Tel: 949-453-3990 Fax: 949-450-7249 RoHS Notice All Lantronix products in the following families are China RoHS-compliant and free of the following hazardous substances and elements: Lead (Pb)
Need help?
Do you have a question about the PremierWave XN and is the answer not in the manual?
Questions and answers