Epson R-D1 User Manual
Rangefinder digital camera
Hide thumbs
Also See for R-D1:
- User manual (59 pages) ,
- (55 pages) ,
- Product support bulletin (10 pages)
Table of Contents
Advertisement
Quick Links
Download this manual
See also:
User Manual
Advertisement
Table of Contents

Related Manuals for Epson R-D1


Summary of Contents for Epson R-D1
- Page 1 ® User’s Guide...
- Page 2 Seiko Epson Corporation. The information contained herein is designed only for use with this Epson product. Epson is not responsible for any use of this information as applied to other products.
-
Page 3: Table Of Contents
Contents Introduction Power save timer settings ..... . . 22 Assigning a function to the USER button ..22 Main Features . - Page 4 File size of photos......53 EPSON PhotoRAW ......45 About Optional Accessories .
-
Page 5: Introduction
❏ Protect the camera from rapid temperature change. storage device periodically. ❏ Epson is not liable for any problems resulting from the loss or corruption ❏ Never spill liquid onto this product. of data on the HDD. -
Page 6: When Using The Strap
❏ Do not insert the battery into power outlets or other power sources immediately. ❏ Use only an Epson Li-ion battery for this camera according to the such as cigarette lighters. ❏ Charge the battery before using it. The battery is not fully charged directions in the user documentation. -
Page 7: Important Safety Instructions
❏ Use only the Epson battery charger provided to charge the Epson ❏ Do not dispose of the battery as ordinary refuse. Instead, dispose Li-ion battery Model EU-85. Never attempt to charge other types of it in a collection or recycle box in accordance with local laws. - Page 8 ❏ The battery charger included is designed for use with this product. ❏ If you cannot insert the plug into the power outlet, contact an Use of any other battery charger could result in fire, electrical shock, electrician. or injury. For US and Canadian users: ❏...
- Page 9 ❏ Do not store this product near water. ❏ Do not store this product in a location subject to high temperature or humidity. ❏ Do not store this product in a location subject to rapid changes in temperature or humidity. ❏...
-
Page 10: Chapter 1 Getting Started
Make sure that your camera box contains all of the items shown below. Battery charger Power cable (for battery charger) Camera body Lens hole cover User’s guide CD-ROM (EPSON PhotoRAW/EPSON RAW Plug-In × 1, Adobe Photoshop Elements 2.0 × 2) Li-ion battery strap Getting Started... -
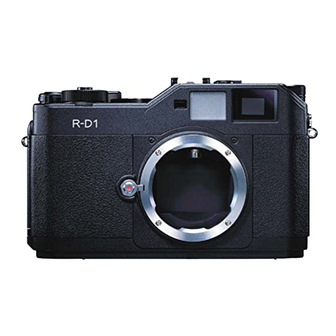
Page 11: Camera Parts
Camera Parts Front view Top view Shutter-release button Accessory shoe Needle indicator X contact Lens release button JOG dial Frame selector Power switch lever Back view AE-lock button Photo quality/WB settings Shutter speed Lock-release lever dial/ISO speed button set ring Shutter charge lever SD card access LED... -
Page 12: Getting Started
Needle indicator Displays the current settings information with 4 needles (number of remaining photos, photo X contact Used to mount an optional flash. quality, remaining battery power, and white balance settings). For details, see “About Lens release button Used to mount or remove lenses. Indicator Needles”... -
Page 13: Attaching The Strap To Your Camera
3. Lace the strap end through the two plastic fasteners. Attaching the Strap to Your Camera Follow the steps below to attach the strap with the camera. 1. Attach the protective pad and the metal ring to one side of the camera. -
Page 14: Inserting The Battery
1. Connect the battery charger with the provided power cable, then 3. Take the battery out when the charge lamp turns off. After charging insert the plug into a power outlet. the battery, unplug the battery charger’s plug from the outlet. Note: 2. -
Page 15: Installing And Removing A Memory Card
1. Make sure that the camera is off, and then open the battery cover Note: ❏ To check the battery’s remaining charge, see “Remaining battery power” as shown below. on page 24. ❏ If you find that your battery has run out soon after recharging it a number of times, make sure to discharge it completely before recharging it. -
Page 16: Installing A Memory Card
Formatting a memory card Installing a memory card Format a memory card when you want to erase all the data on the card 1. Make sure that the SD memory access LED is unlit, and then open or when a message on the LCD monitor instructs you to do so. the memory card cover. -
Page 17: Removing A Memory Card
Removing a memory card When you mount a collapsible lens, do not collapse the lens after mounting it. Collapsing the lens into the camera by force or 1. Make sure the SD memory access LED is unlit, and then open the mounting the lens while it is collapsed may damage the camera or memory card cover. -
Page 18: Removing M (Bayonet) Mount Lenses
2. Insert the lens into the camera body and turn the lens clockwise 2. Lift the lens straight out of the mount. until it clicks. Mounting L mount lenses Removing M (Bayonet) mount lenses Note: ❏ When you install an L mount lens, you need an optional M-Bayonet 1. -
Page 19: Removing L Mount Lenses
Removing L mount lenses 2. Turn the M-Bayonet adapter ring clockwise, then remove the cover. 1. Turn the lens all the way counterclockwise and pull the lens straight out. DUMMY 3. Align the lens mount screw with that of the M-Bayonet adapter ring, and turn the lens clockwise until it clicks. -
Page 20: Setting Up Your Camera
Note: Setting Up Your Camera To turn the power switch off, turn the power switch to the off position. Setting the date and time Turning the power on When you turn on the camera the first time, you need to set the current 1. -
Page 21: Setting The Date Format
3. Confirm that the value for year is highlighted, and rotate the JOG 2. Select your desired display format for the year, month, and date dial clockwise or counterclockwise to change the value. using the JOG dial. YYYY/MM/DD (default setting) Year/Month/Day DD/MM/YYYY Day/Month/Year... -
Page 22: Power Save Timer Settings
The new setting is saved, and the screen returns to the Basic Setup The selected function is assigned to the USER button, and the screen menu. returns to the Camera Settings menu. Power save timer settings Confirming the current settings If no operations are performed for a certain period although the power You can check the current settings on the LCD monitor. -
Page 23: Resetting All Settings To Default Values
Resetting all settings to default values Releasing the Shutter If necessary, you can use this function to initialize all current settings to their default settings as shown below. Full and half-release Setting item Default setting The shutter-release button has the following two-step function. Half-release: When you press the shutter-release button halfway Color... -
Page 24: Chapter 2 Taking Pictures
Chapter 2 Taking Pictures Photo Quality About Indicator Needles The short needle on the right-side of the meter indicates the photo quality setting. The current photo quality setting is indicated as N With the needle indicator on the top of the camera, you can check the 2240 ×... -
Page 25: Setting Photo Quality
2. Rotate the JOG dial to select your desired photo quality. Setting Photo Quality The selected photo quality is indicated on the needle indicator (the short needle on the right-side of the indicator). For details, see Before taking photos using the camera, photo quality (image format, “About Indicator Needles”... -
Page 26: Setting Iso Sensitivity
2. Rotate the JOG dial to select the desired white balance (light 2. Rotate the ISO speed set ring. You can select ISO sensitivity from source). You can select from Auto, Sunny, Shade, Cloudy, 200, 400, 800, or 1600. Incandescent, or Fluorescent. Note: You can check the selected white balance setting on the needle indicator. -
Page 27: Exposure Compensation
3. Maneuver the shutter charge lever. Note: ❏ When you set NR (Noise Reduction) to Hi (High) in the Film Settings screen and set the exposure at more than 2 seconds, noise reduction is automatically performed after taking a photo. While the noise reduction is being performed, do not turn the power off until the SD card access LED is unlit. -
Page 28: Setting Manual Exposure (Shutter Speed Priority)
Note: Setting Manual Exposure (Shutter Speed ❏ When you switch the shutter speed setting from AE (0) to another value, rotate the shutter speed dial while pressing the lock-release button. Priority) ❏ To cancel the exposure compensation, turn the shutter speed dial to AE. Exposure compensation value is set to zero. -
Page 29: B (Bulb) Shooting
❏ To install or uninstall a cable release on the camera, follow the illustration 5. Focus on the subject. below. 6. Press the shutter-release button all the way down to take a photo. Note: ❏ If you set the shutter speed at a high value, you can shoot even a fast moving subject as if it is a stationary subject. -
Page 30: Selecting A Frame
3. Press the shutter-release button halfway. The optimal shutter speed Selecting a Frame (i.e., optimal exposure value) blinks, and the current shutter speed is lighted, in the viewfinder. Frame patterns can be selected from 28 mm, 35 mm, and 50 mm. Turn the frame selector lever to select the frame pattern according to the focal length of the lens being used. -
Page 31: Selecting The Picture Settings (Image Type)
2. Select Color or Monochrome. ou can set your desired value for Edge Film1 to Film3 To set the color to color, select Color using the JOG dial and press Enhance, Saturation, Tint, Contrast, and NR the ENTER button. The color setting is complete and the screen (Noise Reduction) using the JOG dial. -
Page 32: Sequential Number Settings
4. Focus on the subject and identify the length between the camera Calibrating Indicator Needles lens and the subject. 5. Set the corresponding aperture value from the length and aperture You can check the statuses of the following four factors: the number of list. - Page 33 2. Select the needle to be adjusted using the JOG dial, and press the ENTER button. The needles indicate the following factors. Needle display Function E (long needle on the top of the Number of remaining photos meter) R (short needle on the right-side of Photo quality the meter) E (short needle on the bottom of the...
-
Page 34: Chapter 3 Viewing And Managing Your Photos
Chapter 3 Viewing and Managing Your Photos - Histogram display Viewing Photos with the LCD Monitor - Highlight display - Framing guide display When turning the power switch on, the camera enters the shooting - Detailed information display mode. To view the photos on the camera, invert the LCD monitor - 4-photo display toward you and press the LCD button. - Page 35 Standard display Indicates you can magnify or shrink of a photo by rotating the JOG dial clockwise or counterclockwise in the lower position (displayed in the Magnify mode). Appears when the ENTER button is available. Appears when the CANCEL button is available. Appears when the current photo display style is full screen.
- Page 36 ❏ Lock ( ❏ Number of current photo/total number of images (9999 at a ) icon (displayed only when the file is locked) ❏ Print ( maximum) ) icon with number of prints (displayed only when DPOF ❏ Highlight display settings have been made) Histogram display Framing guide display...
-
Page 37: Viewing Your Photos In A Slide Show
❏ Number of current photo/total number of images (9999 at a Viewing Your Photos in a Slide Show maximum) ❏ Date and time of photo Images are played back in an automatic slide show with an interval of ❏ File name (file number and format) about 3 seconds between each image. -
Page 38: Deleting Images
Note: Deleting Images ❏ You cannot delete the image displayed with the lock ( ) icon. For details, see “Locking Images” on page 39. In the playback mode, you can delete the currently displayed image or ❏ When an SD memory card is locked, the message “Cannot delete. The SD all of the images at once in the LCD monitor. -
Page 39: Locking Images
All the images in the SD memory card are locked. Locking Images Caution: When you format an SD memory card, all the data on the card is erased, This function is used to protect images from accidental deletion. including protected pictures. Note: After locking images, they become read only. -
Page 40: Lcd Brightness Settings
4. Specify the number of prints using the JOG dial and press the LCD Brightness Settings ENTER button. Note: Brightness of the LCD monitor can be selected from 8 grades (default The number of prints cannot be specified for CCD-RAW data. setting is 5). -
Page 41: Chapter 4 Using The Lcd Monitor
Chapter 4 Using the LCD Monitor ❏ When you perform one of the following in the playback mode, the LCD How to Use the LCD Monitor monitor is turned off and the camera returns to the shooting mode. - Press the LCD button You can use the LCD monitor to view photos in the playback mode or - Press the shutter-release button halfway make settings for the camera functions. -
Page 42: Camera Settings Menu
Main menu items CANCEL button: Used when you exit without making any setting and the screen returns to the previous menu or Function Description function. USER button: Used when you perform previously assigned Delete Delete 1 image or Delete all images function. -
Page 43: Basic Setup Menu
Basic Setup Menu items Function Description Function Description Film Setting Available from Film1 to Film3, or Standard. When selecting Film1 to Film3, you can set a Time and Date Sets the date (year, month, and day) and time value for Edge Enhance, Saturation, Tint, (hours and minutes). -
Page 44: Chapter 5 Using The Raw Data Processing Software
(EPSON RAW File) files on these applications. SVGA (800 × 600) or higher, 24 bit color or Display: higher Note: ❏ To install the EPSON PhotoRAW or EPSON RAW Plug-In software, ® Macintosh: OS: Mac OS 9.1 - 9.2.2 (CarbonLib compatible), you need administrator privileges. -
Page 45: Installing The Software
❏ If the EPSON Installation Program dialog box does not appear, click Installing the Software the CD-ROM icon, and then select Open from the File menu. Then double-click EPSETUP. EXE. EPSON PhotoRAW For Macintosh users: Double-click Ins EPSON RAW Plug-In icon inside the EPSON 1. -
Page 46: Starting The Software
EPSON PhotoRAW is started and the main window is displayed. Note: ❏ When the EPSON RAW Plug-In does not start automatically even if you select an ERF file, select Open from the File menu, and select EPSON RAW Plug-In from Format drop-down list. Then select your desired ERF file. -
Page 47: Chapter 6 Maintenance And Troubleshooting
Chapter 6 Maintenance and Troubleshooting Cleaning the Camera Troubleshooting To keep your camera at its best, you should clean it thoroughly several When a problem occurs, an error message usually appears in the LCD times a year. Before you perform any maintenance on the camera, be monitor. -
Page 48: Contacting Customer Support
For users in the Middle East Contacting Customer Support If your Epson product is not operating properly and you cannot solve http://www.epson.com the problem using the troubleshooting information in your product documentation, contact the customer support services for assistance. If E-mail epson_support@compubase.co.ae... - Page 49 902 40 41 42 http://www.epson.fr/support/services/index.shtml pour accéder aux SERVICES du support technique. 93 582 15 16 For user in Germany For users in Portugal EPSON Service Center c/o Exel Hünxe GmbH Werner-Heisenberg-Strase 2 46569 Hünxe http://www.epson.pt For user in Italy E-mail apoio_clientes@epson.pt...
-
Page 50: Appendix A Appendix
Appendix A Appendix Standards and Approvals Specifications Camera Camera Epson Rangefinder Digital Camera R-D1 EMC Directive 89/336/EEC EN55022 Class B General EN55024 Dimensions Height: 88.5 mm (3.54 inches) Lithium-ion battery and weight: Width: 142 mm (5.68 inches) Depth: 39.5 mm (1.58 inches) -
Page 51: Optic System
Display functions JPEG compression ratio: Locked at 1/4 PRINT image matching: Supports PRINT Image Matching Ver.2.6 LCD monitor: Type 2 low-temperature polysilicon color LCD (JPEG only) 235K pixels Needle 4-needle indicator (number of remaining Optic system indicator: photos/photo quality/remaining battery Primary-color CCD (APS size: 23.7 ×... -
Page 52: Viewfinder Indicators
Viewfinder indicators Battery service life: Number of shots possible Under shooting conditions 1*: Up to about 1000 Exposure meter: Displays optimal shutter speed on LED based on shots metered value. Also displays current set value Under shooting conditions 2**: Up to about 360 through shutter speed dial shots (compliant with the CIPA standard) (metered value: blinking/SS dial setting: lit). -
Page 53: Performance
Performance File size of photos Photo quality: Compression ratio Average file size 2240 × 1488 (JPEG): Locked at 1/4 about 1.5MB 3008 × 2000 (JPEG): Locked at 1/4 about 3MB CCD-RAW: Non-compressive about 10MB About Optional Accessories The following options are available for the camera. ❏... -
Page 54: Index
10 Compression ratio, 25 EPSON RAW Plug-In, 44 charging, 13 Language, 21 Contacting EPSON, 48 ERF (EPSON RAW File), 44 inserting, 14 LCD button, 11 Current settings, 22 Exposure compensation, 27 lamp, 14 LCD monitor, 11, 12, 20, 41... - Page 55 Manual shooting aperture locking, 29 RAW, 25 Technical support, 48 shutter speed locking, 28 Memory card cover, 16 Memory card slot, 16 MENU button, 11 SD card access LED, 11, 12 USER button, 11, 22 SD memory card formatting, 16, 38 installing, 15 Needle indicator, 11, 12 WB settings lever, 11, 12...
- Page 56 Index...
Need help?
Do you have a question about the R-D1 and is the answer not in the manual?
Questions and answers