Table of Contents
Advertisement
Quick Links
Download this manual
See also:
User Manual
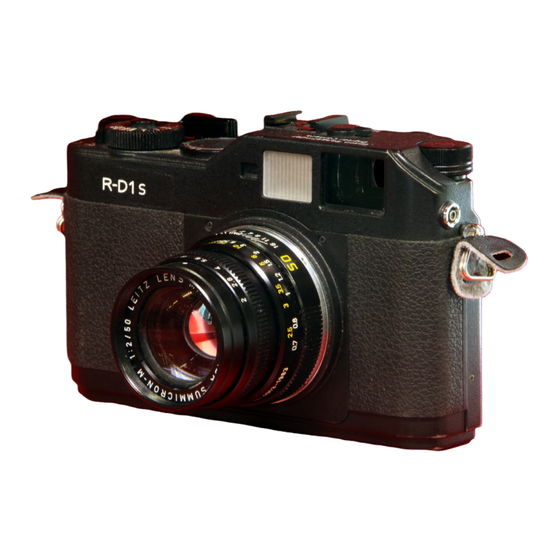
Introduction
Thank you for purchasing the Epson R-D1s. Please follow the
instructions in this guide to set up and start using your camera.
Warnings must be followed carefully to avoid bodily injury.
w
Cautions must be observed to avoid damage to your equipment.
c
Notes contain important information and useful tips on the operation of your
product.
Components
Top View
Status gauge
(page 4)
X-sync contact
Jog dial
Accessory shoe
(page 4)
Frame selector lever
(page 3)
Back View
AE-lock button Image quality/WB lever
Viewfinder
(page 6)
Battery cover
LCD monitor
(page 3)
(page 4)
Lens release button
Shutter
(page 3)
speed/ISO
sensitivity dial
(page 5)
Power switch
(page 4)
Shutter release
button
(page 7)
Dial-lock release
button (page 6) Shutter charge lever
(page 6)
(page 5)
Memory card access
light (page 2)
Strap eyelet (page 2)
LCD button (page 4)
Memory card slot
cover (page 2)
MENU button (page 4)
ENTER button (page 7)
CANCEL button
USER button (page 9)
1
Advertisement
Table of Contents

Related Manuals for Epson R-D1s


Summary of Contents for Epson R-D1s
- Page 1 Introduction Status gauge Lens release button Shutter (page 4) (page 3) Thank you for purchasing the Epson R-D1s. Please follow the speed/ISO X-sync contact instructions in this guide to set up and start using your camera. sensitivity dial (page 5) Warnings must be followed carefully to avoid bodily injury.
-
Page 2: Insert A Memory Card
Attach the Strap to the Camera Insert a Memory Card Open the memory card slot cover. Insert the memory card until it clicks, 1. Remove the protective pads and metal rings from the strap. with the labeled side facing the back of the camera. Close the cover. Metal ring Protective pad 2. -
Page 3: Charge And Install The Battery
Align the dot on the lens body with the red dot on the lens release Charge and Install the Battery button. Insert and rotate the lens clockwise until it clicks. Be sure to charge the battery before installing it in the camera. It takes about 3.5 hours to fully charge a new or empty battery. -
Page 4: Turn On The Camera
Turn on the Camera Set Time and Date To turn on the camera, move the power switch to the On position. The Follow these steps to set the time and date: status gauge displays the current settings: white balance, remaining 1. -
Page 5: Set White Balance
Set ISO Sensitivity Set White Balance Pull up and rotate the outer ring of the shutter speed dial to select the Pull down and hold the image quality/WB lever at the WB position, ISO sensitivity: 200, 400, 800, or 1600. and rotate the jog dial to select the white balance setting on the status gauge. -
Page 6: Taking A Picture
Set Shutter Speed Taking a Picture Rotate the shutter speed dial to the desired value. Select AE for Cock the shutter before taking each picture. automatic exposure, or a desired shutter speed from 1 to 1/2000 second, or B (Bulb). Look through the viewfinder and point to the subject. -
Page 7: Delete Pictures
Press the shutter release button halfway to display the shutter speed in Delete Pictures the viewfinder. If you set the shutter speed for manual exposure, the metered value flashes for your reference. For automatic exposure (i.e., To delete a picture, rotate the jog dial to display the picture you want AE on the shutter speed dial), the camera uses the displayed shutter to delete. -
Page 8: Setting Items
3. Select the desired setting using the jog dial, then press the Setting Description (ENTER) button. The selected setting is displayed. (Initialize Settings) Resets the current settings (except date and If you select (Basic Setup), select the desired setting using the time) to their default settings as shown below. -
Page 9: Basic Setup Menu
Setting Description Setting Description (Film Setting) Allows you to quickly switch film profiles to best LCD Brightness Changes brightness of the LCD monitor. suit the shooting subject or environment. For Also shows the firmware version. each film profile (Film1, Film2, or Film3), you can Language Selects the language for messages and menus assign Edge Enhance, Saturation, Tint, Contrast,... -
Page 10: Safety Instructions
❏ To prevent fire or electric shock, do not expose this product or its For more information about the camera, see the Epson R-D1s User’s options to rain or moisture. - Page 11 ❏ Charge the battery before using it. The battery is not fully charged ❏ Use only an Epson lithium-ion battery for this camera according to when you purchase it. the directions in the user documentation.
-
Page 12: Important Safety Instructions
❏ Use only the Epson battery charger provided to charge the Epson For the Netherlands users: lithium-ion battery Model EU-85. Never attempt to charge other Do not dispose of the battery with ordinary refuse. Instead, dispose of types of batteries in this charger as they may explode, leak, it as small chemical waste in accordance with local laws, and the overheat, or cause personal injury. - Page 13 ❏ If you use an extension cord with this product, make sure the total ❏ Do not remove the memory card while the power switch is on. amperage of all devices plugged into the extension cord does not exceed the cord’s ampere rating. When using the LCD ❏...
-
Page 14: Fcc Compliance Statement For United States Users
For United Kingdom, Hong Kong, and Singapore FCC Compliance Statement for users United States Users Replace fuses only with fuses of the correct size and rating. This equipment has been tested and found to comply with the limits For United Kingdom users for a Class B digital device, pursuant to Part 15 of the FCC Rules. - Page 15 DECLARATION of CONFORMITY According to 47CFR, Part 2 and 15 for Class B Personal Computers and Peripherals; and/or CPU Boards and Power Supplies used with Class B Personal Computers: EPSON AMERICA, INC. Located at: MS 3-13 3840 Kilroy Airport Way...
- Page 16 Seiko Epson Corporation. The information contained herein is designed only for use with this Epson product. Epson is not responsible for any use of this information as applied to other products. Trademarks EPSON is a registered trademark of Seiko Epson Corporation.
Need help?
Do you have a question about the R-D1s and is the answer not in the manual?
Questions and answers