Table of Contents
Advertisement
Advertisement
Table of Contents

Related Manuals for Electrolux EDC 3250


Summary of Contents for Electrolux EDC 3250
-
Page 2: Table Of Contents
Contents For the user For the installer Safety information Technical data – Installation and servicing Unpacking the machine – Child safety – Damages – During use – Accessories supplied – At the end of the dryer’s life – Optional extra accessories Description of the appliance –... -
Page 3: Safety Information
Safety information Before installing and first using the tumble dryer, read this instruction booklet carefully, including its hints and warnings. To avoid unnecessary mistakes and accidents, it is important to ensure that all people using the dryer are thoroughly familiar with its operation and safety features. Save these instructions and make sure they remain with the tumble dryer if it is moved or sold, so that everyone using it through its life can be properly informed on appliance use and safety. -
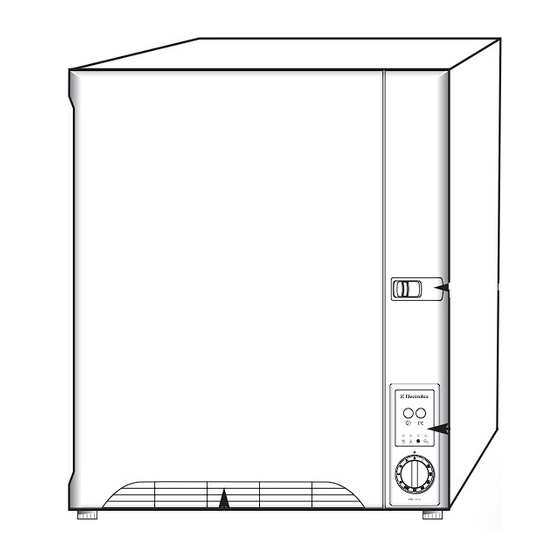
Page 4: Components View
Description of the appliance Door Latch (push the knob to the right to open) Avoid opening the door while a program is in progress. Space for programme chart (Self-adhesive label) Control panel Warm air discharge Air ducts - These should not be obstructed. Condenser This is built into the door and needs to be cleaned at regular intervals. - Page 5 Description of the appliance 13. Connector for drain hose There is a drain hose as an extra accessory for you who want and can connect the tumble dryer directly to a drain outlet. Fix the hose to the connector (13) after releasing the hose clip and removing the plug.
-
Page 6: Using Your Appliance
Using your appliance Before using the dryer for the first time Capacity (dry items) Dampen some clean pieces of unwanted cloth and dry Cotton max. 3,4 kg them for about 15 minutes the very first time, to make Synthetics max. 1,5 kg sure that there is no dust or dirt in the dryer. -
Page 7: General Information
General washing and drying information Sorting Starched items Always sort loads for drying according to the type of fabric Laundry which has been starched can also be dried in a (check the care labels) and how much you want to dry them. tumble dryer. -
Page 8: Program Chart
Program chart The programs can be divided into two types: automatic programs and timed programs. The automatic programs (A – D) switch off the tumble dryer when the load has been dried to the extent required. The timed programs are for special requirements or finishing drying individual items. Using these, the dryer will continue to dry through the time you have set, unless the load is dry before that time has elapsed. -
Page 9: The Indicator Lights
The indicator lights The indicator lights on the panel have three possible statuses: fixed light, flashing slowly and flashing rapidly. The table below explains the meanings of the various lights or combinations of lights. Fixed light Drying stage in progress. Cool-down stage in progress. -
Page 10: Maintenance
Maintenance The filters For your tumble dryer to function correctly, the filters need to be cleaned before or after every load dried. To clean them: 1. Open the door. 2. Open the coarse filter upwards (Fig. A). 3. Brush the fluff off the fluff filter, which is under the coarse filter (Fig. -
Page 11: The Filters
Maintenance Emptying the water tank If you have connected the tumble dryer directly to a waste pipe with the accessory hose, you can ignore this section. But note that even if the water tank has been bypassed in this way, the indicator light warning that the tank is full will flash intermittently during the anti-crease stage. -
Page 12: If The Machine Is Not Working
If the machine is not working Before calling out an engineer, please check through the details below because some faults can be rectified easily without the need to call out an engineer. If service is called to resolve a problem listed below or to repair a fault caused by incorrect installation or mis-use, there is a risk that you will be responsible for the cost. -
Page 13: Service
Service Service and Spare Parts You can note these details here: TYPE: ............Before calling service, use the trouble shooting table «If the machine is not working» to try to attend to the fault MOD: ............yourself. PROD.NO: ............Servicing and repairs must be carried out by a service company authorised by the supplier. -
Page 14: Unpacking The Machine
Unpacking the machine Damages If the dryer has been damaged during transport, you should immediately notify the company responsible for delivering it. Check that the dryer is undamaged. If you discover any damage, faults or that anything is missing, you should notify the dealer immediately. -
Page 15: Installation
Installation Positioning You can install this dryer in a number of different ways. We will show you the most suitable of these. Whichever way you install it, here are some points to bear in mind: Always ensure that the dryer is level for optimum functioning. -
Page 16: Wall Mounting
Installation Wall mounting Different wall materials require different types of mounting If you are installing the dryer between wall-mounted cup- hardware. Purchase mounting hardware suited to the walls boards, you should use the wall mounting console. If the in your home. Use a minimum of 3 suitable fasteners to adjacent cupboards are more than 370 mm deep, don’t attach your mounting console to the wall. -
Page 17: Rukowodstwo Po \Kspluatacii
Technical changes possible Prawo na izmeneniq sohranqetsq...