Table of Contents
Advertisement
Triple-Trunking
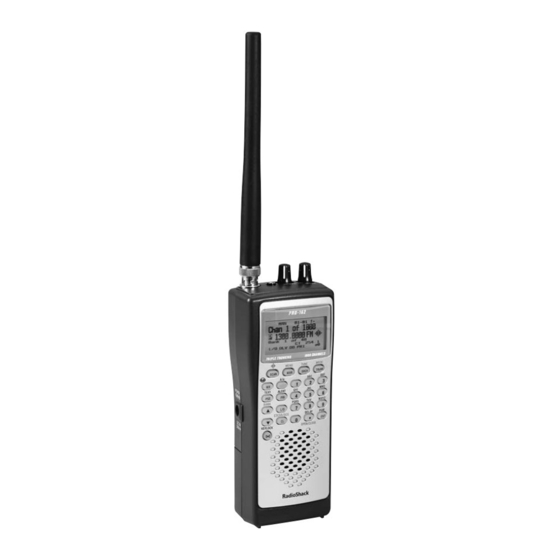
Handheld Radio Scanner
Thank you for purchasing your
RadioShack 1000-Channel Triple-
Trunking Handheld Radio Scanner from
RadioShack.
Your handheld scanner is one of a new
generation of scanners designed to
track Motorola® Type I, Type II, hybrid
analog systems, (such as Smartnet® and
Privacy Plus®) plus M/A-COM EDACS®
and EF Johnson LTR. Those systems are
extensively used in many 800 MHz, 900
MHz, and UHF communication systems.
www.radioshack.com
What's Included
Scanner
Antenna
Belt Clip and 2 Screws
Preprogrammed
Frequency List
User's Guide
Quick Start Guide
20-162
Advertisement
Table of Contents

Related Manuals for Radio Shack 20-162


Summary of Contents for Radio Shack 20-162
- Page 1 20-162 Triple-Trunking Handheld Radio Scanner Thank you for purchasing your RadioShack 1000-Channel Triple- Trunking Handheld Radio Scanner from RadioShack. Your handheld scanner is one of a new generation of scanners designed to track Motorola® Type I, Type II, hybrid analog systems, (such as Smartnet® and Privacy Plus®) plus M/A-COM EDACS®...
-
Page 2: Table Of Contents
ontents Scanner Setup ............6 Scanner Features ..............6 Display Features..............8 Connecting the Antenna ..........10 Attaching the Belt Clip........... 10 Powering Your Scanner ..........10 Batteries ..............10 Battery Notes............12 External Power............12 Turning on the Scanner ..........13 Connecting Headphones.......... - Page 3 Contents Signal Stalker I ............... 27 Using Signal Stalker I..........27 Setting the Signal Stalker I Options ....... 28 Signal Stalker I Options..........28 Log Channels ............. 29 Signal Stalker I Band Meter........30 Scanning..............31 Scanning Stored Channels..........31 Manually Selecting a Channel........
- Page 4 ontents Trunk Scanning ............46 Trunk Operation.............. 46 Programming Trunked Frequencies ....... 46 Using Trunk Scanning Scan Delay ......49 Skipping a Trunked Bank......... 49 Talk Group IDs ..............49 Finding Talk Group IDs ..........49 Storing Talk Group IDs..........50 Talk Group ID Text Tags ..........
- Page 5 Contents EDACS Talk Groups ............66 Selecting the EDACS Talk Group ID Format ..66 EDACS Talk Group ID Range Search ...... 67 Advanced Programming ..........68 Transferring Data To or From another Scanner or PC ..68 Cloning Your Scanner ..........68 Wired Programming ..........
-
Page 6: Scanner Setup
Scanner Setup Scanner Setup Scanner Features SCAN Scan the stored channels; scan an active ID while trunking. Press and hold to turn Signal Stalker on and off. MAN (Manual) MENU Manually enter a channel. Press after FUNC to enter Menu Mode. - Page 7 Scanner Setup Start weather search. Press and hold to activate Skywarn. PSE (Pause) TEXT Stop and resume search or scan. Change from Programming Mode to enter Text Tag Mode. BANK Select options during programming; change scan or search direction; change the ID location number while trunking.
-
Page 8: Display Features
Scanner Setup Display Features Channel Text Tag Frequency Modulation Or Trunking System Police FM, AM - Conventional Fire MO - Motorola Medical ED - EDACS Custom Priority LT - LTR Channel Etc. P GM 0 0 -0 1 T + &... - Page 9 Scanner Setup Operation Mode PGM - Programming MAN - Manual SCAN - Scan SRCH - Search Bank Number SVC - Service Search TUNE - Fine Tune SIG-S - Signal Stalker Channel Number WX - Weather Scan PAUSE displayed during Pause Mode Text Input Mode Trunking Mode - Upper case letter...
-
Page 10: Connecting The Antenna
Scanner Setup Connecting the Antenna Attach the supplied antenna to the scanner by aligning the slots around its base with the tabs on the scanner, and then slide into place. When using an external antenna, always connect with 50-ohm, RG-58, or RG-8, coaxial cable. - Page 11 Scanner Setup 3. Insert two AA batteries (not included) into the battery compartment and two AA batteries into the battery compartment cover, matching the polarity symbols (+ and -) marked inside. Battery Switch 4. Replace the cover. Warning: Only set the Battery Switch to Ni-MH for use with nickel metal hydride (Ni-MH) rechargeable batteries.
-
Page 12: Battery Notes
Scanner Setup Battery Notes & • When battery power is low, flashes and the scanner beeps every 15 seconds. When battery power is depleted, the scanner turns itself off. • Rechargeable batteries last longer and deliver more power if you let them fully discharge once a month. -
Page 13: Turning On The Scanner
Scanner Setup jack. You can use an “Adaptaplug C” for AC adapters. Using an adapter that does not meet these specifications could damage the scanner or the adapter. To use an external power source: 1. Always connect the adapter (not supplied) to the scanner first. -
Page 14: Connecting Headphones
Scanner Setup Connecting Headphones For private listening, you can plug headphones (not included) into the headphone jack on top of your scanner. This automatically disconnects the internal speaker. Note that the sound is not in stereo. Listening Safely To protect your hearing, follow these earphone or headphones guidelines: •... -
Page 15: Service Banks
Scanner Setup Besides searching within a selected frequency range, you can also search your scanner’s service banks. Service banks are preset groups of frequencies categorized by type of service. For example, many amateur radio frequencies are located in the Ham service bank. When you search and find a desired frequency, you can store it into a programmable memory location called a channel. -
Page 16: Manual Mode
Scanner Setup Manual Mode To enter Manual Mode from any other mode, press MAN/MENU. Programming Frequencies into Channels Before the scanner can begin to scan, you must program a frequency into at least one channel. To locate and store specific frequencies into channels for later use: 1. -
Page 17: Entering Channel Text Tags
Scanner Setup “Erase Frequency” will appear; press ENT/PGM to erase. • The scanner automatically rounds the entered number to the nearest valid frequency. For example, if you enter 151.473 (MHz), your scanner accepts it as 151.475. • After a transmission, the scanner automatically pauses for 2 seconds on this channel before proceeding to the next active transmission. -
Page 18: Entering Bank Text Tags
Scanner Setup 5. Enter up to 16 letters by repeatedly pressing the number keys. Press to move the cursor to the right or the left. Press [A/a] to choose the input mode: upper case letters, lower case letters, or numbers. (See “Appendix A: Inputting Text on p. -
Page 19: Copying Or Moving A Frequency
Scanner Setup 2. Press FUNC + to select the bank where you want to erase all the frequencies. 3. Press FUNC + ENT/PGM. “Edit Bank Tag or Erase All Freq.” appears. 4. Press FUNC + CL. 5. Press 1 to erase all frequencies in the selected bank. - Page 20 Scanner Setup 4. Press to select the bank where you want to copy or move the frequency. 5. Press ENT/PGM. The smallest empty channel number and 0.0000 appears. If there is no empty channel, the scanner automatically selects the first channel of the bank. 6.
-
Page 21: Searching
Searching Searching Use the search function to find active frequencies. While doing a chain, fine tune, or service bank search, press •/DELAY to turn the delay on or off. While doing a chain, fine tune, or service bank search, set the scanner to skip data signals (such as fax or modem signals) if you want to search only for audio (voice) signals (see “Skipping Data Signals”... -
Page 22: Storing Frequencies Found During A Search
Searching 3. Press to search down or to search up. 4. When the scanner stops on a transmission, quickly press PSE to stop searching and listen to the transmission. SR6 PAUSE appears. To step through the frequencies during search Pause Mode, press 5. -
Page 23: Programming Search Bank Text Tags
Searching 3. Press to select the bank number. Press ENT/PGM. 4. Using the number keys and •, enter the lower limit frequency, and then press ENT/PGM. 5. Using the number keys and •, enter the upper limit frequency, and then press ENT/PGM. 6. -
Page 24: Fine Tune
Searching choose the input mode: upper case letters, lower case letters, or numbers. (See “Appendix A: Inputting Text” on p. 79.) 6. Press ENT/PGM to store the text tag. 7. Press MAN/MENU to exit Programming Mode, or press CL to go back to a previous menu. Fine Tune To search up or down from the currently displayed frequency using fine tune:... -
Page 25: Service Bank Search
Searching Service Bank Search The scanner is preprogrammed with all the frequencies allocated to Marine, CB band, FRS/ GMRS/MURS, Police (Fire/Emergency), Aircraft and Ham band transmissions. To search the service banks: 1. Press SRCH. The current service bank appears and the scanner starts searching. To select a different service bank, press SRCH again. - Page 26 Searching Note: You cannot skip frequencies during weather scan. To skip a frequency, press L/O when the scanner stops on the frequency during a search. The scanner stores the skipped frequency in memory and automatically resumes the search. To clear a single frequency from skip memory: 1.
-
Page 27: Search Speeds
Searching • If you select more than 200 frequencies to skip, “L/O List Full!” appears. Search Speeds The scanner has two search speeds: Normal search at 90 steps/second and Hypersearch at 270 steps/second. Hypersearch applies only to the 5 kHz step bands (25–54 MHz, 137–174 MHz, and 216–224.9950 MHz). -
Page 28: Setting The Signal Stalker I Options
Searching To turn off Signal Stalker I and turn on normal scanning, press and hold SCAN/ . The icon disappears. Note: Signal Stalker I doesn’t run in weather search, program search range, or Programming Mode. Setting the Signal Stalker I Options 1. -
Page 29: Log Channels
Searching Pager Screen: Set to On if you want to • ignore common pager frequencies. Only Mode: Set to On to turn off normal • scanning while Signal Stalker I runs. Set to Off to continue normal scanning while Signal Stalker I runs in the background. -
Page 30: Signal Stalker I Band Meter
Searching memory is deleted and the new frequency is stored in that channel. You can scan the log channels along with the normal 1000 channels. • The 10 log channels are located after Bank 19 Channel 49 and you can manually access them by selecting channels as Bank 20 Channel 00, Bank 20 Channel 01, ... -
Page 31: Scanning
Scanning Scanning Scanning Stored Channels To begin scanning channels, press SCAN. The scanner scans through all non-locked channels in the activated banks (see “Locking Out Channels” on p. 37 and “Turning Banks On and Off” on p. 35). When the scanner finds a transmission, it stops on it. When the transmission ends, the scanner resumes scanning. -
Page 32: Weather Scan
Scanning want to miss any details, even though there might be periods of silence. To directly access a channel: 1. Press MAN to stop scanning. 2. Enter the bank and channel number and press MAN. The selected channel appears. To stop at a channel while scanning: 1. -
Page 33: About Skywarn
Scanning Activate Skywarn by pressing and holding WX/ If no frequency is programmed in the last channel, “Skywarn Freq. is not stored.” appears and the scanner sounds an error tone. The scanner has 10 channels for Skywarn (Bank 19 channels 40-49). Press to select other Skywarn channels. - Page 34 Scanning • Tornadoes • High water areas • Downed power lines • Other emergency conditions that affect life or property Note: If you tune to a Skywarn frequency when the Skywarn net is not active, you may hear nothing, or you may hear amateur radio operators talking on a local repeater system.
-
Page 35: Settings
Settings Settings Setting Delay Sometimes a user might pause before replying to a transmission. To avoid missing a reply on a specific channel, the scanner automatically programs a 2-second delay into any channel or frequency. Depending on the operation mode, follow one of these steps to turn the delay on or off. -
Page 36: Programming Scan Bank Lists
Settings 4. Press MAN/MENU or CL to exit from Menu Mode. Notes: • The scanner scans all the channels within the displayed banks that are not locked out. • You can manually select any channel within a bank, even if that bank is turned off. •... -
Page 37: Locking Out Channels
Settings 7. Select Edit Text and press ENT/PGM. 8. Input text and press ENT/PGM. 9. Press MAN/MENU to exit from the menu. To load a scan bank list: 1. Press FUNC + MAN/MENU. 2. Select Scan List and press ENT/PGM. 3. -
Page 38: Skipping Data Signals
Settings Skipping Data Signals The data skip feature prevents the scanner from stopping on channels that consist of non- modulated or data signals (such as fax or modem transmissions) during a search or scan. When the radio receives a data signal and data skip is selected, the signal is ignored. -
Page 39: Using The Display Backlight
Settings 1. To turn on keylock, hold down /KEYLOCK until appears. 2. To turn off keylock, hold down /KEYLOCK until disappears. Using the Display Backlight To turn on the display light for easy viewing at night, press .The display lights for 15 seconds. Setting the Auto Backlight Display You can set the scanner so the backlight turns on for about 5 seconds when the scanner receives... -
Page 40: Setting The Keytone
Settings Setting the Keytone Each time you press any of the scanner’s keys, the scanner sounds a tone. To turn the scanner’s key tone on or off: 1. Press FUNC + MAN/MENU. 2. Select Key Tone and press ENT/PGM. 3. Select On or Off and press ENT/PGM. 4. -
Page 41: Setting Priority
Settings Notes: • When CTCSS/DCS is on in Scan Mode or Manual Mode, the scanner works according to the channel settings. • When CTCSS/DCS is on in Chain Search, Fine Tune, or Signal Stalker I, the scanner searches for CTCSS/DCS codes. •... -
Page 42: Weather Priority
Settings 3. Repeat Steps 1 and 2 for the channel in each bank that you want to program as a priority channel. To review all priority channels (in ascending order only), repeatedly press PRI to see the numbers of the priority channels. To turn on the priority feature, press PRI during scanning. -
Page 43: Receiving Nwr-Same And Weather Alert Signals
Settings From Scan Mode or Search Mode, Press FUNC + PRI. “WX Priority Scan Turn On” or “WX Priority Scan Turn Off” appears. Receiving NWR-SAME and Weather Alert Signals The National Oceanic and Aerospace Administration (NOAA) broadcasts alerts that include digitally encoded data. The severity of the alert is identified using Specific Area Message Encding (SAME). -
Page 44: Programming Fips
Settings Watch level, then Warning level, and “WX ALERT TEST” flashes. Each alert code appears as its tone sounds. Press any key to end the test sequence. Programming Alerts for a Specific County To specify a county, SAME uses a standard established by the US Census bureau, called FIPS. - Page 45 Settings 2. Press CL to cancel or ENT/PGM to delete. “------” appears. To reset the scanner to sound an alert for all areas: 1. From Scan or Manual Mode, press WX/ 2. Press FUNC + ENT/PGM to go to the Programming FIPS Code menu.
-
Page 46: Trunk Scanning
Trunk Scanning Trunk Scanning The scanner tracks transmissions that use the Motorola Type I, Type II, hybrid, EDACS, and LTR analog trunking systems. Simultaneous Trunking The scanner allows you to track up to 20 systems at a time. You can trunk scan or search and scan conventional frequencies at the same time. - Page 47 Trunk Scanning Notes: • You can scan only one type of trunked frequency, either EDACS (GE/Ericsson), Motorola, LTR (EF Johnson), or EDCAS SCAT in a bank at one time. You can, however, mix conventional channels and frequencies in a bank. •...
- Page 48 Trunk Scanning 5. Repeatedly press FUNC + TRUNK/MODE to select MOT (Motorola), EDCS, LT, or EDCS SCAT. This sets the talk group ID decoding method to be used for the bank. BNKO9 MOT mode MT ID–O: ––––– ID List: O 5.
-
Page 49: Using Trunk Scanning Scan Delay
Trunk Scanning • You may replace any frequency by selecting the bank and channel, pressing ENT/PGM and entering the new frequency. • If you make an error in the entry process, repeatedly press CL to erase the incorrect data. Using Trunk Scanning Scan Delay Sometimes a user might pause before replying to a transmission. -
Page 50: Storing Talk Group Ids
Trunk Scanning 2. Press TRUNK to go to the Set Open/Close menu. 3. Press to move the cursor up or down. Press the number key that corresponds to the desired bank, choosing + for Open Mode or – for Close Mode. 4. -
Page 51: Pausing On An Active Talk Group Id
Trunk Scanning ID. You can confirm the ID code while the scanner shows the text when the received signal is a voice channel. 1. Press FUNC + PSE/TEXT while the scanner is receiving the voice channel and indicating the text name. The ID code appears as MT ID: XXXXXX, etc. -
Page 52: Unlocking Locked-Out Talk Group Ids
Trunk Scanning assigned Talk Group IDs just like other users, you may want to lock out reception of these signals. The scanner allows that you lock out up to 50 Talk Group IDs for each trunk scanning bank. If you use all the banks as trunking banks, you can lock out up to 1000 IDs at one time. -
Page 53: Manually Programming Talk Group Ids
Trunk Scanning 5. If you want to unlock all lockouts at the same time, select Unlock All after Step 2. Manually Programming Talk Group IDs 1. Press ENT/PGM then TRUNK/MODE to enter the ID Programming Mode. 2. Press FUNC + to select the desired bank. -
Page 54: Motorola
Trunk Scanning See the following subsections for specific requirements for entering Motorola, EDACS and LTR talk group IDs. Motorola To enter a Motorola Type II Talk Group ID: 1. Enter the ID you want to store by using the keypad. 2. -
Page 55: Ltr
Trunk Scanning Note: You cannot use partial talk groups in Decimal Mode. (See “Selecting the EDACS Talk Group ID Format” on p. 66.) You can program a specific talk group such as 01- 011 into the scan list memory. In AFS Mode, you can program the talk groups for an entire agency by pressing corresponding keys. -
Page 56: Clearing Talk Group Ids
Trunk Scanning To enter an LTR ID: 1. Enter the area code. 2. Enter the home repeater number. 3. Enter the Use ID you want to store. 4. Press ENT/PGM. Clearing Talk Group IDs 1. Press ENT/PGM then TRUNK/MODE to enter the ID Programming Mode. -
Page 57: Turning A Talk Group Id List On Or Off
Trunk Scanning Once talk group IDs are stored in list, you can scan them like you scan conventional frequencies. Turning a Talk Group ID List On or Off 1. Press ENT/PGM then TRUNK/MODE to enter the ID Programming Mode. 2. Repeatedly press TRUNK to select the desired ID List. -
Page 58: Motorola Trunking Systems
Trunk Scanning To turn priority ID scanning on or off, press PRI during ID while scanning in Close Mode. “PRI” appears when priority scanning is turned on. Note: Priority ID scanning does not operate when priority IDs are locked out. See “Locking Out Talk Group IDs”... -
Page 59: Setting The Base Frequency, Offset Channel, And Spacing For 800 Mhz Custom
Trunk Scanning Setting the Base Frequency, Offset Channel, and Spacing for 800 MHz Custom To properly track Motorola 800 MHz Custom trunked systems, you must enter the base frequency, offset channel and spacing for each system. 1. Press FUNC + MAN/MENU to enter the Menu Mode. -
Page 60: Motorola Uhf / Vhf
Trunk Scanning Notes: • Usually, the settings for base frequency, offset channel, and spacing are common between systems, therefore these settings are applied to all Motorola 800MHz custom banks. Motorola UHF / VHF You can program the scanner to receive transmissions in the UHF band (406-512 MHz) / VHF band (136-174MHz) of the Motorola trunking system. - Page 61 Trunk Scanning Base Freq Notes: • Base frequency consists of Lower frequency and Upper frequency. Upper frequency should input the value subtracted from the next lower frequency by 1 step. For example, if you get the following information from radioreference.com, you can input the Lower and Upper Frequency into the Base Frequency.
-
Page 62: Type I And Hybrid Trunked Systems
Trunk Scanning • For Motorola UHF system use 12.5kHz spacing between 12.5kHz – 100kHz. • For Motorola VHF system use 5kHz spacing between 5kHz – 100kHz. 10. Press CL to return to the Custom Range menu and repeat steps 5-9 for the other ranges. Type I and Hybrid Trunked Systems Your scanner is preset to scan Type II system IDs. -
Page 63: Selecting A Preset Fleet Map
Trunk Scanning preset fleet maps to choose from, and it is best to start with these when setting up a Type I or hybrid trunk scanning bank. If none of the following preset fleet maps allow you to follow complete conversations, then you probably need to program your own fleet map (see “Programming a Custom Fleet Map”... -
Page 64: Setting Control Channel Only Mode
Trunk Scanning 4. Select the block and press ENT/PGM. 5. Select the size code supplied with the Type I system information and press ENT/PGM. 6. Repeat steps 4 and 5 for each block. 7. Make sure each entry is correct. Notes: •... -
Page 65: Setting The Status Bit Feature (S-Bit)
Trunk Scanning Setting the Status Bit Feature (S-Bit) To control how the scanner interprets and displays talk group IDs, set status bits (also called S-Bits), to Yes or Ignore. The last four bits of a Motorola Type II talk group ID (a binary 16-bit code) are the status bits. -
Page 66: Setting The Disconnect Tone Detect Function
Trunk Scanning Setting the Disconnect Tone Detect Function When the Motorola disconnect tone detect function is disabled, the scanner looks for squelch before returning to the control channel instead of waiting for the disconnect tone. Only in rare instances will you need to adjust the default settings. -
Page 67: Edacs Talk Group Id Range Search
Trunk Scanning You can use this feature to translate decimal talk group lists to the much more powerful AFS format. Become familiar with AFS partial entry, and your scanning will become far more flexible and efficient. EDACS Talk Group ID Range Search When your scanner searches EDACS talk group IDs, the scanner can search within a range you set for agency or fleet listings. -
Page 68: Advanced Programming
Advanced Programming Advanced Programming Transferring Data To or From another Scanner or PC You can clone your scanner by transferring the programmed data to or from another PRO-162 scanner using a connecting cable. You can also upload or download programmed data from a PC through wired programming. -
Page 69: Ctcss/Dcs
Advanced Programming RadioShack or www.radioshack.com). 1. Make sure your scanner is turned off. 2. Connect the interface cable to your computer and then connect the other end of the cable to the PC/IF jack on the side of the scanner. 3. -
Page 70: Programming Ctcss/Dcs Codes
Advanced Programming interference where there are several stations with output frequencies that interfere with each other. A scanner equipped with CTCSS and DCS allows squelch to open only when the tone you have programmed with a specific frequency is received along with a transmission. -
Page 71: Ctcss Frequencies (Hz)
Advanced Programming CTCSS Frequencies (Hz) 67.0 69.3 71.9 74.4 77.0 79.7 82.5 85.4 88.5 91.5 94.8 97.4 100.0 103.5 107.2 110.9 114.8 118.8 123.0 127.3 131.8 136.5 141.3 146.2 151.4 156.7 159.8 162.2 165.5 167.9 171.3 173.8 177.3 179.9 183.5 186.2 189.9 192.8... -
Page 72: Additional Information
Additional Information Additional Information FCC Notice Your scanner might cause radio or TV interference even when it is operating properly. To determine whether your scanner is causing the interference, turn off your scanner. If the interference goes away, your scanner is causing it. Try the following methods to eliminate the interference: •... -
Page 73: Care
Additional Information According to the Electronic Communications Privacy Act (ECPA), as amended, you are subject to fines and possible imprisonment for intentionally listening to, using, or divulging the contents of such a transmission unless you have the consent of a party to the communication (unless such activity is otherwise illegal). - Page 74 Additional Information Specifications Frequency Coverage 25.0000-54.0000 (in 5 kHz steps) 108.0000-136.9875 (in 12.5 kHz steps) 137.0000-174.0000 (in 5 kHz steps) 216.0000-224.9950 (in 5 kHz steps) 225.0000-399.9875 (in 12.5 kHz steps) 400.0000-512.0000 (in 6.25 kHz steps) 764.0000-775.9875 (in 12.5 kHz steps) 794.0000-823.9875 (in 12.5 kHz steps) 849.0125-868.9875 (in 12.5 kHz steps) 894.0125-956.0000 (in 12.5 kHz steps)
- Page 75 Additional Information IF Frequencies ..380.75 MHz, 265.55MHz, 10.85 MHz, 450 kHz IF Rejection at 162.40 MHz ......80 dB IF Rejection at 453.25 MHz ......44 dB Operating Temperature Normal ...... .-4° to 140°F (-20° to 60°C) Signal Stalker I... 14° to 140°F (-10° to 60°C) Scan Speed......
-
Page 76: Troubleshooting
Additional Information Troubleshooting Problem Cause Solution Scanner is on but SQUELCH is not Adjust SQUELCH. will not scan. adjusted correctly. Only one channel Store frequencies into or no channels are more than one chan- stored. nel. Scanner won’t Scanner is not Recharge the re- work at all. - Page 77 Additional Information Problem Cause Solution Scanner won’t The transmission Scan another track a trunked might not use a transmission. system. system that can be tracked by your scanner. The data See “Programming frequency is Trunked Frequencies” missing. on p. 46 and “Scanner is not acquiring a data channel”...
-
Page 78: Resetting Your Scanner
Additional Information Resetting your scanner If the scanner’s display locks up or stops operating properly, you might need to reset the scanner. Caution: This procedure clears all the information you have stored in the scanner. Before you reset the scanner, try turning it off and on again to see if it begins working properly. -
Page 79: Appendix A: Inputting Text
Additional Information Appendix A: Inputting Text Use the number keypad on the scanner to enter text according to the alphabet printed at each number key. Press a number key until the scanner displays the correct letter. Press to move the cursor to the right or the left. Press [A/a] to choose the input mode: Upper case letters, lower case letters, or numbers. -
Page 80: Appendix B: Fleet Maps
Additional Information Appendix B: Fleet Maps Preset Fleet Maps Block Size Code (S12) (S12) (S12) (S12) (S12) Block Size Code (S12) (S12) (S12) User Defined Fleet Maps When a Type I system is designed, the address information for all the IDs are divided into 8 equal sized blocks. -
Page 81: Fleet Map Size Codes
Additional Information For example, a size code of “4” has one Fleet, which is divided into 16 separate Subfleets, and it has a total of 512 individual IDs. When a block is assigned a size code, the Fleet or Fleets created within the block are assigned a Type I ID. -
Page 82: Size Code Restrictions
Additional Information Size Code Restrictions If you select size code 12, 13, or 14, these restrictions apply: • Size code 12 can only be assigned to Blocks 0, 2, 4, or 6. • Size code 13 can only be assigned to Blocks 0 and 4. -
Page 83: Index
Index Index Advanced Programming ............68 Cloning..................68 CTCSS/DCS Codes ............69, 70 Data Transfer (PC to Scanner)..........68 Data Transfer (Scanner to Scanner)......... 68 Wired ..................68 Antenna................10, 76 Impedance ................75 Backlight................39 Banks Bank Text Tags ................18 Channel Storage Banks About.................. - Page 84 Index Storage Banks..............15, 35 Contrast ................39 CTCSS/DCS..............40, 69 CTCSS Frequency Table............71 Data Signals, Skipping ..........21, 27, 38 DCS Codes (Octal) Table............71 Delay ................. 21, 35, 49 Digital Weather Alert ............43 Display Features..............8 EDACS ID Format ..................
- Page 85 Index Keylock.................. 38 Keytone ................. 40 LCD Contrast ................ 39 Legal Scanning ..............72 Log Channels ................ 29 LTR................... 47, 55 Manual Mode ................ 16 Manual Selection..............31 Motorola Features Base Frequency, Offset Channel, and Spacing...... 59 Control Channel ............... 64 Disconnect Tone Detect ............
- Page 86 Index Scanning................31 See also Trunk Scanning Legal ..................72 Manual Channel................ 31 Skipping Data Signals .............. 38 Skipping Trunked Bank ............49 Stored Channels ............... 31 Troubleshooting ............... 76 Trunking..................46 Weather..................32 Searching Chain ..................21 EDACS Talk Group ID Range ..........67 Fine Tune...................
- Page 87 Index Talk Groups Clearing..................56 EDACS................. 54, 66 Finding ..................49 ID Lists ..................56 Locking Out ................51 LTR ..................... 55 Motorola..................54 Priority ..................57 Programming ................53 Scanning..................57 Storing ..................50 Text Tags ............. 17, 18, 23, 50 Inputting Text................
- Page 88 Motorola, Smartnet, and Privacy Plus are registered trademarks of Motorola Inc. EDACS is a registered trademark of MA-COM Inc. LTR is a registered trademark of EF Johnson. ©2008. RadioShack Corporation. All rights reserved. RadioShack and RadioShack.com are trademarks used by RadioShack Corporation. 20-162 Printed in China UBZZ01350ZZ(0) 02A08...
Need help?
Do you have a question about the 20-162 and is the answer not in the manual?
Questions and answers