Table of Contents
Advertisement
Quick Links
GE Monogram ®
Installation
Instructions
Stainless Steel
Professional
Outdoor
Cooking
Centers
48" Natural g'a,s mode£:
ZGG48N42
ZGG48N3
I
ZGG48N40
ZGG48N30
48" Liquid Ih'@a)_e model, s:
ZGG48L42
ZGG48L31
ZGG48L40
ZGG48I_30
36" Natural g'a,s modd, w
ZGG36N31
ZGG36N21
ZGG36N30
ZGG36N20
36" Liquid !'r@a_e
modd, w
ZGG36L31
ZGG36L21
ZGG36L30
ZGG36120
27" Natural g'a,s modd, s:
,
,c
_
c
ZG(,21N21
Z(,(,2
IN20
27 _'Liquid Propa_e
model, s:
,
,c
_
c
Z(,G21121
,
,c_
c
ZG(,2 zL20
Advertisement
Table of Contents

Related Manuals for GE ZGG27120


Summary of Contents for GE ZGG27120
- Page 1 GE Monogram ® Installation Instructions Stainless Steel Professional Outdoor Cooking Centers 48" Natural g'a,s mode£: ZGG48N42 ZGG48N3 ZGG48N40 ZGG48N30 48" Liquid Ih'@a)_e model, s: ZGG48L42 ZGG48L31 ZGG48L40 ZGG48I_30 36" Natural g'a,s modd, w ZGG36N31 ZGG36N21 ZGG36N30 ZGG36N20 36" Liquid !'r@a_e...
-
Page 2: Table Of Contents
Before wm begin--Read IMPORTANT: IMPORTANT: NOTE TO INSTALLER: NOTE TO CONSUMER: reference. ftlture If vou hme installation Answer Center Serxice at 800.626.2000, 7 days a week. If vou receix ed a damaged should VOtl FOR _r)UR Do not use cooking gasoline or other xapors... -
Page 3: For
ZGG36L20 2 grill bm'ners, 2 side bm'ners 27" Liquid Propane models: ZGG27121 2 grill burners, 1 rear infl'a red burner ZGG27120 2 grill burners Vinyl Covers: Tough vinyl, telt lined with elastic ZX48CVCY, fits all 48" models on cart. ZX48CV4Y, fits 48"... - Page 4 Product Dimensions & Clea__ances 16-1/4' 24-3 36" Wide Min. to Combustibles 3"Clearancefor Lid 13-7/8" 2" 27" Wide Models mbustibles 3" Clearance for Lid Models Min. to Combustibles 47-7/8" 48" Wide Models Design Inf_)rmation...
-
Page 5: Planning
Advance • Mon(_gram designed Planning an enclostlre. 27" Models: • In a non-combustible the grill drops ledge on each side is required fl'om the bottom. • Insulated grill to be installed enclosure. supported ledge on each side beneath • If using a backsplash electrical side. -
Page 6: Installations
• Open Step Open the grill • tie-downs • Remove Remove • Remove • Open P<_ckagi'ng check contents. LP Regulator Grill Grates Rotisserie rod, handle, models so equipped). Motor Spit Forks remove packaging. plastic lid and remove white on b/irners. side burner grate... - Page 7 All Outdoor on a cart designed size. Follow provided with the carts to install. Provide (;as supply Support • All models Built4n combustible hl, stallation • Combustible an insulated available specific type flw yore" model. Clearalces • Allow 3" at tile rear t0r lid clearance. •...
-
Page 8: The Grill
36" Modeh 12"Min. to Combustibles 3" Clearancefor Lid 9-1/8" 36" wide models: Installation 48" Modeh 12" Min. to Combustibles 3" Clearance for Lid 48" wide models: Installation • In a non-cond)ustible the grill drops fl'om its side flanges. support. Installation Install Electrical tisserie OnRightside... -
Page 9: Lp Gas Models
When storing nect the LP tank. Store in a well ventilated Provide Do not store Gas & Otltdoor E#ctrical LP GAS MODELS Suppl>, • Com_ect assembly • Tile Quick the user to pull on tile outer timbale coupling inserting then release To cmmect •... - Page 10 ELECTRICAL Models with rotisserie and cmmected grounded amp circuit The power with a three-prong mates with a standard wall receptacle shock hazard If the electrical meet the above mended that a licensed approved A complete pertormed es[Jo " • Do not use the grill tmtil all com_ections Leaks been leak tested.
- Page 11 Check Burner, s, Drip 7 ays and G' ates • During shipping reflectors all parts --- Anti-Fli Bracket Check to be position. Bm'ners flip brackets with (l()IV parts, such as burners may haxe mined. Check to be sure are in position. CORRECT BurnerRests Level o nto Anti-FlipBracket INCORRECT...
-
Page 12: Lighting The Grill
light tile grill if tile odor of gas is present. CAUTION: Lighting from tile grill as possible when lighting. the Grill • Open tile lid and remove b/irller cover. • Turn all knobs • Turn gas supply wdve, NOTE: When time (11"... -
Page 13: Adjusting The Burners
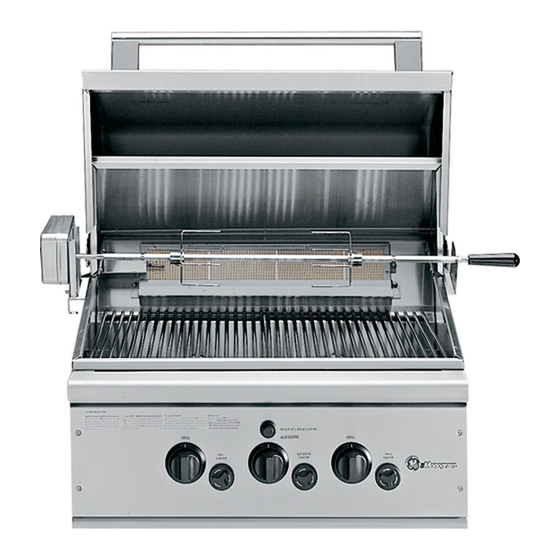
A_!jusm_ents vibration during gas supply Ac!justments Adjusting technician the Burners care should after installation. • Turn gas supply • Push and turn tile burner tile "LITE" be required • Flames should yellow tips, excessive burner. If any of these control to off and burner ports... - Page 14 27" Wide hzstaU • Slide the motor Rotis_serie the lett side and tighten ((/so _,q_i/,i,,,cl) • To use, place the motor, the right • Remove of the skewer Models: down into the channel thumb screw. pointed end of the skewer into mad the threaded end resting...
- Page 15 hi, stall Optional Access Doors ZXAI) CSS ZXSI)CSS • The opening doors should be 24-1/8" wide and 18-1/4" high. • Place the fl'ame into the opening and secure with screws on all sides. • Hang the doors on the hinges as shown. Install fiw double and single access Access...
- Page 16 Monogram ° Gene_l_ecrricCompany Lousy#re, KY40225 Note: While performing installations described in this book, safety glasses or goggles should be worn. 7;_obtain _peciflc i_ffinmalion com:erni_g ahr Monogwzm pwducl or service5 _zdl (_E Answer C_ozter _ ; consu*mn i_lfinm(zHo_l se*wi : al 800. 626.2000_a_ time, d( 0 m nigfiL F_n Mon_g*gzm k)_aI s_.*_6.,i_ your ar*,a, _ all 1-800-444-184 5.
Need help?
Do you have a question about the ZGG27120 and is the answer not in the manual?
Questions and answers