Table of Contents
Advertisement
Advertisement
Table of Contents

Related Manuals for Nexus AUTOPILOT


Summary of Contents for Nexus AUTOPILOT
- Page 1 Installation and Operation Manual...
- Page 2 This manual is written for: Nexus Autopilot instrument (Art. No. 20445-5), for version 1.12> Nexus Servo Unit A-1500 version (Art. No. 21035), for version 2.23> Nexus Servo Unit A-1510 version (Art. No. 21035-2), for version 2.23> Nexus Rudder Angle Transmitter (Art. No. 21036)
-
Page 3: Table Of Contents
Linear Drive .......................7 1.4.7 Solenoid Valve Drive (A-1500 only) ..............7 Registering this product ....................7 About this manual .....................7 2 First start .........................8 Initialising the instrument in a Nexus Network............8 Re-initialising the instrument ..................8 3 Operation .........................9 Instrument overview ....................9 3.1.1 Instrument display....................9 3.1.2... - Page 4 6 Maintenance........................23 Instrument maintenance..................23 Drive unit maintenance and inspection schedule............23 7 Fault finding........................24 General........................24 Symptom - Cause - Action ..................24 Nexus Network error messages with cause and remedy ..........27 Specifications.......................29 Technical Specifications..................29 8.1.1 Autopilot instrument ..................29 8.1.2 Servo Unit A-1500....................29 8.1.3...
- Page 5 12 Fine tuning ........................48 Operator Warning! An Autopilot is an aid to navigation only. It is not intended or designed to replace the man on watch. Always be in position to monitor the boat’s heading and to watch for navigational hazards. Be prepared to revert to manual steering...
-
Page 6: Introduction
GPS and wind transducers, Nexus Remote Control instrument and other Nexus digital and analog instruments. The Autopilot Servo Unit A-1500 is designed for sailing and power boats from 35 ft. (11 m.) to over 160 ft. (50 m.), depending on drive units used. Hydraulic drive units provide precise control with low power consumption. -
Page 7: Components
1.4 Components 1.4.1 Autopilot instrument Control and display of all Autopilot functions are provided by the Autopilot instrument. It is waterproof and may be mounted below or above deck. Multiple Autopilot instruments can be connected and the Autopilot may be activated by pressing the push-buttons of any instrument. -
Page 8: Linear Drive
On larger boats the main hydraulic steering may be fitted with solenoid valve controlled power steering. In this case the Autopilot does not need to be supplied with a pumpset since the Nexus Servo Unit output can be reconfigured with its board mounted DIP switch to provide drive for steering solenoids or relays having coil voltages of 12 or 24 VDC. -
Page 9: First Start
KEY on the next instrument! The Nexus Servo Unit or the Server automatically gives the first unit ID number 16, then 17 and so on. The order in which you press KEY, will be the same order as the instruments will be given a logical ID number on the Nexus Network, and the same order they will be addressed by the Remote Control instrument if used. -
Page 10: Operation
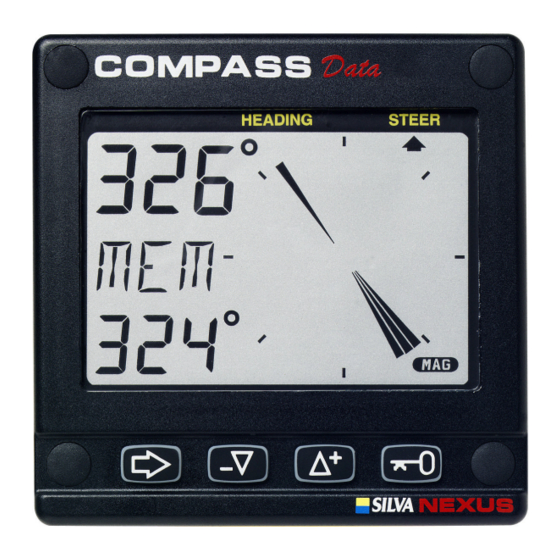
The display consists of two lines, a top-line with 24 mm (1”) digits and a lower-line with 13 mm (0.5”) digits. 3.1.2 Instrument pages and functions The Autopilot instrument has its functions divided into 4 pages. The page names are printed above the display: COMPASS, NAV (Navigation), WIND and PWR ST (Power steer) The selected function is indicated by the page-arrow at top of the dis- play. -
Page 11: How To Use The Push-Buttons
In edit mode a press on LEFT decreases a digit by one. 3.2.3 RIGHT When the Autopilot is activated, a short press on RIGHT increases the course by 1 , a long press increases the course by 10 In setup mode a press on RIGHT moves to the next setup function. - Page 12 To select between the 4 light levels [LOW], [MID], [MAX] and [OFF], press RIGHT. To lock the selected level, press KEY. The selected light level will be copied to all Nexus instruments con- nected to the Network. It is not possible to reduce or turn off the lighting...
-
Page 13: Function
FUNCTION 4 Function 4.1 Standby mode At power on the Autopilot starts is in standby mode and operates as a passive compass repeater. No page-arrow is shown at the top of the display. The current course is displayed on the top-line. -
Page 14: Automatic Steering By Navigator
Caution! Before activating [NAV] steering, make sure your present heading corresponds approximately with bearing to waypoint, and that the cross track error is less than two NM, because the Autopilot will turn the boat towards the track line first and then onto the heading set. - Page 15 FUNCTION To select wind steering, press MODE until the page-arrow appears un- der WIND, and Apparent Wind Angle [AWA] is flashing on the lower- line. Your present course is displayed on the top-line. To activate wind steering, press KEY when [AWA] is flashing. The present [AWA] now becomes the reference angle, and is displayed on the lower-line to the left, followed by a sign to describe wind from port or starboard.
-
Page 16: Power Steering
MODE and KEY together, within 10 minutes after turning off the auto- matic steering. This function is not available after 10 minutes after Autopilot off, or if the Autopilot has been turned off by pressing KEY for more than two... -
Page 17: Setup
5 Setup 5.1 Setup mode To get the most out of your Nexus product, it is important to carefully setup and calibrate your Network. The settings are stored in a non-volatile memory, which means they will remain in memory after you have turned off the power. To get an overview of your Network settings, we recommend that you note your settings. -
Page 18: Lighting Setup Group [Lit]
Autopilot functions activated. Always be in a position to monitor the boat’s heading and to watch for navigational hazards when calibrating the Autopilot. Be prepared to turn off the Autopilot by a long press on KEY, to revert to manual steering immediately if an undesired heading occurs. -
Page 19: P3, Counter Rudder [Crd]
SETUP 6 SETUP / CALIBRATION This setting is a combination of yaw dead-band (compass sensitivity) and compass damping. The minimum setting may only be used under calm sea conditions to avoid unnecessary rudder correction due to compass acceleration errors. Smaller boats and high speed boats, which are subject to more accel- eration in lighter seas will have to use higher settings. -
Page 20: P6, Adaptive Control [Adc]
The APC routine automatically sets: [RUD], [SEA], [CRD], [ATC] and [RRS]. The Autopilot will not function unless the boat pass the APC routine. The APC will automatically determine and correct how wires and pipes are connected. It will also learn how the boat reacts on different rudder commands and automatically calibrate itself. -
Page 21: Alarm Setup Group [A]
To confirm and restart the timer, press any push-button. If not con- firmed within 1 minute, the optional external alarm buzzer, if connected to the Nexus Server, will sound for 1 minute, to alert the rest of the crew. 5.4.4 A3, Cross Track Error alarm [XTA] Possible settings are [0.00] = OFF to [9.99]. -
Page 22: C0, Return [Ret]
If successful, the text [CAL C3] [Auto DEV] will be displayed. If not, an error messages can be displayed: [Err 15]: Make sure an Autopilot function is not activated and carry out the auto-deviation procedure again. [Err 16]: Auto-Deviation is not possible, because a NMEA compass is selected as compass for the Nexus Network. -
Page 23: C4, Check Auto-Deviation [Auto Chk]
SETUP 5.5.5 C4, Check auto-deviation [Auto CHK] This function is used to check your auto-deviation. The result of [Auto CHK] will be compared with [Auto DEV]. If the de- viation is less than 1,5°, the average value from the comparison be- tween [Auto DEV] and [Auto CHK] will be stored. -
Page 24: Maintenance
Failure to rectify any faulty conditions discovered as a result of the inspection could cause sudden loss of Autopilot control, with consequential danger. It is recommended that all items referenced in the following table be inspected before commencing any cruise. -
Page 25: Fault Finding
7 Fault finding 7.1 General Before you contact your Nexus dealer and to assist your dealer to give you a better service, please check the following points and make a list of: All connected instrument and transducers, including their software versions. - Page 26 Cause Action Blinking [Low Bat] on bottom Low battery voltage. Auto- Turn Autopilot off and charge batteries, or correct line of display matic shut-off in case of voltage loss. When proper voltage restores, restart voltage lower than 10.5 V (12 Autopilot.
- Page 27 Variable error in heading Verify that the steering compass is accurately cor- caused by magnetic interfer- rected and then correct the Autopilot compass as ence. per installation instructions. Large errors not corrected by Run Auto-Deviation-Clear [C5] [CLR].
-
Page 28: Nexus Network Error Messages With Cause And Remedy
7 FAULT FINDING 7.3 Nexus Network error messages with cause and remedy If an error message [Err #] is displayed, an error has been detected by the Nexus Network. The message can assist you to diagnose the cause and remedy the error. - Page 29 Clear waypoint bank to make space. bank memory is full. DGPS mode is interrupted. Check the DGPS receiver. 30-41 Reserved for Nexus Autopilot Servo Unit. See Nexus Autopilot manual. Bad transducer input / bad measure- Reset power. ment. Reserved for Nexus Autopilot Servo Unit.
-
Page 30: Specifications
SPECIFICATIONS 8 Specifications 8.1 Technical Specifications 8.1.1 Autopilot instrument Dimensions: 110 x 110 x 23 mm (4.3 x 4.3 x 0.9”) Weight: 260 g (9.17 oz) Enclosure: Water proof Instrument cable: 0.4 m (16”) Power supply: 12 V DC (10-16 V). The instrument is polarity protected. -
Page 31: Nexus Network Specification
Autopilot mode to be used as an Autopilot instrument, or Instrument mode displaying all information on the Nexus Network. Further it can be used as a remote control for all instruments connected to the Network. It is the ultimate Nexus instrument! 8.3.3 Nexus analog Rudder Angle instrument... -
Page 32: External Alarm Buzzer
This is useful for docking or remote manoeuvring such as required when picking up crab traps etc. In any Autopilot function, the jog steering can be used as a dodge function and when the jog lever is let go, the boat will revert to the previous course set by the Autopilot. - Page 33 Instrument cover Nexus instruments 110 x 110 mm 20443 Nexus extension cable, per meter 21266-8 Nexus cable 8 m (26 ft) with wire protectors at each end 20594 Nexus mast cable 25 m (82 ft) 18129 Instrument panel for up to 6 Nexus 110x110 mm instruments...
-
Page 34: Abbreviations
10 APPENDIX APPENDIX 9 SPECIFICATIONS 8.4 Abbreviations Abbr. Description ADJust ALarM Automatic Pilot Calibration Automatic Trim Control Apparent Wind Angle BATtery Bearing Original Destination BeaRinG Boat SPeed Bearing To Waypoint Calibrate 10 CALibrate Course Deviation Indicator Communaute Europèenne CHecK CLeaR Course Over Ground Course To Steer differential... - Page 35 APPENDIX Liquid Crystal Display metre metres per second Magnetic North MEMory MINimum Magnetic North Man Over Board North NAVigate Nautical Mile NMEA National Marine Electronic Association Off Course Alarm Pilot Course Alarm PoWeR Random Access Memory RETurn RuddeR Speed RUDder South Selective Availability SATellite...
- Page 36 APPENDIX The boat is right of the desired track Apparent wind angle from port Apparent wind angle from starboard Rudder angle port Rudder angle starboard Minus Plus...
-
Page 37: Warranty
WARRANTY 8.5 Warranty WARRANTY GENERAL All our products are designed and built to comply with the highest class industry standards. If the products are cor- rectly installed, maintained and operated, as described in the installation and operation manual, they will provide long and reliable service. -
Page 38: Warranty Card
WARRANTY File id: WARRANTY CARD TO BE RETURNED TO YOUR NATIONAL DISTRIBUTOR OWNER: Name: Street : City/Zip Code : Country: Product name: Serial number: Date of purchase: _________________________Date installed ______________________________ Dealers stamp: Tick here if you do not wish to receive news about future products... -
Page 39: Installation
INSTALLATION 9 Installation 9.1 Installation general Reliable and accurate operation of an Autopilot depends more on correct installation than any other piece of marine electronics. Please read and fully understand the installation requirements before attempting installation. Note! If in doubt, obtain the services of an experienced Autopilot installation technician. -
Page 40: Installation Alternatives
Run the Nexus Network cable from the Autopilot Servo Unit to the instrument. Cut the Nexus Network cable to length. Peel off about 35 mm (1 1/4") of the cable insulation. Remove about 6 mm (1/4") from the 3 isolated wires (the 4 wire is an earth/screen). -
Page 41: Wire Thickness
INSTALLATION Apply silicon paste to the instrument connection pins at the back of the instrument. Press the jack plug into the instrument pins. Press down the cable in the cable leads. Mount the connection back cover with the screw. Mount the instrument in the pre-drilled position. Important! Use all 4 screws and tighten the screws (in cross pattern) so the gasket will be evenly compressed to 1/3 of its original thickness. -
Page 42: Servo Unit
Note! Autopilot instrument / Nexus Network connection. If you want to run the Nexus Network instruments separate from the Autopilot, do not connect green wire to (pin 1) to the left in Servo Unit. Instead insulate the green wire. -
Page 43: Safety Switch
Important! An external safety switch or circuit breaker (relay) (not supplied) should be installed in line with power input. Make sure it is rated greater than or equal to 25 Amps. This switch will serve as your Autopilot ultimate safety OFF switch. 9.5.5 Dip switches The main circuit board has 2 dip switches which must be pre-set during installation to suit the installed configuration. -
Page 44: Trim Potentiometers
9 INSTALLATION 9.5.6 Trim potentiometers If a non-Nexus brand rudder angle indicator is fitted, it can be calibrated with the 2 trim potentiometers as indicated on drawing. Adjust VR3 labelled offset, for rudder centre and VR2 labelled gain, for maximum deflection. -
Page 45: Linear Drive
INSTALLATION 9.8 Linear drive For installation and specification, see separate manual. Figure 1: Typical installation on a boat with mechanical steering, in- cluding Pumpset PF-0,3S with solenoid. Solenoid Hydraulic Pipes Figure 2: Typical installation on a boat with hydraulic steering, including Pumpset PF-0,3. -
Page 46: Solenoid Valve Controlled Pumpset
(overshoot of the rudder). To adjust anti-hunt setting, first complete procedures in described in sections Setup, Dockside Testing and Sea Trials. Activate the Autopilot and with the pumpset running, make 10° course changes to port and starboard. -
Page 47: Dockside Testing
Do not attempt to activate the Autopilot in other functions than power steer, until all air is out of the system, as sloppy course holding will result. The very last air removal will be done as the boat is tested underway. -
Page 48: Sea Trials
Then proceed as per below order. Warning! Do not activate any of the 3 Autopilot functions Compass, Nav or Wind at dock as the rudder may go hard over, since the APC routine has not been carried out yet. -
Page 49: Fine Tuning
1. Check that Dockside Testing, Sea Trials including the APC routine has been done. If not, go back and make sure they are done. 2. Activate the Autopilot on a course and ensure that it holds without excessive understeering or oversteering. - Page 50 FINE TUNING 5. The compass damping [SEA] setting is a combination of yaw dead-band (compass sensitivity) and compass damping. The minimum setting may only be used under calm sea conditions to avoid unnecessary rudder correction due to compass acceleration errors. Smaller boats and high speed boats which are subject to more acceleration in lighter seas will have to use higher settings.
Need help?
Do you have a question about the AUTOPILOT and is the answer not in the manual?
Questions and answers
What means err 38
Error 38 on the Nexus AUTOPILOT typically indicates a problem with the rudder reference unit. It suggests the unit may be malfunctioning or not providing expected data.
This answer is automatically generated