Table of Contents
Advertisement
Quick Links
Advertisement
Table of Contents

Related Manuals for Globalsat GV-370


Summary of Contents for Globalsat GV-370
-
Page 1: User Manual
GV-370 User Manual Version 1.32... -
Page 2: Table Of Contents
Detailed Hardware Functions ........... 10 Chapter 2 Getting Started ..............11 Download Application onto the SD Card ......... 11 Attaching GV-370 to the Mount/Cradle ........17 Charging your GV-370 ............. 18 Chapter 3 Software Application............19 System Menu ................19 Photo View................ - Page 3 System Information ............46 Navigation Software License Agreement ......... 47 Chapter 5 Troubleshooting ............... 48 ► If the GV-370 does not boot up successfully or does not function properly .............. 48 ► Reset ................48 ► Safely Remove Hardware ..........49...
-
Page 4: Chapter 1 Features And Specification
Chapter Features and Specification Features • A complete vehicle navigation solution in one box • Simple touch-screen operation • 3.5” screen, 65536 colors, bright TFT LCD • Fast and easy to use:: - Attach, turn it on and go! - Large screen icons for easy touch-screen access - User-friendly keypads and menus - Clear voice-guidance instruction - Built-in rechargeable battery and adapter to power/charge from cigarette lighter... -
Page 5: Specification
Specification ► System Electrical Characteristics Processor Samsung S3C2410-266MHz WinCE.NET 4.2 core ROM Memory 64MB (NAND Flash Memory) SDRAM Memory 64MB Memory Card Slot SD/MMC GPS Receiver SiRF StarⅢ High sensitivity chipset – 20 Channel USB Connector Mini USB (5 pins) USB Version Ver 1.1 (Active Sync) Operation time... - Page 6 mode) Menu Press Menu button to go back to System menu Zoom In Press Zoom In button to zoom in (Car Navigation Only) Zoom Out Press Zoom Out button to zoom out (Car Navigation Only) Mute Press Mute button to mute voice, press button again to go back to normal.
- Page 7 ► GPS Specification Electrical Characteristics GPS Chipset SiRF Star III Frequency L1, 1575.42 MHz C/A Code 1.023 MHz chip rate Channels 20 channel all-in-view tracking ACCURACY Position Horizontal 10 meters, 2D RMS 1-5 meters 2D RMS, WAAS corrected Velocity 0.1m/sec Time 1 micro-second synchronized to GPS time DATUM...
-
Page 8: Accessories
Accessories USB Cable GV-370 Main Unit AC adapter DC charger Cradle Mount DVD (user manual, driver, map data 2GB SD card (optional) Note: If any item is missing or damaged, please contact with your local retailer. -
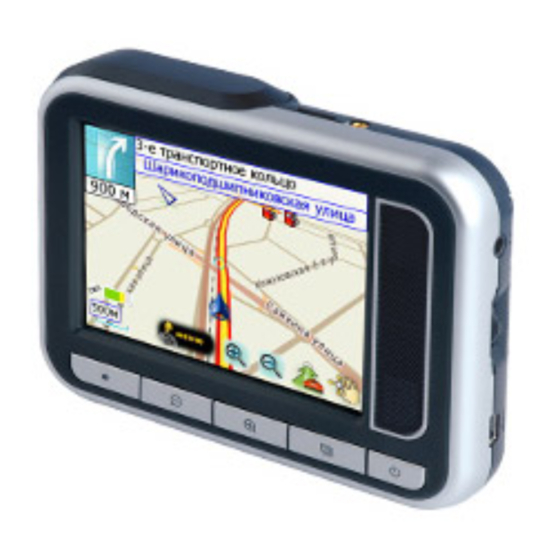
Page 9: Overview
Overview Speaker Power button / Status indicator SD card slot Reset button Mute Zoom out Zoom in System menu Master Switch connector External antenna connector Stylus Earphone jack Volume control... -
Page 10: Detailed Hardware Functions
If you want to use this device, be sure to slide the master switch to the “ON” position. On the back of the GV-370 is a master slide switch to cut off power to the unit. It is used to disable the unit in transit from the factory and if the unit will be in storage for long periods of time. -
Page 11: Chapter 2 Getting Started
Option 2 (by ActiveSync): If you do not have an SD card reader, insert the SD card into the GV-370 and use the provided USB cable to connect GV-370 with your PC. (Before you can use this method, you must install the USB driver for GV-370 and the Microsoft ActiveSync. - Page 12 Check the “Install from a list or specific location” item and click on Next button. Click on “Browse” button and locate the “USB_Driver” folder in the DVD. That’s where the USB driver files stored.
- Page 13 Please follow the instruction to complete the driver installation. If you do not have Microsoft ActiveSync installed in your PC, please install it now. Please...
- Page 14 “MSASYNC.EXE” from the DVD. Then follow the instruction to install Microsoft ActiveSync. After the USB driver and ActiveSync are installed, please open a windows explorer and you will find a “SDMMC” folder under the Mobile Device icon. The SDMMC is the SD card drive on your GV-370.
- Page 15 Hint: Follow this sequence will make your Windows to detect the GV-370 more easily: 1. Connect one end of USB cable to PC’s USB port first. 2. Turn on the GV-370. 3. Connect the other end of USB cable to GV-370.
- Page 16 “Start” button. After the download process is finished, please remove the SD card from card reader, insert it into your GV-370 and restart it. If you use “Option 2 (by ActiveSync)”, then click on “Mobile Device”, and click on “Start”...
-
Page 17: Attaching Gv-370 To The Mount/Cradle
Attaching GV-370 to the Mount/Cradle Release Lock 1. Place the GV-370 at a downward angle into the base of the cradle. 2. Push the top of GV-370 inward until the top clip locks into place. 3. Clean windshield glass thoroughly with glass cleaner. -
Page 18: Charging Your Gv-370
On the back of the GV-370 is a master slide switch to cut off power to the unit. It is used to disable the unit in transit from the factory and if the unit will be in storage for long periods of time. -
Page 19: Chapter 3 Software Application
Software Application System Menu The system menu screen controls the GV-370. All the main features can be accessed from the system menu from the five icons. For the four programs on system menu (Navigation, Photo, Music and Movie), you can only run one of them at a time. When you switch to another program or press the “system menu button”... - Page 20 Previous page Next page Close Full Screen Close Previous picture Next picture...
-
Page 21: Movie Playback
You can store your movie files in the memory card and play them on GV-370. The supported movie files must be encoded in mpg and dat formats. The GV-370 has a full function media player, which has play, stop, pause, forward and rewind functions in the movie player control. To enter Movie Playback, click on the Movie icon in system menu. -
Page 22: Mp3 Player
From the system menu, tap on Music icon to enter the MP3 Player. The GV-370 will scan the memory card for all the MP3 audio files. Play lists can be created from the audio files found. All the songs are played sequentially from a play list. - Page 23 ► Create a Playlist Go back to Playback screen Previous page Add the highlighted song to play list, Highlight a song by the text of selected tapping on it. item will be red. Remove the Next page highlighted song from play list, the text of deselected Close item will be black.
-
Page 24: Setup
Setup Click on the Setup icon from system menu, you can enter the setup mode to configure your GV-370. Display the system information Power setting Backlight adjustment Set the language Display the program Screen and time zone version information correction ►... - Page 25 ► Power From here you can see the remaining capacity of the battery. The auto shut down function is only valid when GV-370 is not connected to external power. If it is connecting to the AC adapter, the system will not be shut down even if you have checked this setting.
- Page 26 ► Regional Setting Set the User Interface language and the time zone. Confirm the change Cancel ► Screen Calibration If you perform a hard reset, a new calibration setting of the screen is required. Tap on the center of the cross-hair, repeat the action when it appears on the four corners of the screen.
-
Page 27: Chapter 4 Navigation Application
Getting GPS Signal To use the Intellinav program to guide you to a destination, the GV-370’s GPS antenna must receive GPS signals. GPS signals can be obstructed by ceilings, trees, and nearby tall buildings. Signals can also be obstructed by the roof of your vehicle. For best results, position your GV-370 where it has the best possibly view to the sky. -
Page 28: Entering Data On The Intellinav System
Resetting the GV-370 You should never have to reset the GV-370 under normal circumstances. However, in the event that a problem cannot be corrected, you may reset the device by pressing the Reset button on the bottom of the unit, using a pen or paper clip. -
Page 29: Working With The Map
Working with the Map The Intellinav program gives you many ways of looking at the map. You can see your current position, view any of the turns on a route, and the map to view other areas. You can zoom in and out, and find information about specific locations. -
Page 30: Route List
Route List If you have set a destination, you can view a list of the maneuvers that make up your route. To view the route list: Tap Menu. The Main Menu appears. Tap Destination. The Destination Option screen appears. Tap Route List. Tapping an item on the list and then tapping Show will display the detail directions for that turn. -
Page 31: Poi Information
POI Information To view information about a POI on the map, tap on the icon on the map. The POI(S) screen will appear. Planning Your Route You can set a destination with the Intellinav program many different ways. Once you have set a destination, you can add a detour or a stopover. - Page 32 can add destinations to. You can also enter a name for a destination and delete destinations from the list. Show displays the location on the panning map without calculating a route. You can also use it to manually set a starting point. ►...
- Page 33 Address screen appears. 9. Select the address that matches the location you want to go to and tap Nav. The map appears, and the guidance directions begin. ► Using an Intersection as a Destination There are two ways to enter the intersection: by selecting the street first, or by selecting the city first.
- Page 34 ► Using a Point of Interest (POI) as a Destination There are many points of interest that you can select as a destination. Generally, you choose a category and then choose one of four methods of selecting the specific point of interest. Sometimes you must first select a subcategory (such as Museum within the category of Attractions) before you can choose a selection method.
- Page 35 To select a nearby POI by distance: a. Tap By Distance. The POI List screen appears, listing the closest POIs first. b. Tap the POI that you want to go to and tap Nav. You may need to scroll down the list by tapping the scroll bar.
- Page 36 To select a POI by city: 1. Tap By City. The Enter City Name screen appears. 2. Tap the Letters to enter the name of the city and tap OK. The Enter POI Name screen appears. 3. Tap the Letters to enter the name of the POI and tap OK. The POI Select screen appears.
- Page 37 ► Using a City Center as a Destination Sometimes you may want to use the Intellinav system to get to a city, but not to a specific location within the city. To do this you select a City Center as a destination. As with selecting a Point of Interest, there are several methods of selecting a city center: two for nearby city centers and one for all city centers in a region.
- Page 38 ► Detours, Avoid Roads, and Stopovers The Detour feature will allow you to bypass a certain portion of the route starting at your present position, while avoid road allows you to bypass the entire road. Stopovers are stops you add to a trip to make prior to reaching your destination. Detours Note: you cannot create a detour if you do not have a current destination.
- Page 39 To avoid roads in the route list: 1. Tap Menu. The main menu appears. 2. Tap Destination. The Destination Options screen appears. 3. Tap Avoid Road. The Avoid Road screen appears. 4. Mark any segments that you do not want included: a.
-
Page 40: Using Shortcuts
Using Shortcuts The shortcut feature provides you quick access to some of the most important destinations while you're on the road, including: Home Hospital Parking Restaurant Tourist Information By tapping any of the POI categories, you will see a list of the nearest POIs sorted by distance. -
Page 41: Managing Your Favorites List
Managing Your Favorites List You can edit the destinations you add to your favorites list to give them descriptive names. You can also remove destinations from your favorites list. To manage your favorites list: 1. Tap Menu. The main menu appears. 2. -
Page 42: Setting Your Options
Setting Your Options You can set many different options to customize the Intellinav system and make it work your way. These options include: Display Options Route Options Speed Alert Localization GPS Information System Information Display Options The display options give you control over the appearance of the map. -
Page 43: Route Options
you choose off, no POI icons are displayed. If you choose custom, you can choose which categories of POI icons you want displayed. The color settings control the background color of the map. You can choose from four different colors. The 3D view settings control your view of the map. -
Page 44: Speed Alert
There are four method settings. Quickest calculates the route that should take the least amount of time. Major calculates a route that uses major roads whenever possible. Shortest calculates the route that is shortest in distance. Local calculates a route that uses local roads whenever possible. -
Page 45: Localization
To set the speed alert: 1. Tap Menu and then Settings. 2. Tap Speed Alert. The Speed Alert screen appears. To set auto speed alert: a. Tap Atuo. A warning appears. b. Tap OK to close the warning. c. Tap OK. You return to the map. To set a fixed speed alert: a. -
Page 46: Gps Information
6. Tap your Daylight Saving preference: DST or Standard. 7. Tap your Units preference: Mi or KM. 8. When you have finished choosing your options, tap OK. GPS Information To view the GPS Information: 1. Tap Menu. The Main Menu appears. 2. -
Page 47: Navigation Software License Agreement
Navigation Software License Agreement The mapping and navigation software ("Software") and map data ("Data") is provided for your personal, internal use only and not for resale. It is protected by copyright, and is subject to the following terms and conditions which are agreed to by you, on the one hand, and Netropa ("LICENSEE"). -
Page 48: If The Gv-370 Does Not Boot Up Successfully Or Does Not Function Properly
4. Perform the “Reset” to restart the device. ► Reset If your GV-370 is down or it encounters an unexpected error, you can reset it. You will need to use a stylus or pencil to press the reset button. Pressing the reset button will restart the system retaining all the information stored on the device. -
Page 49: Safely Remove Hardware
► Safely Remove Hardware Before you remove the memory card from the card reader, or before you unplug the USB cable from the device or USB port, please safely remove the hardware by the following processes: 1. Double click the "Safely Remove Hardware" icon from the task bar on the right bottom corner of desktop. -
Page 50: Update The Firmware Of Gv-370
► Update the firmware of GV-370 Step 1: Unzip the “NK.nb0.zip” and you will get the file named “NK.nb0”. Step 2: Copy “NK.nb0” into a SD card. Step 3: Insert the SD card into GV-370. Step 4: Press and hold the power button, don’t let go. -
Page 51: Fcc Notices
EQUIPMENT. © 2006 Globalsat Technology Corporation. All rights reserved. . Globalsat and G-Sat are registered trademarks of Globalsat Technology Corporation. Intellinav and Intellinav log are registered trademarks of Netropa Corp. All other trademarks are the property of their respective owners.
Need help?
Do you have a question about the GV-370 and is the answer not in the manual?
Questions and answers