
Related Manuals for Motorola DTR410


Summary of Contents for Motorola DTR410
- Page 1 Title Page DTR Series ™ DTR410/DTR550/DTR650 User Guide Motorola, Inc. 8000 West Sunrise Boulevard 9980384R89-E Fort Lauderdale, Florida 33322...
-
Page 2: Foreword
No duplication or distribution of this document or any portion thereof shall take place without the express written permission of Motorola. No part of this manual may be reproduced, distributed, or transmitted in any form or by any means, electronic or mechanical, for any purpose without the express written permission of Motorola. -
Page 3: Table Of Contents
Table of Contents Foreword ......................ii FCC Licensing Information ................v Chapter 1 Introduction ................. 1-1 Notations Used in This Manual........................ 1-1 Your DTR Series Radio ........................... 1-4 Getting Started ............................1-5 Menu Icons ............................ 1-5 Status Icons ........................... 1-5 Text Area ............................1-6 Display Options.......................... - Page 4 Selecting a Group ID........................4-5 Entering a Home Group Number ....................4-5 Selecting Group Only........................4-6 Entering Group Members (PrivateGroup Only for DTR550/650) ........... 4-6 Entering a Ringer Type (Private Calls Only for DTR550/650 or Contacts Only for DTR410) ..4-7 November 2008 9980384R89-E...
- Page 5 See All Groups..........................4-10 Language............................. 4-10 Chapter 5 Programming the Radio with Customer Programming Soft- ware (CPS) (DTR410 Only) ..........5-1 CPS Set-up.............................. 5-1 Entering a Name on the Radio ........................ 5-1 Creating the Private Contacts........................5-2 Creating the PublicGroup Contacts ......................5-3 Setting up Scan ............................
- Page 6 Table of Contents Notes November 2008 9980384R89-E...
-
Page 7: Fcc Licensing Information
Read this manual carefully and make sure you know how to properly operate radio before use. Changes or modifications not expressly approved by Motorola may void the user’s authority granted by the FCC to operate this radio and should not be made. To comply with FCC requirements, transmitter adjustments should be made only by or under the supervision of a person certified as technically qualified to perform transmitter maintenance and repairs. - Page 8 Notes November 2008 9980384R89-E...
-
Page 9: Chapter 1 Introduction
The DTR Series radios provide cost-effective communications for businesses such as retail stores, restaurants, schools, construction sites, manufacturing, property and hotel management, and more. Motorola professional two-way radios are the perfect communications solution for all of today’s fast-paced industries. - Page 10 Introduction: Notations Used in This Manual Your model number is shown on the radio lens above the display, and tells you the following information: DTR Features DTR410 DTR550 DTR650 PublicGroups Up to 25 Up to 20 Up to 50 Available...
- Page 11 Introduction: Notations Used in This Manual DTR Features DTR410 DTR550 DTR650 Drop in Charging Tray Customer Programming Software (CPS) Compatible 9980384R89-E November 2008...
-
Page 12: Your Dtr Series Radio
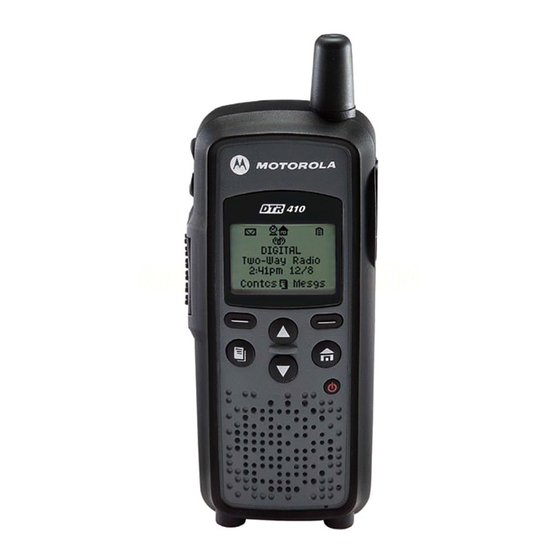
Introduction: Your DTR Series Radio Your DTR Series Radio Antenna Volume Controls Audio Jack Connect audio accessories Push-to-Talk (PTT) Option Keys Button Use to select display options Home Key Use to exit the current menu Menu Key and return to the idle screen Power Button Speaker Navigation Keys... -
Page 13: Getting Started
Introduction: Getting Started Getting Started NOTE: “Chapter 5 The DTR410 radio is Customer Programming Software (CPS) compatible. Please refer to Programming the Radio with Customer Programming Software (CPS) (DTR410 Only)” on page 5-1 for more details. Any time your radio is powered on, the display provides you with information and options. -
Page 14: Text Area
Introduction: Antenna Battery Status More bars on the battery indicate a greater charge. When the battery is flashing, it is time to charge the radio. New Message You have a new unopened text message. Text Area This area displays menus, messages, unit names or IDs, and other information. Display Options Two display options appear at the bottom of most screens. -
Page 15: Charging The Radio
WARNING: Do not attempt to change or charge the battery in a hazardous atmosphere. To charge the battery, place the battery (with or without the radio) in a Motorola-approved charger. Charging the Radio While the radio is charging, the display lights and the battery status icon flashes to show the status. -
Page 16: Charging A Radio And Battery Using A Multi-Unit Charger
Introduction: Attaching the Battery Charging a Radio and Battery using a Multi-Unit Charger A Multi-Unit Charger (MUC) is available separately (RPN4040) which charges up to 6 radios, batteries, or a combination of the two at the same time. When charging a radio in the MUC, the battery icon on the radio display shows the charging status. When charging a battery, the LED in front of the pocket indicates charging status. -
Page 17: Swivel Belt Holster
RLN5713 for DTR550/650 (53961 for DTR410). Mini Keyboard A mini keyboard accessory, part number NNTN5491 for DTR550/650 (53967 for DTR410), is available separately that can be attached to your radio. The mini keyboard allows you to customize Private and Group names, write text messages, and create/modify stored text messages. -
Page 18: Entering Text With The Mini Keyboard
• Your radio DTR550/650 accepts a maximum of 512 characters in its largest input fields while the DTR410 accepts a maximum of 80 characters. • Some of your radio's functions cannot be used simultaneously, just as when you are using your radios without the mini keyboard. -
Page 19: Standard Yellow Function Green Function
Introduction: Mini Keyboard 1-11 4. Press the Yellow or Green key to unlock the caps mode and enter the yellow or green mode, respectively. Standard Yellow Function Green Function Standard Yellow Function Green Function APOSTROPHE " ACCENT < > UP ARROW DOWN ARROW &... -
Page 20: Using Mini Keyboard Key Shortcuts
1-12 Introduction: Mini Keyboard Using Mini Keyboard Key Shortcuts You can perform most of your radio’s functions using the keys on the Motorola mini keyboard. Radio Key Action Keyboard Equivalent Chooses current left display option Left Option Left Option Key... -
Page 21: Other Special Characters
Introduction: Accessories 1-13 Other Special Characters To create other special characters, enter the keystrokes listed in the table below. Accent Example Description Keystrokes ß sharp s, German sz ligature Green Æ diphthong AE ligature Green ç or Ç cedilla single quote, then c or C Þ... - Page 22 1-14 Introduction: Accessories November 2008 9980384R89-E...
-
Page 23: Chapter 2 General Radio Operations
Press to turn your radio on. The radio chirps and the display briefly shows Motorola. The display shows the radio Unit ID or Name, current Scroll list setting, time, date, and the available Option key selections. If the radio has been assigned a unique Unit Name, the name displays rather than the Unit ID for both the radio and any Contacts. -
Page 24: Selecting A Scroll List Contact
General Radio Operations: Selecting a Scroll List Contact Selecting a Scroll List Contact In idle mode, use to select the desired TalkGroup/Private contact. Press the PTT button for one-touch communication. Viewing a Contact 1. From the main screen, press under Contcs to enter the Contact List. JOE SMITH Security 5:49pm 11/14... -
Page 25: Receiving And Making Calls
General Radio Operations: Receiving and Making Calls Receiving and Making Calls NOTE: Your DTR Series radio must be programmed to be fully compatible with other DTR Series radios and fully utilize all radio features. Refer to Chapter 3 - Advanced Radio Operations. Types of Calls Your radio can make and receive three different types of voice calls: •... -
Page 26: Call Alerts
General Radio Operations: Call Alerts Call Alerts Sending a call alert lets the recipient know you want to talk to him or her. When you send a call alert, the recipient's radio emits a series of beeps, or vibrates, and displays your Unit Name or ID along with the time and date. -
Page 27: Text Messaging
General Radio Operations: Text Messaging Text Messaging Your radio can send and receive short text messages to Private or Group contacts. Your radio must be on and within range to receive text messages. NOTE: DTR SMS test messaging is available on the DTR website with the help file of how to use this tool. -
Page 28: Replying To A Received Message
General Radio Operations: Text Messaging Replying to a Received Message Your radio has a number of pre-programmed Quick Notes available, or the mini keyboard can be used to create a response. Additional Quick Notes can be created and the existing ones modified/ deleted with the mini keyboard by selecting Text Messaging while in Programming Mode. -
Page 29: Sending A Text Message
General Radio Operations: Text Messaging Sending a Text Message Your radio can send and receive short text messages to Private or Group contacts, and has several pre-programmed Quick Notes available. The mini keyboard can be used to change, add additional, or delete these messages while in Programming Mode. -
Page 30: Composing A Message Using The Mini Keyboard
General Radio Operations: Text Messaging 5. Press under Select to choose the message. The display shows the Contact and the message you want to send Compose Msg To:Jones Mesg:Can you mee View Send 6. To change the Contact you are sending to, press under Change. -
Page 31: Deleting A Message
General Radio Operations: Text Messaging 4. Scroll to highlight the Mesg: option. Press under Change. 5. The Mesg: screen appears. Use the mini keyboard to enter your message (maximum 80 characters). esg: Done Delete NOTE: The under Delete can be used to erase characters. Holding deletes the entire message. -
Page 32: Accessing The Main Menu
2-10 General Radio Operations: Accessing the Main Menu Accessing the Main Menu 1. Press to access the Main Menu. The Main Menu appears. ain enu Recent Calls Settings y Info Back Select 2. Scroll through the available menu options. Highlight the desired menu option and press under Select. -
Page 33: Recent Calls
General Radio Operations: Recent Calls 2-11 Recent Calls This menu lists recent calls received and allows the user to view, alert or delete the twenty most recent calls on the list. From the Main Menu, scroll to highlight Recent Calls and press under Select. -
Page 34: Deleting Recent Calls
2-12 General Radio Operations: Settings Deleting Recent Calls 1. Scroll to highlight a recent call from the list. 2. Press . The Rec. Call Menu appears. Rec.CallMenu View elete elete All Select Back NOTE: View only appears as a menu option for Private calls. 3. -
Page 35: Setting The Display
General Radio Operations: Settings 2-13 Setting the Display From the Settings menu, scroll to highlight Display and press under Select. The Display menu appears. From the Display menu, you can adjust the contrast and backlight time. Display Contrast:2 Backlight:10 Back Change Adjusting the Contrast 1. -
Page 36: Setting Vibracall
2-14 General Radio Operations: Settings Setting VibraCall VibraCall allows you to set the radio to vibrate with no audio alert tones when text messages or call alerts are received. NOTE: This does not mute the audio for voice calls. 1. From the Settings menu, scroll to highlight VibraCall and press under Select. - Page 37 General Radio Operations: Settings 2-15 Setting the Time 1. From the Clock/Alarm Menu scroll to highlight Time and press under Change. The Time screen is displayed. ime: 20am __ > Done 2. Scroll to select the desired hour. NOTE: Press and hold to fast scroll.
- Page 38 2-16 General Radio Operations: Settings Setting the Alarm Your DTR Series radio has an alarm feature that can be set to remind you of a recurring daily event. From the Clock/Alarm menu, scroll to highlight Set Alarm and press under Select. The Set Alarm menu appears.
-
Page 39: Setting The Volume
General Radio Operations: Settings 2-17 7. After completing the time setting press under Done to complete the setting and to return to the previous menu. Setting the Volume The functions of the various selections are as follows: • Ringer: volume level for all data status alerts such as Alert Tones and incoming SMS Messages. - Page 40 2-18 General Radio Operations: Settings 2. Use the Volume Control keys to adjust the Ringer volume as necessary and then press under OK to save the selection and return to the previous menu. Setting the Speaker Volume 1. From the Volume menu, scroll to highlight Speaker and press under Change.
-
Page 41: My Info
General Radio Operations: My Info 2-19 My Info The My Info screen displays your Unit Name, ID, Channel and Home Group. From the Main Menu, scroll to highlight My Info and press under Select. NOTE: The Unit Name defaults to Unit ID unless it is customized in programming mode using the mini keyboard. - Page 42 2-20 General Radio Operations: My Info Notes November 2008 9980384R89-E...
-
Page 43: Chapter 3 Advanced Radio Operations
Chapter 3 Advanced Radio Operations Accessing the Advanced Menu The Advanced features are for managing your Scroll List, Call Forwarding, Remote Disable, Remote Monitor, and Remote Time. NOTE: Remote Disable, Remote Monitor, and Remote Time are not available, unless Manager Mode has been enabled in Programming Mode (DTR650 model only). -
Page 44: Enabling Scan
Advanced Radio Operations: Accessing the Advanced Menu Enabling Scan The Scan feature allows your radio to monitor up to 10 PublicGroups per channel and switch to them when there is activity. Scan is turned On by default, but can be disabled by switching to OFF. When Scan is OFF, you must select a PublicGroup in the Scroll List to hear any activity on it. -
Page 45: Remote Disabling (Dtr410 And Dtr650 Models Only)
Advanced Radio Operations: Accessing the Advanced Menu Remote Disabling (DTR410 and DTR650 Models Only) NOTE: Manager Mode must be enabled in order for a user to use this feature. Refer to page 4-9. Remote Disabling allows a user to remotely enable or disable another DTR Series radio. The selected radio must be turned on and within range in order to be enabled or disabled. -
Page 46: Remote Monitoring (Dtr410 And Dtr650 Models Only)
Advanced Radio Operations: Accessing the Advanced Menu Remote Monitoring (DTR410 and DTR650 Models Only) NOTE: Manager Mode must be enabled in order to use this feature. Refer to page 4-9. Remote Monitoring allows you to monitor a selected radio either for training purposes or if the target radio user is unable to press the PTT button. -
Page 47: Chapter 4 Radio Programming
Chapter 4 Radio Programming Program Menu Navigation Chart Scroll List Contacts Scan Lists Program Menu Text Messaging Display Call Forward VibraCall Radio History Settings Clock/Alarm Reset Defaults to scroll through list Volume Manager Mode* to select display option Ambient Noise to exit Program menu See All Groups Advanced... -
Page 48: Entering Programming Mode
The separate programming mode allows access to modify and add contacts, update existing and add new quick notes, and access manager features (DTR410 and DTR650 only) such as Remote Disable and Remote Monitoring. A mini keyboard, part number NNTN5491 for DTR650 (53967 for DTR410) is used to enter text into contacts and to modify saved text messages. -
Page 49: Adding Contacts
Radio Programming: Adding Contacts Adding Contacts 1. From the Program Menu, scroll to select Contacts and press under Select. The Con- tacts screen appears. Contacts [New Contact] ffice Security Select Back 2. Scroll to select [New Contact] and press under Select. The Private screen appears. Private 1 Type:Private Channel:1... -
Page 50: Channel
NOTE: A mini keyboard, part number NNTN5491 for DTR550/650 (53967 for DTR410) must be connected to the radio to enter alphanumeric characters. -
Page 51: Programming A Unit Id (Private Calls Only)
Change to select a PublicGroup ID from 1-50 for DTR410 or 1-100 for DTR550/650. IDs already in use on your radio are preceded by an “x”. When programming a new PrivateGroup (DTR550 or DTR650 only), the radio selects your GroupID from your contact list. -
Page 52: Selecting Group Only
Radio Programming: Adding Contacts 2. Scroll to select the desired entry. Press under Select to select the new item. The dis- play returns to the previous screen with the new Home Group Number entered. Selecting Group Only NOTE: Selecting Group Only on a radio prohibits the user from initiating PrivateCalls. Private contact information is still retained by the radio to identify other units, but the user can only return a PrivateCall during hangtime. -
Page 53: Entering A Ringer Type (Private Calls Only For Dtr550/650 Or Contacts Only For Dtr410)
Text Messaging NOTE: Entering or changing the Quick Notes requires the use of the mini keyboard, part number NNTN5491 for DTR550/650 (53967 for DTR410) which must be attached to the connector on the bottom of the radio. 1. From the Program Menu, scroll to select Text Messages and press under Select. -
Page 54: Settings
Radio Programming: Settings 2. Scroll to select [Create Quick. and press Select. The Quick Note screen appears. Quick Note: Cancel 3. Use the mini keyboard to enter the new message. When the first letter is entered, the left changes to Save and the right changes to Delete. -
Page 55: Reset Defaults
Radio Programming: Settings 3. Scroll to select Radio History and press under Select. adio History IDL: Back Select TX is the total amount of transmit time. RX is the total amount of receive time. IDL is the total time the radio has been turned on but not receiving or transmitting. -
Page 56: See All Groups
3. Scroll to Language and copy the verbiage of "press xxx under Select." 4. End user can select their preference of language (English, French-Canadian or Spanish) For more information on DTR products, visit the following website at: <http://www.motorola.com/ DTR/>. November 2008... -
Page 57: Chapter 5 Programming The Radio With Customer Programming Software (Cps) (Dtr410 Only)
Chapter 5 Programming the Radio with Customer Programming Software (CPS) (DTR410 Only) The CPS is used to program features and various parameters into your radio. For example, you can program all your contacts in a contact list for Private and PublicGroup calls. -
Page 58: Creating The Private Contacts
5-2 Programming the Radio with Customer Programming Software (CPS) (DTR410 Only): Creating the Private Con- Creating the Private Contacts You need to enter the contact information for a radio before you can make a Private Call to it. For more details on Private Call, see “... -
Page 59: Creating The Publicgroup Contacts
Programming the Radio with Customer Programming Software (CPS) (DTR410 Only): Creating the PublicGroup Con- Creating the PublicGroup Contacts You need to enter a group’s information to make a PublicGroup call to it. For more details on PublicGroup Calls, see Selecting a Group ID. -
Page 60: Setting Up Scan
Programming the Radio with Customer Programming Software (CPS) (DTR410 Only): Setting up Scan Setting up Scan To use the Scan feature, you need set up a scan list for each of the radio’s channels. 1. Select “Lists->Scan List->Channel x” from the left of the CPS screen. -
Page 61: Personalizing Your Radio
Programming the Radio with Customer Programming Software (CPS) (DTR410 Only): Personalizing your Radio 5-5 Personalizing your Radio There are several settings that you can choose at your preference. 1. Check VibraCall, if you do want your radio to vibrate, instead of ringing, when receiving a call. -
Page 62: Setting The Scroll List
Programming the Radio with Customer Programming Software (CPS) (DTR410 Only): Setting the Scroll List Setting the Scroll List You can keep in touch with everyone through Private or PublicGroup options by setting the Scroll List: 1. Select “List->Scroll” on the left of your CPS screen. -
Page 63: Scenario On How To Program A Radio
Programming the Radio with Customer Programming Software (CPS) (DTR410 Only): Scenario On How To Program Scenario On How To Program A Radio The following is an example of a scenario on how to set up an organization. You can program the radio according to the following order: 1. - Page 64 5-8 Programming the Radio with Customer Programming Software (CPS) (DTR410 Only): Scenario On How To Pro- November 2008 9980384R89-E...
-
Page 65: Chapter 6 Cloning Mode
ALL. This allows the users to either clone all contacts from one radio to another or to clone to all contacts. In the DTR410 cloning also allows all radios to maintain a contact list so that User Name is shown rather than User ID when receiving voice and data calls. -
Page 66: Cloning Using The Cloning Cable
Cloning Mode: Cloning Using the Cloning Cable Cloning Using the Cloning Cable 1. From the Clone menu, scroll to select Duplicate Radio and press under Select. The fol- lowing screen is displayed indicating the target radio must now be connected to the source radio to be cloned using the cloning cable. -
Page 67: Adding/Deleting A Contact
Cloning Mode: Adding/Deleting a Contact Adding/Deleting a Contact These menus are used to add or remove a contact from a Private contact or PrivateGroup contact over the air. This feature is used primarily for fleet maintenance. When adding/deleting a contact to a PrivateGroup contact, the radio attempts to contact all radios within that PrivateGroup and notifies any radios that did not receive the update. - Page 68 If cloning was successful, both the source and targets radios indicated “Programming Successful”. If over-the-cloning to a PrivateGroup fails, the radio displays the failed clone list. The user can attempt cloning again to any members of this list. For more information on DTR products, visit the following website at: <http://www.motorola.com/ DTR/>. November 2008...
-
Page 69: Reset All Contacts
Cloning Mode: Reset All Contacts Reset All Contacts This key sequence deletes all contacts in the radio. This is useful for radio programming and rental radios. 1. Hold down and press the PTT button three times. 2. Press 3. Press 4. - Page 70 Cloning Mode: Remote Delete Contact Notes November 2008 9980384R89-E...
-
Page 71: Chapter 7 Troubleshooting
Chapter 7 Troubleshooting Symptom Try This: Display shows "User Not Target radio is in a call, try again after 30 seconds to determine if call has been Available" when PTT pressed completed. Target radio is out of range. At least one radio (Private or Group call) must be turned on and within range to transmit. - Page 72 Troubleshooting: Notes November 2008 9980384R89-E...
-
Page 73: Chapter 8 Motorola Limited Warranty For The United States And Canada
(d) other acts which are not the fault of Motorola, are excluded from coverage. Use of Non-Motorola Products and Accessories. Defects or damage that result from the use of Non-Motorola branded or certified Products, Accessories, Software or other peripheral equipment... -
Page 74: Software
Furthermore, the purchase of the Motorola products shall not be deemed to grant either directly or by implication, estoppel, or otherwise, any license under the copyrights, patents, or patent applications of Motorola or any third party software provider, except for the normal, non-exclusive, royalty-free license to use that arises by operation of law in the sale of a product. -
Page 75: Patent Notice
Governments of the United States of America may restrict the exportation or re-exportation of this product to certain destinations. For further information contact the U.S. Department of Commerce. For more information on DTR products, visit the following website at: <http://www.motorola.com/ DTR/>. - Page 76 Motorola Limited Warranty for the United States and Canada: Export Law Assurances Notes November 2008 9980384R89-E...
-
Page 77: Index
INDEX Accent Marks ...............1-12 Accessing Advanced Menu . - Page 78 INDEX Battery, Charging using the Drop-in Charging Tray ............. .1-7 Multi-Unit Charger .
- Page 79 INDEX Exclusions Product and Accessories ............8-1 Software .
- Page 80 INDEX My Info ................2-19 Name for you Radio .
- Page 81 INDEX Selecting A Call Type ...............4-3 A Channel .
- Page 82 INDEX Viewing a Contact ................2-2 Recent Call .
- Page 83 QUICK REFERENCE DTR SERIES™ PORTABLE RADIO Antenna Audio Jack Volume Controls Connect audio accessories Option Keys To select display options Push-to-Talk (PTT) Button Home Key Use to exit the current menu and return to the Menu Key idle screen Power Button Speaker Navigation Keys Use to scroll menu...
-
Page 84: Install The Battery
3. When a Private, private Group, or Group call is received, it will be heard at the volume level you have set. Press the PTT to respond. MOTOROLA, the Sylized M Logo, are registered in the *5480384S84* U.S. Patent and Trademark Office. All other product or service names are the property of their respective owners.
Need help?
Do you have a question about the DTR410 and is the answer not in the manual?
Questions and answers