Table of Contents
Advertisement
Quick Links
Wireless Temperature Station
Installation Manual
Note:
The Wireless Temperature Station (Davis product number 6372) can be used with wireless
Vantage Pro2
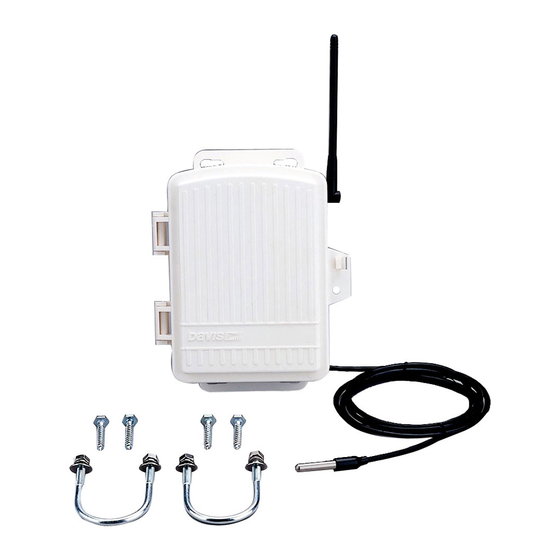
Components and Hardware
The Wireless Temperature Station includes the following components and
mounting hardware:
8" Cable Ties
3-Volt
Lithium
Battery
4" Cable Tie
1/4" Flat Washers
1/4" Lock Washers
1/4" Hex Nuts
Tools for Setup
In addition to the components shown, you will need some or all of the
following materials:
• Adjustable wrench or 7/16" (11 mm) wrench
• Ballpoint pen or paper clip (small pointed object of some kind)
• Drill and 3/16" (5 mm) drill bit (if mounting on a vertical surface)
™
weather stations, and/or wireless Weather Envoy (6316) and Envoy8X (6318).
1/4" x 1-1/2"
Lag Screws
U-Bolts
Temperature Probe
Shelter with
Temperature Probe
1
Advertisement
Table of Contents

Related Manuals for DAVIS 6372


Summary of Contents for DAVIS 6372
-
Page 1: Tools For Setup
Wireless Temperature Station Installation Manual Note: The Wireless Temperature Station (Davis product number 6372) can be used with wireless ™ Vantage Pro2 weather stations, and/or wireless Weather Envoy (6316) and Envoy8X (6318). Components and Hardware The Wireless Temperature Station includes the following components and mounting hardware: 8"... -
Page 2: Table Of Contents
• Test transmission from the proposed mounting location, page 7 • Mount the temperature station, page 8 • A note on securing cables, page 10 • Specifications, page 11 For Technical Support, please see “Contacting Davis Instruments” on page 10. -
Page 3: Prepare The Temperature Station
Preparing the Temperature Station The illustration below shows the Sensor Interface Module, or “SIM”, inside the shelter. Insert the 3-volt lithium battery into the battery holder, matching the “+” sign on the battery with the “+” sign on the SIM. 3-Volt Lithium Battery Test LED... -
Page 4: Set Id On The Temperature Station Using Dip Switches
Note: The transmitter and receiver communicate with each other only when both are set to the same ID. The factory default transmitter ID is ‘1’. Looking at the table below, you can see that means the DIP switches are in the OFF position when each transmitting station leaves the factory, whether it is an ISS, a wireless temperature station, or another kind of station. -
Page 5: View Current Temperature
Screen 1: Transmitters displays on the console screen. You should see the words: “RECEIVING FROM...” and “STATION NO.” followed by the transmitter IDs that your console detects. One of these should be the ID number you just set on the temperature station transmitter. If you don’t see it, make sure the console is within 10' of the transmitter, and verify that you set the DIP switches correctly. -
Page 6: Choose A Location For The Wireless Temperature Station
2.5 seconds. If the LED flashes only once and then remains dark, there is a problem with the transmitter. See “contacting Davis Instruments” on page 10. If the LED flashes repeatedly but your console isn’t picking up a signal anywhere in the room, it could be related to one of the following causes: 1. -
Page 7: Test Transmission From The Proposed Mounting Location
The following factors should be considered whether your temperature probe is inside a radiation shield or not: • If placing the probe on the outside of a building, a good location is under the eaves on the north side of the building. (In the Southern Hemisphere, the south side of a building is preferable.) •... -
Page 8: Mount The Temperature Station
Mounting the Wireless Temperature Station Mounting on a Pole 1. While holding the shelter against the pole, place a U-bolt around the pole and through the two holes on at the top of the shelter. 2. Place a flat washer, a lock washer and a hex nut on each of the bolt ends. Lock Flat Washer... - Page 9 Mounting on a Vertical Surface 1. With a 3/16" (5 mm) drill bit, drill two holes approximately 2" (50 mm) apart. Use a carpenter’s level to ensure the holes will be level. 2. Drill two more holes 7-1/32" below the upper holes. Screw Flat Washer...
-
Page 10: A Note On Securing Cables
Do not use metal staples or a staple gun to secure cables. Metal staples—especially when installed with a staple gun—have a tendency to cut the cables. Contacting Davis Instruments (510) 732-7814 for Technical Support, Monday – Friday, 7:00 a.m. – 5:30 p.m. -
Page 11: Specifications
S p e c i f i c a t i o n s General Operating Temperature ... . . -40° to +150°F (-40° to +65°C) Non-operating Temperature ..-50° to +158°F (-45° to +70°C) Sensor Type . - Page 12 Product Numbers: 6372, 6372OV Wireless Temperature Station Installation Manual 07395.239 Rev. D (3/8/13) ©2011 Davis Instruments Corp. All rights reserved. Vantage Pro2™, Weather Envoy™ and Envoy8X™ are trademarks of Davis Instruments. Davis Instruments Quality Management System is ISO 9001 certified.
Need help?
Do you have a question about the 6372 and is the answer not in the manual?
Questions and answers