DAVIS Vantage Vue Console Quick Reference Manual
Hide thumbs
Also See for Vantage Vue Console:
- User manual (48 pages) ,
- Manual (32 pages) ,
- Getting started manual (13 pages)
Table of Contents
Advertisement
Advertisement
Table of Contents

Related Manuals for DAVIS Vantage Vue Console


Summary of Contents for DAVIS Vantage Vue Console
- Page 1 ® For more detailed information, see your Vantage Vue Console manual.
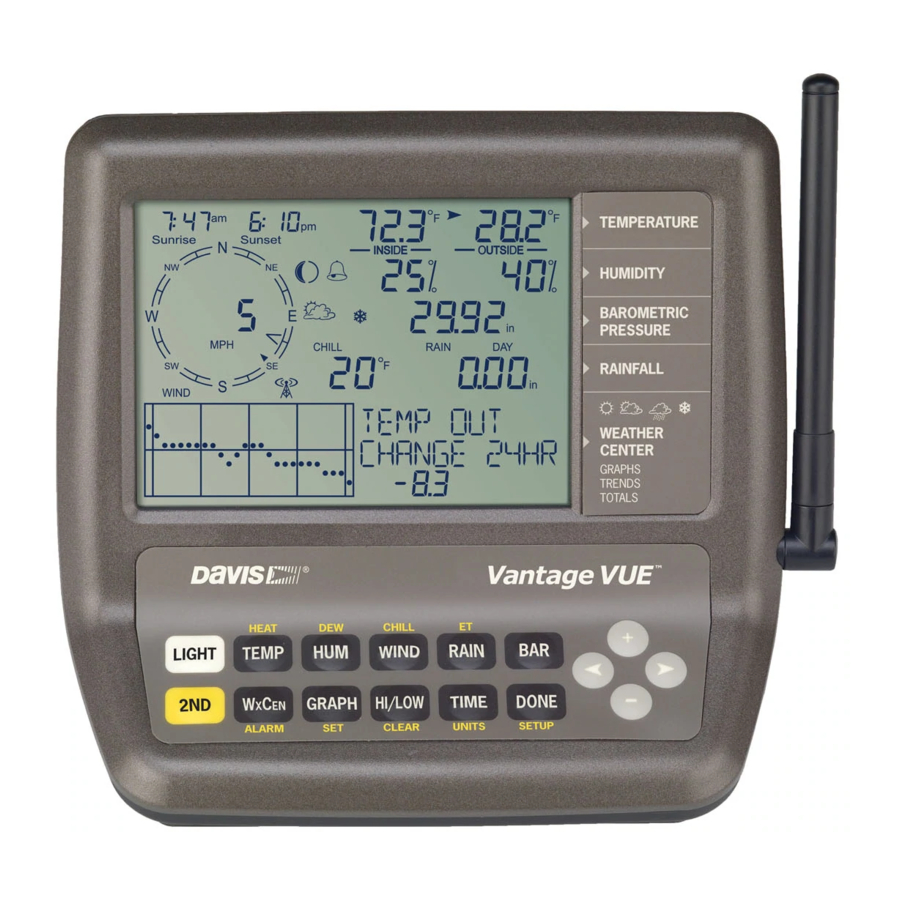
- Page 2 Current Weather Mode Arrow shows Time & Date, Inside & Outside which variable Sunrise/Sunset Temperature is selected Moon phase, alarm Inside & Outside INSIDE OUTSIDE & forecast icons Humidity Barometric Wind Rose pressure & trend Compass Rain data & CHILL RAIN RATE ET * Antenna icon...
- Page 3 Icons Forecast Icons Mostly Clear Partly Cloudy Mostly Cloudy Rain Snow See the Vantage Vue Console Manual for a list of all the forecast icons. Moon Phase Icons Waxing First Waxing Full Waning Last Waning Moon Crescent Quarter Gibbous Moon...
- Page 4 Icons Alarm Bell — Appears when setting an alarm. Blinks on and off when an alarm is triggered. Graph — Indicates that graph mode is currently being displayed. GRAPH 2ND — Indicates that 2ND was pressed and all the alternate key functions (printed above or below each key) can be used.
-
Page 5: Setup Mode
Setup Mode To enter Setup Mode: 1. Press and release 2ND and then press SETUP. 2. Press DONE to advance or BAR to step back through setup screens: • TIME AND DATE — Press < and > to move between segments. Press + and - to change the value of the flashing segment. - Page 6 Setup Mode • ACTIVE TRANSMITTERS — Press < or > to select ID, use + or - to set to ON (to receive from that station) or OFF. Press GRAPH to change station type: Vue ISS, VP2 ISS, WIND. • RETRANSMIT — Press + or - to set the retransmit function ON or OFF.
- Page 7 Setup Mode • WIND CUP (This option will only display if you have chose VP2 ISS or WIND in the ACTIVE TRANSMITTERS screen) — Press + or - to change wind cup option: SMALL, LARGE, or OTHER. • RAIN COLLECTOR — Used at factory for calibration. •...
- Page 8 Light Press LIGHT to toggle between: • Backlight on • Backlight off If the console is running on AC power: • The backlight will remain on until you turn it off. If the console is running on battery power: • The backlight will remain on as long as you continue pressing various keys.
- Page 9 Temperature Press TEMP to toggle between: • Outside Temperature • Inside Temperature Press 2ND and UNITS to change unit of measure. There are four different units of measure: 0F, 0.0F, 0C, 0.0C. All temperature-related readings (outside and inside temperature, wind chill, heat index, and dew point) will read in the same unit of measure.
- Page 10 Wind Press WIND to toggle between: • Wind Speed • Wind Direction (degrees) Press 2ND and UNITS to change unit of measure. There are four different units of measure for wind speed: 0 mph, 0.0 m/s, 0 km/h, 0 knots On the compass rose: Current Wind Direction Dominant Wind Direction —...
- Page 11 Rain Press RAIN to toggle between: • Rain Rate: current rate • Rain Day: rain accumulated since midnight • Rain Month: rain accumulated month-to-date • Rain Year: rain accumulated year-to-date Press 2ND and UNITS to change unit of measure. There are two different units of measure for rain values: (0.00 in, 0.0 mm). Changing the unit of measure for rain changes ET units as well.
- Page 12 Barometer Press BAR to select: Barometric Pressure Press 2ND and UNITS to change unit of measure There are four units of measure for barometric pressure: 0.00 in, 0.0 mm, 0.0 hPa, and 0.0 mb. Barometric Trend Arrow shows change over the last three hours: Increase of 0.06"...
- Page 13 Second Press 2ND to select the second key function. The second key function is printed above the top keys and below the bottom keys. icon will appear near the time and date. After you press another key, the icon will disappear. If you wish to select another second key function, you must press 2ND again.
-
Page 14: Heat Index
Heat Index Dew Point Wind Chill Press 2ND and HEAT to: Display Heat Index Press 2ND and DEW to: Display Dew Point Press 2ND and CHILL to: Display Wind Chill Press 2ND and UNITS to change unit of measure. There are two different units of measure: 0F, 0C, All temperature-related readings (outside and inside temperature, wind chill, heat index, and dew point) will read in the same unit of measure. - Page 15 Console is listening to a Vantage Pro2 Plus ISS or Vantage Pro2 with solar radiation sensor. If you press 2ND and ET while listening to a Vantage Vue ISS, the console will not display ET readings and you will hear an error beep.
- Page 16 Weather Center. Press a variable key and then press WxCen multiple times to scroll through the available screens. See the Vantage Vue Console Manual for more information on all the screens available in the Weather Center.
- Page 17 The time and date change as you move backward and forward in time. (NOTE: Not all highs and lows are available for all weather variables. See Vantage Vue Console Manual for details.) Press DONE to exit the Graph Mode.
- Page 18 (NOTE: Not all highs and lows are available for all weather variables. See Vantage Vue Console Manual for details.) 4. Press ( < ) or ( > ) to scroll through the dots on the graph. The time and date will change and the corresponding dot on the graph will flash.
- Page 19 Time/Date; Sunrise/Sunset Press TIME to toggle between: • Current Time & Date • Times of Sunrise & Sunset Done Press DONE to: • Accept an alarm setting. • Silence an alarm. • Exit the alarm screen. • Exit the graph screen. •...
-
Page 20: Set Alarms
Except for the time alarm, the arrow icon displays next to the variable you have selected. 3. Press HI/LOW to switch between high and low alarms. (Note: Not all alarms are available for all weather variables. See Vantage Vue Console Manual for details.) 4. Press 2 then SET to enter or change an alarm setting. - Page 21 Silence & Clear Alarms When an alarm is triggered, you will hear an audible alarm: • Until conditions change (i.e., they rise above or fall below the alarm thresholds you have set) or you clear the alarm, if the console is being run on AC power.
- Page 22 Enter or Change Alarm or Calibration Press 2ND and SET to: Enter or change an alarm or calibration setting. Choose Alarm Mode or a weather variable: 1. Use + and - to change the digit within a field. Use < or > to move to the next field.
- Page 23 Clear To clear daily, monthly or yearly HIGH/LOW data: 1. Press HI/LOW. 2. Select the variable you wish to clear. 3. Press 2ND then CLEAR, holding CLEAR down until the digits stop flashing and zeroes or dashes appear in the field. To clear a single alarm setting: 1.
- Page 24 Change Units of Measure Press 2ND and UNITS to: Change the unit of measure for a selected variable. • All temperature-related readings (inside and outside temperature, wind chill, heat index, and dew point) will read in the same unit of measure. Changing one from F to C (or vice versa) changes all the others.
- Page 25 Enter Setup Mode Press 2ND and SETUP to: Enter Setup Mode.
- Page 26 Diagnostic Screens To Display the Console Diagnostic Screens: Press and hold TEMP then press HUM to display the Statistical Diagnostic Screen. Statistical Diagnostic Screen: 1. Time or number of closed anemometer reed switch* 2. Date or number of open anemometer reed switch* 3.
- Page 27 5. Times Phase Lock Loop did not lock* 6. % Good packets 7. Frequency index of next packet* 8. Background noise level 9. Console battery voltage * Used by Davis engineers. Please see your Vantage Vue Console Manual for more information on console diagnostic screens.
- Page 28 3465 Diablo Avenue, Hayward, CA 94545-2778 U.S.A. 510-732-9229 • Fax: 510-732-9188 E-mail: info@davisnet.com • www.davisnet.com ® Vantage Vue Console Quick Reference Guide Part Number: 7395.260 Rev. B (1/6/12) ©2012 Davis Instrument Corp. All Rights Reserved. ® Vantage Vue is a trademark of Davis Instruments Corp.
Need help?
Do you have a question about the Vantage Vue Console and is the answer not in the manual?
Questions and answers