Table of Contents

Related Manuals for RiverGrille GR1008-013841


Summary of Contents for RiverGrille GR1008-013841
- Page 1 Farmer’s Grill Owner’s Manual Assembly and Operating Instructions Model # GR1008-013841 Tools required for assembly: (Not Included) Pliers, Philips & Flathead Screwdrivers, Adjustable Wrench. Keep this manual for future reference. 1 of 20 20110714...
- Page 2 WARNING Only use this grill on a hard, level, non-combustible, stable surface (concrete, ground, etc.) capable of supporting the weight of the grill. Never use on wooden or other surfaces that could burn. DO NOT attempt to remove charcoal ash tray while coals are hot. When grill is in use, keep clearance of 36”...
- Page 3 WARNING When grilling, grease from meat may drip into the charcoal and cause a grease fire. If this should happen close lid to suffocate the flame. Do not use water to extinguish grease fires. Use caution when opening the lid, keep hands, face and body a safe distance away. Flash flare ups may occur when air comes into contact with fire or hot coals.
-
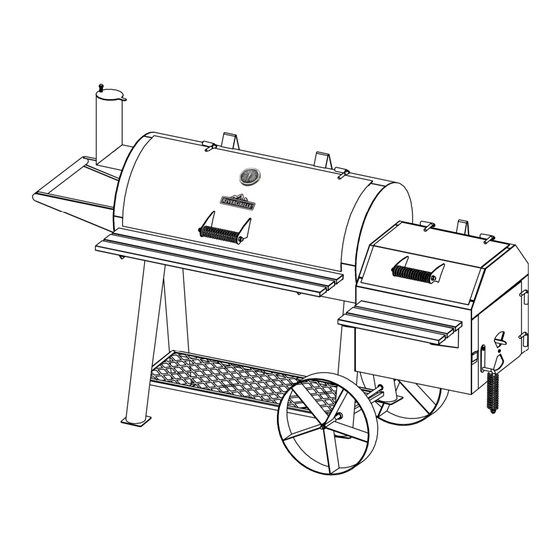
Page 4: Product Diagram
ASSEMBLY INSTRUCTIONS THANK YOU FOR PURCHASING THIS GRILL Read all safety warnings & assembly instructions carefully before assembling or operating your grill. customerservice@rankam.com For missing parts, please contact customer service at or at 888-837-1380 (U.S. only), Mon to Fri, 9:00 a.m. – 5:00 p.m. Western Standard Time. (Proof of purchase will be required.) Inspect contents of the box to ensure all parts are included and undamaged. -
Page 5: Component List
Component List 1. Main Grill Lid 2. Grill Body 3. Firebox Lid Supports 4. Firebox Lid 5. Firebox 6. Firebox Door 7. Firebox Door Latch 8. Firebox Air vent 9. Firebox Cooking 10. Firebox Bracket 11. Firebox Charcoal 12. Wheel Grate Grate 2pcs... - Page 6 17. Front Shelf 18. Bottom Rack 19. Front Shelf Bracket 20. Left Front Leg 2pcs 21. Left Rear Leg 22. Right Front Leg 23. Right Rear Leg 24. Side Handle 25. Grease Cup Holder 26. Smoke Stack 27. Temperature Gauge STOP! DO NOT RETURN TO RETAILER.
- Page 7 Hardware List Item No. Item name Diagram Bolt M8 X 15 Shoulder Bolt M8 X 18 Bolt M6 X 12 Bolt M5 X 10 Nut M8 Nut M6 Lock Nut M12 Washer M6 Washer M5 Spring Washer M8 Hex Nut Wrench Screwdriver 7 of 20 20110714...
-
Page 8: Assembly Procedures
Assembly Procedures Step 1. Assemble 4 legs (Part# 20,21,22,23) by 16pcs of Bolt M8 x 15 (A) and 16pcs of Nut M8 (E) on Grill Body (Part# 2) Left Rear Leg Left Front Leg Right Rear Leg Right Front Leg 8 of 20 20110714... - Page 9 Step 2. Insert Axle (Part# 13) through the holes on Right Front Leg (Part# 22) and Right Rear Leg (Part# 23) Step 3. Insert Wheel (Part# 12) through the Axle (Part#13) & lock by 2pcs of Lock Nut M12 (G) Step 4.
- Page 10 Step 5. Assemble Side Handle (Part# 24) by 4pcs of Bolt M8 x 15 (A) and 4pcs of Nut M8 (E) on Grill Body (Part# 2) Step 6. Assemble Smoke Stack (Part# 26) by 4pcs of Bolt M8 x 15 (A) and 4pcs of Nut M8 (E) on Grill Body (Part# 2) 10 of 20 20110714...
- Page 11 Step 7. Assemble Front Shelf (Part# 17) by 2pcs of Bolt M8 x 15 (A) and 2pcs of Nut M8 (E) on Grill Body (Part# 2) Step 8. Assemble Front Shelf Bracket (Part# 19) by 2pcs of Bolt M6 x 12 (C) and 2pcs of Nut M6 (F) on Front Shelf (Part# 17).
- Page 12 Step 9. Insert Temperature Gauge (Part# 27) into Main Grill Lid (Part# 1) by the Nut & Washer which are pre-attached on the Temperature Gauge (Part# 27) Step 10. Assemble Main Grill Lid (Part# 1) by 2pcs of Bolt M5 x 10 (D) and 2pcs of Washer M5 (I) on Grill Body (Part# 2) Step 11.
- Page 13 Step 12. Assemble Firebox Bracket (Part# 10) by 2pcs of Bolt M6 x 12 (C) through the holes on Right Front Leg (Part# 22) and Right Rear Leg (Part# 23). And use 1pc of Bolt M8 x 15 (A) and 1pc of Nut M8 (E) to assemble on Firebox (Part# 5) Step 13.
- Page 14 Step 15. Assemble Firebox Lid (Part# 4) by 2pcs of Bolt M5 x 10 (D) and 2pcs of Washer M5 (I) on Firebox (Part# 5) Step 16. Insert Firebox Door (Part# 6) onto the Firebox (Part# 5). Assemble Firebox Air Vent (Part# 8) by 1pc of Shoulder Bolt M8 x 18 (B), 1pc of Spring Washer M8 (J) and 1pc of Nut M8 (E) on Firebox Door (Part# 6) Step 17.
- Page 15 Step 18. Place Charcoal Grate (Part# 15) into Grill Body (Part# 2) Step 19. Place Cooking Grate (Part# 16) on Step 20. Place Firebox Charcoal Grate (Part# the support rims of Grill Body (Part# 2) 11) into Firebox (Part# 5) Step 21.
-
Page 16: Preparation For Use & Lighting Instructions
WARNING Read all safety warnings and instructions carefully before operating your grill. PREPARATION FOR USE & LIGHTING INSTRUCTIONS Curing your grill Prior to your first use of the grill, follow the instructions below carefully to cure your grill. Curing your grill will minimize damage to the exterior finish as well as get rid of the grill paint odor that can cause unnatural flavors to the first meal prepared on the grill. -
Page 17: Operating Instructions
WARNING Charcoal lighting fluid must be allowed to completely burn off prior to closing grill lid (approximately 20 minutes). Failure to do this could trap fumes from charcoal lighting fluid in grill and may result in a flash-fire or explosion when lid is opened. -
Page 18: Flavoring Wood
IF USING CHARCOAL CHIMNEY STARTER, PROCEED TO STEP 5. If you choose to use charcoal lighting fluid, ONLY use charcoal lighting fluid approved for lighting charcoal. Do not use gasoline, kerosene, alcohol or other flammable materials for lighting charcoal. Follow all manufacturer’s warnings and instructions regarding the use of their product. -
Page 19: Adding Charcoal/Wood During Cooking
NOTE: Dry wood burns hotter than charcoal, so you may want to increase the ratio of wood to charcoal to increase the cooking temperature. Hardwood such as oak, hickory, mesquite, fruit and nut wood are an excellent fuel because of their burning rate. When using wood as fuel, make sure the wood is seasoned and dry. DO NOT use resinous wood such as pine as it will produce an unpleasant taste. -
Page 20: Proper Care And Maintenance
Proper Care & Maintenance Cure your grill periodically throughout the year to protect against excessive rust. To protect your grill from excessive rust, the unit must be properly cured and covered at all times when not in use. Wash cooking grates and charcoal grates with hot, soapy water, rinse well and dry. Lightly coat grates with vegetable oil or vegetable oil spray.
Need help?
Do you have a question about the GR1008-013841 and is the answer not in the manual?
Questions and answers