Table of Contents
Advertisement
Quick Links
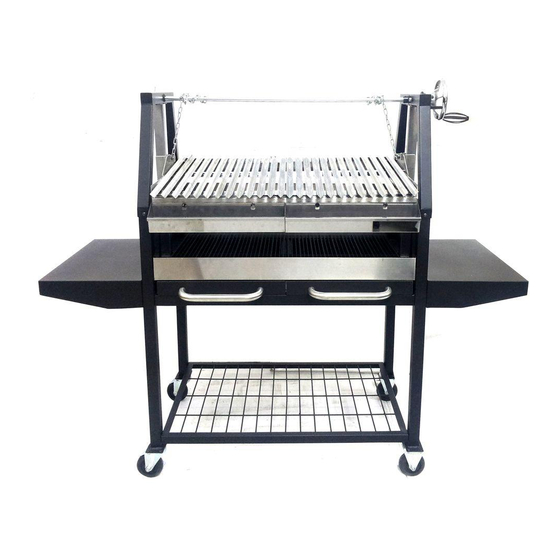
Argentine Barbecue Grill
Owner's Manual
Assembly and Operating Instructions
Model # CG2093901-RG
Tools required for assembly: (Not Included) Pliers, Philips & Flathead Screwdrivers, Adjustable Wrench.
Keep this manual for future reference
Should you encounter any problem,
CALL US FIRST.
Do not return product to the store.
WE CAN HELP.
customerservice@rankam.com
Please contact Customer Service at
, Mon to Fri, 8:00 a.m. – 5:00 p.m. Pacific Standard Time.
1-888-837-1380
or at
CG2093901-RG ENG
Page
1 of 24
20131018 V.1
Advertisement
Table of Contents

Related Manuals for RiverGrille CG2093901-RG


Summary of Contents for RiverGrille CG2093901-RG
- Page 1 Argentine Barbecue Grill Owner’s Manual Assembly and Operating Instructions Model # CG2093901-RG Tools required for assembly: (Not Included) Pliers, Philips & Flathead Screwdrivers, Adjustable Wrench. Keep this manual for future reference Should you encounter any problem, CALL US FIRST. Do not return product to the store.
- Page 2 DO NOT attempt to move the grill. Wear protective gloves or oven mitts. DO NOT touch any hot grill surfaces. DO NOT wear loose clothing or allow hair to come in contact with grill. CG2093901-RG ENG Page 2 of 24 20131018 V.1...
- Page 3 Use caution and common sense when operating your grill. Failure to adhere to safety warning and guidelines in this manual could result in bodily injury or property damage. Save this manual for future reference. CG2093901-RG ENG Page 3 of 24...
-
Page 4: Product Diagram
Inspect contents of the box to ensure all parts are included and undamaged. We recommend two people for assembly of this grill. The following tools are required for assembly and are not included: Pliers Philips & Flathead Screwdrivers Adjustable Wrench Product Diagram CG2093901-RG ENG Page 4 of 24 20131018 V.1... -
Page 5: Component List
12. Cooking Grate Support 1 pc 1 pc 2 pcs 1 pc 13. Grease Collector 14. Side Guard 15. Back Guard 16. (R ) Side Table 2 pcs 2 pcs 1 pc 1 pc CG2093901-RG ENG Page 5 of 24 20131018 V.1... - Page 6 2 pcs 2 pcs 1 pc 29. Chain 30. Stop Collar 31. (R ) Sliding Pillar 32. (L) Side Table 2 pcs 1 pc 1 pc 1 pc 33. Security Pin 1 pc CG2093901-RG ENG Page 6 of 24 20131018 V.1...
-
Page 7: Hardware List
4 pcs Bolt (M6X12 SS) 32 pcs Flange Nut (M6) 26 pcs Flange Nut (M6 SS) 12 pcs Lock Nut (M16) 1 pc Insulation Washer 1 pc Step Screw A 4 pcs CG2093901-RG ENG Page 7 of 24 20131018 V.1... - Page 8 Bolt (M6X15 SS) 2 pcs Step Screw B 1 pc Check Lever Collar 1 pc Cap Nut 1 pc R Pin 1 pc CG2093901-RG ENG Page 8 of 24 20131018 V.1...
-
Page 9: Assembly Procedures
Assemble the Left Rear Leg (23) and Right Rear Leg (24) to the Grill Body Chassis (18) using M6X12 Bolt (A) as illustrated below. Hand Tighten only Assembly of legs on the rear side of the grill CG2093901-RG ENG Page 9 of 24 20131018 V.1... - Page 10 Assemble the Swivel Caster with Brake (27) to Left Front Leg (22) and Left Rear Leg (23), also Swivel Caster (26) to Right Front Leg (25) and Right Rear Leg (24) using M6X12 Bolt (A) and M6 Flange Nut (E). Tighten with tools CG2093901-RG ENG Page 10 of 24...
- Page 11 Assemble (L) Lifter Rack (8) and (R ) Lifter Rack (9) on the upper end of the legs and fix with M6x50 Bolt (C ) and M6 Flange Nut (E ). Also affix the joints with M6X12 Bolt (A). Hand Tighten only CG2093901-RG ENG Page 11 of 24...
- Page 12 NOTE: Now tighten all screws in Steps 1 through Step 7 Tighten with tools Step 8. Install the two Side Guards (14) to the upper part of the legs using M6X12 SS Bolt (D) as shown. Hand Tighten only CG2093901-RG ENG Page 12 of 24 20131018 V.1...
- Page 13 Install the Back Guard (15) to the upper part of the legs using M6X12 SS Bolt (D) as shown. Hand Tighten only Step 10. Install the (L) Side Table (32) and (R ) Side Table (16) using M6X12 Bolt (A). Tighten with tools CG2093901-RG ENG Page 13 of 24 20131018 V.1...
- Page 14 Nut (M). Hook up the Check Lever Spring (5) with Check Lever (6) and (R ) Sliding Pillar (31). Fix the chain of the Security Pin (33) on the (R ) Lifter Rack(9) with a M6X12 Bolt (A). Hand Tighten only CG2093901-RG ENG Page 14 of 24...
- Page 15 Lifter Brackets (11) using M6 SS Flange Nut (F) and M6X15 SS Bolt (D). NOTE: Adjust and make sure both Chains (29) are taut and hanging the Cooking Grate Support (12) firmly. Tighten with tools CG2093901-RG ENG Page 15 of 24 20131018 V.1...
- Page 16 Assemble the Ash Pans (20) with Ash Pan Handles (21) using M6X12 Bolt (A). Tighten with tools Step 15. Put the Ash Pans (20) and Charcoal Grates (17) into the Grill Body Chassis (18) carefully. CG2093901-RG ENG Page 16 of 24 20131018 V.1...
- Page 17 V-bar of the V-groove Grate (7) is tightly bounded by the lower frame of the Cooking Grate Support (12) as shown by illustration B below. Step 17. Hook on the Grease Collectors (13). CG2093901-RG ENG Page 17 of 24...
- Page 18 Check Lever (6) unexpectedly. Tighten with tools Step 19. Assembly completed! NOTE: Make sure all screws are tightened before use! Tighten with tools CG2093901-RG ENG Page 18 of 24 20131018 V.1...
-
Page 19: Preparation For Use & Lighting Instructions
Make sure the cooking frame suspension system and its ratchet locking device are functioning properly. The Check Lever (6) MUST BE engaged with the Ratchet Wheel (2) tightly and sturdy. Adjust the cooking grate to highest position by turning the flywheel in front to back direction. CG2093901-RG ENG Page 19 of 24... - Page 20 Adjust the cooking grate at desired level by turning the flywheel and ensuring lock in place, and then insert the Security Pin (33) at once to lock the ratchet locking device again for safety purpose. CG2093901-RG ENG Page 20 of 24...
- Page 21 For example, we recommend: Whole poultry split and cooked flat, like steaks Whole fish butterflied and cooked without turning Vegetables and fruits – their sweetness is complemented by hardwood flavor CG2093901-RG ENG Page 21 of 24 20131018 V.1...
-
Page 22: Adding Charcoal/Wood During Cooking
With a garden hose, completely wet surface beneath and around the grill to extinguish any ashes, coals or embers which may have fallen during the cooking or cleaning process. Cover and store grill in a protected area away from children and pets. CG2093901-RG ENG Page 22 of 24... -
Page 23: Proper Care And Maintenance
· Rust or corrosion is not deemed a manufacturing or materials defect · Discoloration or loss of paint due to handling during assembly, heat or cleaning products. Paint may require touch up. · Stainless steel discoloration or corrosion · Consumables such as batteries CG2093901-RG ENG Page 23 of 24 20131018 V.1... - Page 24 Rankam Metal Products Manufactory Ltd. 1618 W. Rosecrans Ave., Gardena, CA90249 customerservice@rankam.com Please contact Customer Service at , Mon to Fri, 8:00 a.m. – 5:00 p.m. Pacific Standard Time. 1-888-837-1380 or at CG2093901-RG ENG Page 24 of 24 20131018 V.1...
Need help?
Do you have a question about the CG2093901-RG and is the answer not in the manual?
Questions and answers