
Related Manuals for Yamaha Neo's YN50


Summary of Contents for Yamaha Neo's YN50
- Page 1 Read this manual carefully before operating this vehicle. OWNER’S MANUAL YN50 / YN50M 5C2-F8199-E3...
- Page 2 EAU46090 Read this manual carefully before operating this vehicle. This manual should stay with this vehicle if it is sold.
- Page 3 Yamaha a reputation for dependability. Please take the time to read this manual thoroughly, so as to enjoy all advantages of your YN50 / YN50M. The Owner’s Manual does not only instruct you in how to operate, inspect and maintain your scooter, but also in how to safeguard yourself and others from trouble and injury.
-
Page 4: Important Manual Information
IMPORTANT MANUAL INFORMATION EAU10132 Particularly important information is distinguished in this manual by the following notations: This is the safety alert symbol. It is used to alert you to potential personal injury hazards. Obey all safety messages that follow this symbol to avoid possible injury or death. - Page 5 IMPORTANT MANUAL INFORMATION EAUS1172 YN50 / YN50M OWNER’S MANUAL ©2010 by YAMAHA MOTOR ESPAÑA S.A. 1st edition, July 2010 All rights reserved. Any reprinting or unauthorized use without the written permission of YAMAHA MOTOR ESPAÑA S.A. is expressly prohibited. Printed in Spain.
-
Page 6: Table Of Contents
TABLE OF CONTENTS SAFETY INFORMATION .....1-1 OPERATION AND IMPORTANT Checking the front brake pads Further safe-riding points ....1-5 RIDING POINTS ........5-1 and rear brake shoes ....6-13 Starting a cold engine ......5-1 Checking the brake fluid level ..6-14 DESCRIPTION........2-1 Starting off ........5-1 Changing the brake fluid ....6-15 Left view ...........2-1 Acceleration and deceleration ..5-2... - Page 7 TABLE OF CONTENTS SCOOTER CARE AND STORAGE ..7-1 Matte color caution......7-1 Care ..........7-1 Storage ..........7-3 SPECIFICATIONS .......8-1 CONSUMER INFORMATION .....9-1 Identification numbers ......9-1...
-
Page 8: Safety Information
SAFETY INFORMATION EAUT1016 Safe Riding • Use extra caution when you Be a Responsible Owner Perform the pre-operation checks are approaching and passing As the vehicle’s owner, you are res- each time you use the vehicle to through intersections, since ponsible for the safe and proper ope- make sure it is in safe operating con- intersections are the most... - Page 9 SAFETY INFORMATION rator. A typical error made by the Never ride under the influence of feet. The engine or exhaust sys- operator is veering wide on a turn alcohol or other drugs. tem become very hot during or due to excessive speed or under- This scooter is designed for on- after operation and can cause cornering (insufficient lean angle...
- Page 10 Yamaha accessories, which are avai- possible on both sides of the of the scooter is changed. To avoid lable only from a Yamaha dealer, have scooter to minimize imbalance or the possibility of an accident, use been designed, tested, and approved instability.
- Page 11 SAFETY INFORMATION modifications not specifically recom- does not in any way reduce This improper position limits mended by Yamaha, even if sold and ground clearance or cornering the freedom of movement of installed by a Yamaha dealer. clearance, limit suspension tra-...
-
Page 12: Further Safe-Riding Points
SAFETY INFORMATION Remove all loose items from the EAU10372 Always wear a helmet, gloves, Further safe-riding points scooter. trousers (tapered around the cuff Be sure to signal clearly when Point the front wheel straight and ankle so they do not flap), making turns. -
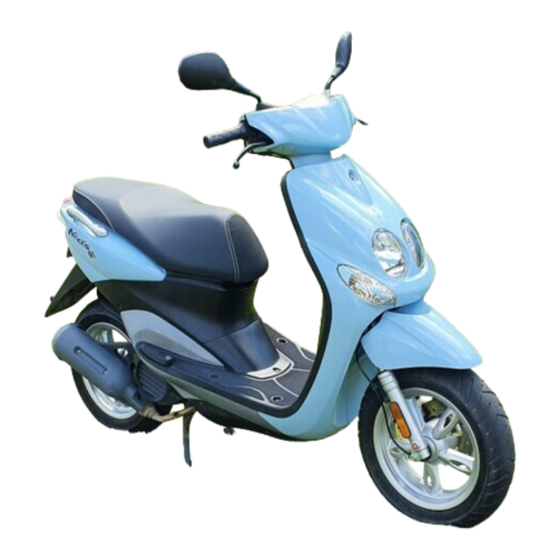
Page 13: Description
DESCRIPTION EAU10410 Left view 1. Storage compartment (page 3-11) 2. Shock absorber assembly 3. Final transmission oil filler cap (page 6-8) 4. Brake lever free play adjusting nut (page 6-13) 5. Final transmission oil drain bolt (page 6-8) 6. Kickstarter (page 3-10) 7. -
Page 14: Right View
DESCRIPTION EAU10420 Right view 1. Grab bar (page 5-1) 9. Passenger footrest 2. Fuel tank cap (page 3-7) 10. Centerstand (page 6-17) 3. 2-stroke engine oil tank (page 3-7/3-10) 4. Seat (page 3-10) 5. Battery (page 6-19) 6. Fuses (page 6-20) 7. -
Page 15: Controls And Instruments
DESCRIPTION EAU10430 Controls and instruments 1. Rear brake lever (page 3-6) 2. Left handlebar switches (page 3-5) 3. Multi-function display (page 3-3) 4. Right handlebar switch (page 3-5) 5. Throttle grip (page 6-10) 6. Front brake lever (page 3-6) -
Page 16: Instrument And Control Functions
INSTRUMENT AND CONTROL FUNCTIONS EAU10460 EAU47791 1. Turn the handlebars all the way to OFF “ ” Main switch/steering lock the left. All electrical systems are off. The key 2. Push the key in from the “ ” can be removed. position, and then turn it to “... -
Page 17: Indicator And Warning Lights
4. Fuel level warning indicator “ ” If the warning light does not come on have a Yamaha dealer check the elec- when the key is in the “ ” position trical circuit. -
Page 18: Multi-Function Display
INSTRUMENT AND CONTROL FUNCTIONS EAUS1394 All LCD segments and warning Multi-function display lights come on and then go off. Be sure to turn the key to “ ” before using the button. For the U.K. only: To switch the EWA12312 speedometer and odometer/trip- WARNING meter displays between kilome-... - Page 19 INSTRUMENT AND CONTROL FUNCTIONS 3. To change the minutes digits, Odometer and tripmeter modes push the button for at least three Pushing the button switches the dis- seconds. play between the odometer mode 4. When the minutes digits start “ODO” and the tripmeter “TRIP” in flashing, push the button to set the following order: the minutes.
-
Page 20: Handlebar Switches
If a problem is detected in the fuel electrical circuit, all LCD segments of the fuel gauge and the fuel level war- ning indicator will flash. If this occurs, have a Yamaha dealer check the vehi- cle. 1. Start switch “ ”... -
Page 21: Front Brake Lever
INSTRUMENT AND CONTROL FUNCTIONS EAU12400 EAU12900 EAU12950 Dimmer switch “ ” Front brake lever Rear brake lever Set this switch to “ ” for the high beam and to “ ” for the low beam. EAU12460 Turn signal switch “ ”... -
Page 22: Fuel And 2-Stroke Engine Oil Tank Caps
INSTRUMENT AND CONTROL FUNCTIONS EAU13202 Fuel tank cap To remove the 2-stroke engine oil tank Fuel and 2-stroke engine oil cap, pull it off. tank caps To install the 2-stroke engine oil tank cap, push it into the oil tank opening. EWA10141 WARNING Make sure that the fuel and 2-stro-... -
Page 23: Fuel
Your Yamaha engine has been desig- may deteriorate painted surfa- other sources of ignition such as ned to use regular unleaded gasoline ces or plastic parts. -
Page 24: Fuel Tank Breather/Overflow Hose
INSTRUMENT AND CONTROL FUNCTIONS EAU39451 EAU13433 ECA10701 Fuel tank breather/overflow Catalytic converter NOTICE This model is equipped with a cataly- hose Use only unleaded gasoline. The tic converter in the exhaust system. use of leaded gasoline will cause unrepairable damage to the cataly- EWA10862 tic converter. -
Page 25: 2-Stroke Engine Oil
INSTRUMENT AND CONTROL FUNCTIONS EAUM1150 EAUS1050 EAU13932 2-stroke engine oil Kickstarter Seat Make sure that there is sufficient oil in the 2-stroke engine oil tank. Add the To open the seat recommended 2-stroke engine oil if 1. Place the scooter on the centers- necessary. -
Page 26: Storage Compartment
INSTRUMENT AND CONTROL FUNCTIONS EAUM1191 ECA10080 Storage compartment NOTICE Keep the following points in mind when using the storage compart- ment. Since the storage compart- ment accumulates heat when exposed to the sun, do not sto- re anything susceptible to heat inside it. -
Page 27: Luggage Hook
INSTRUMENT AND CONTROL FUNCTIONS EAUT1072 Luggage hook Some helmets cannot be stored EWAT1031 in the storage compartment WARNING because of their size or shape. Do not leave your scooter unat- Do not exceed the load limit of 3 kg (6.6 lb) for the luggage tended with the seat open. -
Page 28: For Your Safety - Pre-Operation Checks
Do not operate the vehicle if you find any problem. If a problem cannot be corrected by the procedures pro- vided in this manual, have the vehicle inspected by a Yamaha dealer. Before using this vehicle, check the following points:... - Page 29 • Make sure that operation is smooth. • Check throttle grip free play. 6-10, 6-16 Throttle grip • If necessary, have Yamaha dealer adjust throttle grip free play and lubricate cable and grip housing. • Check for damage. • Check tire condition and tread depth.
-
Page 30: Operation And Important Riding Points
If ECA10250 NOTICE there is a control or function you do See page 5-3 for engine break-in not understand, ask your Yamaha Before starting off, allow the engine to instructions prior to operating the dealer. warm up. -
Page 31: Acceleration And Deceleration
OPERATION AND IMPORTANT RIDING POINTS 4. Check for oncoming traffic, and EAU16780 EAU16793 Acceleration and Braking then slowly turn the throttle grip EWA10300 deceleration (on the right) in order to take off. WARNING 5. Switch the turn signal off. Avoid braking hard or suddenly (especially when leaning over to one side), otherwise the sco- oter may skid or overturn. -
Page 32: Tips For Reducing Fuel Consumption
OPERATION AND IMPORTANT RIDING POINTS Front EAU16820 EAU16830 Tips for reducing fuel Engine break-in There is never a more important consumption period in the life of your engine than Fuel consumption depends largely on the period between 0 and 1000 km your riding style. -
Page 33: Parking
If any engine trouble should occur soft ground, otherwise the during the engine break-in period, vehicle may overturn, increa- immediately have a Yamaha dealer sing the risk of a fuel leak and check the vehicle. fire. Do not park near grass or other... -
Page 34: Periodic Maintenance And Adjustment
Failure to properly maintain the vehicle or performing maintenance activities incorrectly may increase your risk of injury or death during service or while using the vehicle. If you are not familiar with vehicle service, have a Yamaha dealer per- form service. -
Page 35: Periodic Maintenance Chart For The Emission Control System
From 30000 km (17500 mi), repeat the maintenance intervals starting from 6000 km (3500 mi). Items marked with an asterisk should be performed by a Yamaha dealer as they require special tools, data and technical skills. -
Page 36: General Maintenance And Lubrication Chart
PERIODIC MAINTENANCE AND ADJUSTMENT EAU17717 General maintenance and lubrication chart ODOMETER READING CHECK OR ANNUAL ITEM MAINTENANCE JOB CHECK 1000 km 6000 km 12000 km 18000 km 24000 km (600 mi) (3500 mi) (7000 mi) (10500 mi) (14000 mi) • Clean. √... - Page 37 PERIODIC MAINTENANCE AND ADJUSTMENT ODOMETER READING CHECK OR ANNUAL ITEM MAINTENANCE JOB CHECK 1000 km 6000 km 12000 km 18000 km 24000 km (600 mi) (3500 mi) (7000 mi) (10500 mi) (14000 mi) • Check bearing play and steering √ √...
- Page 38 PERIODIC MAINTENANCE AND ADJUSTMENT ODOMETER READING CHECK OR ANNUAL ITEM MAINTENANCE JOB CHECK 1000 km 6000 km 12000 km 18000 km 24000 km (600 mi) (3500 mi) (7000 mi) (10500 mi) (14000 mi) • Check operation and free play. Throttle grip •...
-
Page 39: Removing And Installing The Cowling And Panel
PERIODIC MAINTENANCE AND ADJUSTMENT EAU18740 Removing and installing the cowling and panel 1. Cowling A 1. Headlight coupler 2. Screw 2. Auxiliary light lead coupler To install the cowling 1. Cowling A 1. Connect the headlight coupler, 2. Panel A and the auxiliary light lead cou- pler. -
Page 40: Checking The Spark Plug
To install the panel operating improperly. Do not attempt Place the panel in the original posi- to diagnose such problems yourself. tion, and then install the screw. 1. Spark plug cap Instead, have a Yamaha dealer check the vehicle. -
Page 41: Final Transmission Oil
If any leakage is found, have a 3. Install the spark plug with the Yamaha dealer check and repair the spark plug wrench, and then Specified spark plug: scooter. In addition, the final trans- tighten it to the specified torque. -
Page 42: Air Filter Element
7. Refill with the specified amount lubrication chart. Have a Yamaha of the recommended final trans- dealer clean or replace the air filter mission oil. WARNING! Make element. -
Page 43: Adjusting The Carburetor
Therefore, all car- cle, note the following points regar- buretor adjustments should be left to ding the specified tires. a Yamaha dealer, who has the neces- sary professional knowledge and Tire air pressure experience. 1. Throttle grip free play The throttle grip free play should mea- sure 4.0–6.0 mm (0.16–0.24 in) at the... - Page 44 175 kPa (1.75 kgf/cm After extensive tests, only the tires lis- 25 psi, 1.75 bar) ted below have been approved for Rear: this model by Yamaha Motor Co., Ltd. 200 kPa (2.00 kgf/cm ZAUM0054 29 psi, 2.00 bar) 90–163 kg (198–359 lb): 1.
-
Page 45: Cast Wheels
Besides lever free play and, if necessary, have An unbalanced wheel can result being illegal, operating the a Yamaha dealer check the brake sys- in poor performance, adverse vehicle with excessively worn tem. handling characteristics, and a... -
Page 46: Adjusting The Rear Brake Lever Free Play
If a brake pad is damaged or if adjusting nut in direction (b). the lining thickness is less than 3.1 mm (0.12 in), have a Yamaha dealer replace the brake pads as a set. 6-13... -
Page 47: Checking The Brake Fluid Level
DOT 4 Yamaha dealer replace the brake sho- check the brake pads for wear and es as a set. Refill with the same type of brake the brake system for leakage. -
Page 48: Changing The Brake Fluid
As the brake pads wear, it is nor- have a Yamaha dealer check or repla- mal for the brake fluid level to ce it. WARNING! Damage to the gradually go down. However, if... -
Page 49: Checking And Lubricating The Throttle Grip And Cable
In addition, the cable should be lubri- should be checked before each ride. Front brake lever cated by a Yamaha dealer at the inter- In addition, the cable should be lubri- vals specified in the periodic mainte- cated at the intervals specified in the nance chart. -
Page 50: Checking And Lubricating The Centerstand
2. While applying the front brake, WARNING push down hard on the handle- If the centerstand does not move up bars several times to check if the and down smoothly, have a Yamaha front fork compresses dealer check or repair it. Otherwise, rebounds smoothly. -
Page 51: Checking The Steering
If any free lubrication chart. If there is play in the play can be felt, have a Yamaha wheel hub or if the wheel does not dealer check or repair the stee- turn smoothly, have a Yamaha dealer ring. -
Page 52: Battery
PERIODIC MAINTENANCE AND ADJUSTMENT EAUM1403 contains minerals that are Battery Make sure that the scooter is positio- harmful to the battery. [ECA10611] ned straight up when checking the EWA10760 electrolyte level. WARNING 2. Remove panel A. (See page 6-6). Electrolyte is poisonous and 3. -
Page 53: Replacing The Fuse
PERIODIC MAINTENANCE AND ADJUSTMENT Batteries produce explosive at least once a month and fully EAU23503 Replacing the fuse hydrogen gas. Therefore, keep charge the battery whenever sparks, flames, cigarettes, etc., necessary. away from the battery and pro- 3. Fully charge the battery before vide sufficient ventilation when installation. -
Page 54: Replacing The Headlight Bulb
7.5 A NOTICE luminosity of the bulb, and the It is advisable to have a Yamaha bulb life will be adversely affec- 3. Turn the key to “ ” and turn on dealer perform this job. -
Page 55: Replacing A Front Turn Signal Light Bulb
Replacing a front turn signal der, and then remove the burnt- light bulb out bulb. ECA10670 NOTICE It is advisable to have a Yamaha dealer perform this job. 1. Place the scooter on the centers- tand. 2. Remove cowling A. (See page 1. Cowling 6-6). -
Page 56: Replacing A Turn Signal Light Bulb Or The Tail/Brake Light Bulb
PERIODIC MAINTENANCE AND ADJUSTMENT 5. Insert a new bulb into the socket, EAU24283 Replacing a turn signal light push it in, and then turn it clock- bulb or the tail/brake light wise until it stops. 6. Install the socket (together with bulb the bulb) by turning it clockwise. -
Page 57: Replacing The License Plate Light Bulb (Depens On Models)
PERIODIC MAINTENANCE AND ADJUSTMENT EAUS1151 EAU45462 Replacing the license plate Replacing the auxiliary light light bulb (Depens on bulb (Depens on models) If the auxiliary light bulb burns out, models) replace it as follows. 1. Remove the lens by removing the 1. -
Page 58: Troubleshooting
Use only genuine Yamaha replace- ment parts. Imitation parts may look like Yamaha parts, but they are often inferior, have a shorter service life and can lead to expensive repair bills. 6-25... -
Page 59: Troubleshooting Chart
Remove the spark plug and check the electrodes. The engine does not start. Have a Yamaha dealer check the vehicle. Check the battery. 4. Battery The engine turns over The battery is good. -
Page 60: Scooter Care And Storage
Some models are equipped with nology, it also makes it more vulnera- matte colored finished parts. Be ble. Rust and corrosion can develop Cleaning sure to consult a Yamaha dealer for ECA10783 even if high-quality components are advice on what products to use NOTICE used. - Page 61 SCOOTER CARE AND STORAGE with water may be used. Be scratches on the windshield. sure to rinse off any detergent Test the product on a small hid- Salt sprayed on roads in the winter residue using plenty of water, den part of the windshield to may remain well into spring.
-
Page 62: Storage
Storing the scooter in a poorly WARNING ventilated room or covering it Contaminants on the brakes or Consult a Yamaha dealer for with a tarp, while it is still wet, tires can cause loss of control. advice on what products to use. - Page 63 SCOOTER CARE AND STORAGE 2. Drain the carburetor float cham- the spark plug electrodes information on storing the bat- ber by loosening the drain bolt; while turning the engine tery, see page 6-19. this will prevent fuel deposits over. [EWA10951] from building up.
-
Page 64: Specifications
1.50 L (1.59 US qt, 1.32 Imp.qt) Gear Seat height: Secondary reduction ratio: Transmission oil: 793 mm (31.2 in) YN50: 12.923 (52/13 x 42/13) Type: Wheelbase: YN50M: 15.000 (52/12 x 45/13) YAMALUBE 4 (10W-40) or SAE 10W-40 1275 mm (50.2 in) - Page 65 SPECIFICATIONS Size: Rim size: Battery: 130/70-12 M/C 56L 12 M/C xMT3.50 Model: Manufacturer/model: Front brake: YB 4L-B VEE RUBBER Type: Voltage, capacity: Manufacturer/model: Single disc brake 12 V, 4.0 Ah CONTINENTAL / ZIPPY 1 Operation: Headlight: Manufacturer/model: Right hand operation Bulb type: PIRELLI / SL26 Recommended fluid:...
-
Page 66: Consumer Information
Record the vehicle identification num- ber and model label information in the spaces provided below for assistance when ordering spare parts from a Yamaha dealer or for reference in case the vehicle is stolen. VEHICLE IDENTIFICATION NUMBER: 1. Model label 1. - Page 67 INDEX 2-stroke engine oil ........3-10 Fuel level warning light ......3-2 Spark plug, checking .........6-7 Fuel tank breather/overflow hose ....3-9 Specifications..........8-1 Fuse, replacing.........6-20 Start switch ..........3-6 Acceleration and deceleration ....5-2 Starting a cold engine........5-1 Air filter element .........6-9 Starting off ..........5-1 Autolube pump, adjusting......6-16 Handlebar switches ........3-5 Steering, checking ........6-18...
- Page 72 YAMAHA MOTOR ESPAÑA, S.A. PRINTED IN SPAIN 2010.09...