Table of Contents
Advertisement
Advertisement
Table of Contents

Related Manuals for Goodmans GCE 7301 CD


Summary of Contents for Goodmans GCE 7301 CD
- Page 1 INSTRUCTION MANUAL Model GCE 7301 CD In Car Radio Compact Disc Player 022479...
-
Page 2: Table Of Contents
+12 volt antenna wire of your radio. If you are in any doubt of this connection please consult your vehicle dealer or the Goodmans installation helpline. IMPORTANT: Do not forget to remove the transit screws on top of the unit. -
Page 3: Accessories
5A Fuse 0.5A Fuse (2) 2 x ISO Plug Connector For use when ISO plugs are not already used on your vehicle Main Unit ISO Socket (3) 2 x Release key P. 3 Goodmans Product Information Helpline (0870) 873 0080... -
Page 4: Important Notes
When connecting your car stereo’s black ground wire, be sure to connect the wire to a metal part of your vehicle or preferably to the negative (–) terminal of the car battery. P. 4 Goodmans Product Information Helpline (0870) 873 0080... -
Page 5: Precautions And Maintenance
Caution Vauxhall owners: Vauxhall do not follow normal ISO wiring convention which will cause Goodmans radios’ to lose the radio preset memories each time the ignition switch is turned off. To prevent such occurrences swap over the Red ignition and Orange Memory wires in the bullet connectors attached to the wiring harness of the car radio. -
Page 6: Installation/Precautions
Bend these claws, if necessary Car aerial Insert radio into car slot Note: Keep the release keys in a safe place as you may need them in future to remove the unit from the car. P. 6 Goodmans Product Information Helpline (0870) 873 0080... -
Page 7: Removing And Attaching The Trim Ring
Ensure that the keys are fully pressed into the slots. • Pull on both of the release keys to remove the unit from the fixing bracket/car slot. Insert keys into key holes and pull to remove unit. P. 7 Goodmans Product Information Helpline (0870) 873 0080... -
Page 8: Using The Detachable Front Panel
2. Remove the front panel by pulling its right-hand side outward. Front Panel 3. For safekeeping, store the front panel in the supplied protective case immediately after being removed. Protective Case Front Panel P. 8 Goodmans Product Information Helpline (0870) 873 0080... - Page 9 5. Do not expose the front panel to high temperatures or direct sunlight. 6. Keep away any volatile agents (e.g. benzene, thinner, or insecticides) from touching the surface of the front panel. 7. Do not attempt to disassemble the front panel. P. 9 Goodmans Product Information Helpline (0870) 873 0080...
-
Page 10: Wiring Identification
Try the unit again it should power up and can be used normally. Note this phenomenon is most frequent in Volkswagen/Audi vehicles. P. 10 Goodmans Product Information Helpline (0870) 873 0080... -
Page 11: Iso Plug Connections
White with black stripe Speaker right front – Grey Speaker left front Grey with black stripe Speaker left front – Brown Speaker left rear Brown with black stripe Speaker left rear – P. 11 Goodmans Product Information Helpline (0870) 873 0080... -
Page 12: Recommended Minimum Loudspeaker Power Ratings
If bare wires are to be used, insert the 2 x supplied ISO plugs into the ISO socket of the car radio. The plugs are handed and will only fit one way. Connect the bare wires ends in accordance with the instructions given on page 10. P. 12 Goodmans Product Information Helpline (0870) 873 0080... -
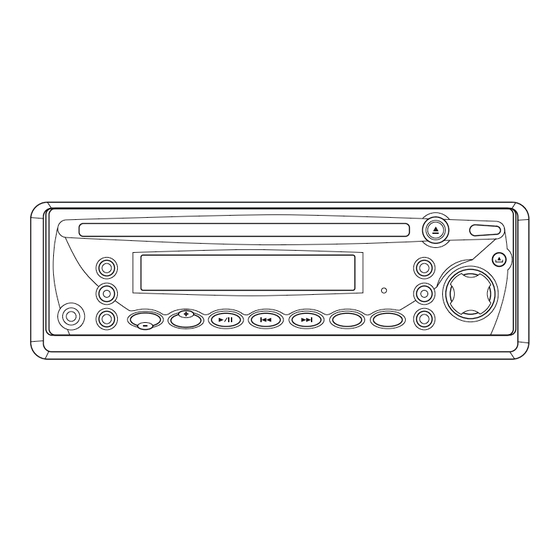
Page 13: Identification Of Controls And Functions
7. Eject Button 18. Band Button 8. Power Button 19. REP/LOC Button 9. Release Button 20. INT/MON Button 10. Auxiliary Input Socket 21. Tuning Knob 11. Select Button 22. Flashing LED P. 13 Goodmans Product Information Helpline (0870) 873 0080... - Page 14 RESET button (5) is located on the front panel and must be pressed with either a ball point pen or thin metal object. The RESET button (5) should be used for the following P. 14 Goodmans Product Information Helpline (0870) 873 0080...
- Page 15 - All the function buttons do not operate. - Error symbol on the display. Note: In the unlikely event of the unit still malfunctioning after pressing the reset button, call the Goodmans product information helpline on 0870 873 0080. RADIO OPERATION • SELECT BAND Press Press BAND button (18) to change bands as below: •...
- Page 16 If the interference is severe, retuning to an alternate frequency (BBC often use more than 1 frequency) or selecting and tuning into a different waveband may be necessary. P. 16 Goodmans Product Information Helpline (0870) 873 0080...
- Page 17 The alternator/dynamo should be fitted with a 2.2 MFD capacitor which should be connected between the +B lead (usually the thickest lead) and the car chassis or body of the alternator. P. 17 Goodmans Product Information Helpline (0870) 873 0080...
-
Page 18: Trouble Shooting
The following checks will assist in the correction of most problems which you may encounter with your unit. Should any problem persist after you have made these checks, call the Goodmans Product Information helpline on 0870 873 0080. Before going through the check list first refer back to the connection and operating procedures. - Page 19 If that disc plays properly, the first poor. disc is defective. The compact disc is dirty. Clean the disc. The radio The aerial cable is not Insert the aerial cable solidly. does not connected. work. P. 19 Goodmans Product Information Helpline (0870) 873 0080...
-
Page 20: Specifications
: 522 to 1620 KHz : 450 KHz Sensitivity (S/N = 20 dB) : 36 dBu Frequency Coverage : 144 to 288 KHz : 450 KHz Sensitivity (S/N = 20 dB) : 45 dBu P. 20 88-C1294-08 Goodmans Product Information Helpline (0870) 873 0080...
Need help?
Do you have a question about the GCE 7301 CD and is the answer not in the manual?
Questions and answers