Table of Contents
Advertisement
Quick Links
Advertisement
Table of Contents

Related Manuals for Cisco 3520


Summary of Contents for Cisco 3520
- Page 1 Cisco Video Surveillance 3520 IP Camera Installation Guide Americas Headquarters Cisco Systems, Inc. 170 West Tasman Drive San Jose, CA 95134-1706 http://www.cisco.com Tel: 408 526-4000 800 553-NETS (6387) Fax: 408 527-0883 Text Part Number: OL-28645-01...
- Page 2 OR ITS SUPPLIERS HAVE BEEN ADVISED OF THE POSSIBILITY OF SUCH DAMAGES. Cisco and the Cisco Logo are trademarks of Cisco Systems, Inc. and/or its affiliates in the U.S. and other countries. A listing of Cisco's trademarks can be found at www.cisco.com/go/trademarks.
-
Page 3: Table Of Contents
Understanding the IP Camera User Interface IP Camera Window Links IP Camera Windows Powering the IP Camera On or Off Resetting the IP Camera Viewing Live Video N D E X Cisco Video Surveillance 3520 IP Camera Installation Guide OL-28645-01... - Page 4 Contents Cisco Video Surveillance 3520 IP Camera Installation Guide OL-28645-01...
- Page 5 Obtaining Documentation, Obtaining Support, and Security Guidelines For information about obtaining documentation, submitting a service request, and gathering additional information, see the monthly What’s New in Cisco Product Documentation, which also lists all new and revised Cisco technical documentation, at: http://www.cisco.com/en/US/docs/general/whatsnew/whatsnew.html Subscribe to the What’s New in Cisco Product Documentation as a Really Simple Syndication (RSS) feed...
- Page 6 Preface Cisco Video Surveillance 3520 IP Camera Installation Guide OL-28645-01...
-
Page 7: Introduction
C H A P T E R Overview This chapter describes the Cisco Video Surveillance 3520 IP Camera, and includes the following topics: Introduction, page 1-1 • Package Contents, page 1-2 • • IP Camera Physical Details, page 1-3 Introduction The Cisco Video Surveillance 3520 IP camera is an indoor, high definition, professional fixed dome IP camera with industry-leading image quality and processing power. - Page 8 Chapter 1 Overview Package Contents Package Contents The Cisco Video Surveillance 3520 IP Camera package includes the following items: Cisco Video Surveillance 3520 IP Camera (1) • Installation template and alignment sticker (1) • Wall anchors (3) • Screws (3) •...
-
Page 9: Cisco Video Surveillance 3520 Ip
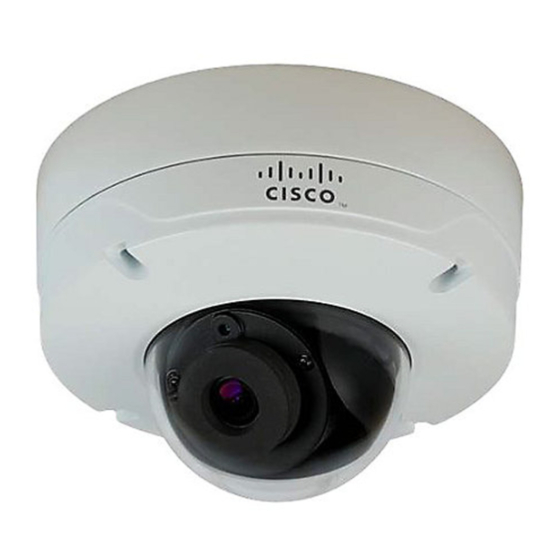
Overview IP Camera Physical Details IP Camera Physical Details Figure 1-1 and the table that follows describe the physical features of the 3520 IP camera. Figure 1-1 IP Camera Details Light sensor Senses the level of ambient light to determine when to switch day/night mode. -
Page 10: Ethernet
Accepts a standard LAN cable to connect the IP camera to a 10/100BaseT router or switch. 11 GPIO terminal block General purpose input/output (GPIO) terminal block that is used to connect external input and output devices. For more information, see Figure 1-2. Cisco Video Surveillance 3520 IP Camera Installation Guide OL-28645-01... -
Page 11: General Purpose I/O Terminal Block
GPIO Terminal Block Pin Locations and Descriptions Description DC 12V- DC 12V+ AC 24V_2 AC 24V_1 DI- (GND) DO+ (+12V) Note The maximum output load from pins 7 and 8 is 400mA. Cisco Video Surveillance 3520 IP Camera Installation Guide OL-28645-01... - Page 12 Chapter 1 Overview IP Camera Physical Details Cisco Video Surveillance 3520 IP Camera Installation Guide OL-28645-01...
-
Page 13: Installation Guidelines
C H A P T E R Camera Installation This chapter provides information and instructions for installing the Cisco Video Surveillance 3520 IP Camera, and includes the following topics: Installation Guidelines, page 2-1 • Warnings Before Installation, page 2-1 •... - Page 14 Do not place the IP Camera in high sunlight. humidity environments. Do not place the IP Camera on unsteady Do not touch the IP Camera during a • • surfaces. lightning storm. Cisco Video Surveillance 3520 IP Camera Installation Guide OL-28645-01...
-
Page 15: Chapter 2 Camera Installation
This product must be connected to a power-over-ethernet (PoE) IEEE 802.3af compliant power source Warning or an IEC60950 compliant limited power source. Statement 353 Inline power circuits provide current through the communication cable. Use the Cisco provided cable or Caution a minimum 24AWG communication cable. -
Page 16: Ip Camera Installation
Mounting the IP camera with a Vandal Resistant Enclosure, page 2-11 • Mounting the IP Camera Directly to a Surface To directly mount the 3520 IP camera to a surface, complete the following steps: Procedure Attach the included alignment sticker to the ceiling or wall. - Page 17 The primary video stream frame rate must be set higher than 15 fps. • The secondary video stream must is enabled. • We recommend that you disable analog video after installation. To disable analog video, see the Cisco Note Video Surveillance 3000 Series IP Camera Configuration Guide. Remove the black cover.
- Page 18 After you install the IP camera, follow the instructions in the “Performing the Initial Setup of the IP Camera” section on page 3-1 to access the IP camera through your network. Cisco Video Surveillance 3520 IP Camera Installation Guide OL-28645-01...
-
Page 19: Mounting The Ip Camera Flush With A Surface
Camera Installation IP Camera Installation Mounting the IP Camera Flush with a Surface To mount the 3520 IP camera flush with a surface, complete the following steps: Procedure Step 1 Secure the IP camera inside the camera housing using the two included screws. - Page 20 IP camera. You may need to temporarily remove and adjacent ceiling tile to access the analog video out port. Cisco Video Surveillance 3520 IP Camera Installation Guide OL-28645-01...
- Page 21 • The secondary video stream must is enabled. • Note We recommend that you disable analog video after installation. To disable analog video, see the Cisco Video Surveillance 3000 Series IP Camera Configuration Guide. Remove the black cover. Step 10...
- Page 22 After you install the IP camera, follow the instructions in the “Performing the Initial Setup of the IP Camera” section on page 3-1 to access the IP camera through your network. Cisco Video Surveillance 3520 IP Camera Installation Guide 2-10 OL-28645-01...
-
Page 23: Mounting The Ip Camera With A Vandal Resistant Enclosure
Camera Installation IP Camera Installation Mounting the IP camera with a Vandal Resistant Enclosure To mount the 3520 IP camera using a vandal resistant (VR) enclosure, complete the following steps: Procedure Step 1 Attach the included alignment sticker to the ceiling or wall. - Page 24 (Optional) Use a mini cable with BNC connector to temporarily attach an NTSC or PAL compliant Step 8 analog video display device to the analog video out port on the IP camera. Cisco Video Surveillance 3520 IP Camera Installation Guide 2-12 OL-28645-01...
- Page 25 • The secondary video stream must is enabled. • Note We recommend that you disable analog video after installation. To disable analog video, see the Cisco Video Surveillance 3000 Series IP Camera Configuration Guide. Remove the black cover. Step 9...
- Page 26 After you install the IP camera, follow the instructions in the “Performing the Initial Setup of the IP Camera” section on page 3-1 to access the IP camera through your network. Cisco Video Surveillance 3520 IP Camera Installation Guide 2-14 OL-28645-01...
- Page 27 To connect to the IP camera for the first time and make initial configuration settings, perform the following steps. You can change these configuration settings in the future as described in the Cisco Video Surveillance 3000 Series IP Camera Configuration Guide.
-
Page 28: Chapter 3 Performing The Initial Setup Of The Ip Camera
If you are prompted to install ActiveX controls, which are required to view video from the IP camera, Step 8 follow the on-screen prompts to do so. The Home window appears. Cisco Video Surveillance 3520 IP Camera Installation Guide OL-28645-01... -
Page 29: Camera Management
C H A P T E R Camera Management This chapter provides information and instructions for managing the Cisco Video Surveillance 2620 IP Camera, and includes the following topics: Understanding the IP Camera User Interface, page 4-1 • Powering the IP Camera On or Off, page 4-3 •... -
Page 30: Chapter 4 Camera Management
Method by which the IP camera obtains its IP address. LAN IP IP address of the LAN to which the IP camera is connected. Subnet Mask Subnet mask of the LAN to which the IP camera is connected. Cisco Video Surveillance 3520 IP Camera Installation Guide OL-28645-01... -
Page 31: Powering The Ip Camera On Or Off
There are various reset types, as described in Table 4-3. You also can also perform these reset operations from the Maintenance Settings window as described in the Cisco Video Surveillance 3000 Series IP Camera Configuration Guide. Cisco Video Surveillance 3520 IP Camera Installation Guide OL-28645-01... -
Page 32: Resetting The Ip Camera
3-1. Viewing Live Video After you install and set up the Cisco Video Surveillance IP Camera, you can connect to the IP camera through Internet Explorer and access the Camera Video & Control window to view live video. The Camera Video & Control window also provides for controlling the video display, configuring preset positions, and controlling certain IP camera functions. -
Page 33: Viewing Live Video
Click this button again to disable the digital zoom feature. To perform a digital zoom, engage the Hotspot Zoom button and click the video display. The first five clicks zoom the display. The sixth click returns to unzoomed display. Cisco Video Surveillance 3520 IP Camera Installation Guide OL-28645-01... - Page 34 Click the Up Arrow to display the motion detection controls. The button button changes to the Down Arrow button. Click the Down Arrow button to hide the motion detection controls. The button changes to the Up Arrow button. Down Arrow toggle button Cisco Video Surveillance 3520 IP Camera Installation Guide OL-28645-01...
- Page 35 Alternatively, enter a value from 1 through 100 for an option and press the Enter key. To reset the sensitivity and threshold to their default values of 50, click Restore. Cisco Video Surveillance 3520 IP Camera Installation Guide OL-28645-01...
- Page 36 Camera Video & Control Window Controls (continued) Control Description Restore button Deselects all areas in the video field that you have selected for motion detection monitoring. Save Settings button Save the current motion detection configuration. Cisco Video Surveillance 3520 IP Camera Installation Guide OL-28645-01...
- Page 37 DHCP, obtaining IP address through windows factory reset live video viewing through home window through third-party device or software help, for IP camera windows Cisco Video Surveillance 3520 IP Camera Installation Guide IN-1 OL-28645-01...
- Page 38 Camera Video/Control window Power over Ethernet (PoE) View Video link Power over Ethernet (PoE) warnings before installation rebooting, IP camera Refresh link reset factory default values reboot saturation sensitivity, for motion detection Cisco Video Surveillance 3520 IP Camera Installation Guide IN-2 OL-28645-01...
Need help?
Do you have a question about the 3520 and is the answer not in the manual?
Questions and answers