Garmin NavTalk Owner's Manual
Cellular phone/gps receiver
Hide thumbs
Also See for NavTalk:
- Owner's manual (130 pages) ,
- Command reference (2 pages) ,
- Owner's manual and reference manual (128 pages)
Table of Contents
Advertisement
Quick Links
Download this manual
See also:
Command Reference
Advertisement
Table of Contents

Related Manuals for Garmin NavTalk


Summary of Contents for Garmin NavTalk
- Page 3 Thank you for choosing the GARMIN NavTalk. To get the most from your new NavTalk, take the time to read through this owner’ s manual in order to understand all of the operating features. This manual is organized into seven sections for your convenience: gives you an overview of the NavTalk functional features.
- Page 4 portable telephone is a low power radio transmitter and receiver. When it is ON, it receives and also sends out radio frequency (RF) signals. In August, 1996, the Federal Communications Commission (FCC) adopted RF exposure guidelines with safety levels for hand-held wireless phones.
- Page 5 For your phone to operate most efficiently: Do not touch the antenna unnecessarily when the phone is in use. Contact with the antenna affects call quality and may cause the phone to operate at a higher power level than otherwise needed. Most modern electronic equipment is shielded from RF signals.
- Page 6 RF signals may affect improperly installed or inadequately shielded electronic systems in motor vehicles. Check with the manufacturer or its representative regarding your vehicle. You should also consult the manufacturer of any equipment that has been added to your vehicle. Turn your phone OFF in any facility where posted notices so require.
- Page 7 For use in vehicles, it is the sole responsibility of the owner/operator of the NavTalk to secure the unit so that it will not inter- fere with the vehicle’ s operating controls, obstruct the operator’ s view of driving conditions, or cause damage or personal injury in the event of an accident.
- Page 8 United States, which is solely responsible for its accuracy and main- tenance. The system is subject to changes which could affect the accuracy and performance of all GPS equipment. Although the GARMIN NavTalk is a preci- sion electronic NAVigation AID (NAVAID), any NAVAID can be misused or mis- interpreted and, therefore, become unsafe.
- Page 11 INTRODUCTION...
- Page 13 A basic understanding of the capabilities of the NavTalk and how its two main features function is essential to prop- er operation and maximum performance.
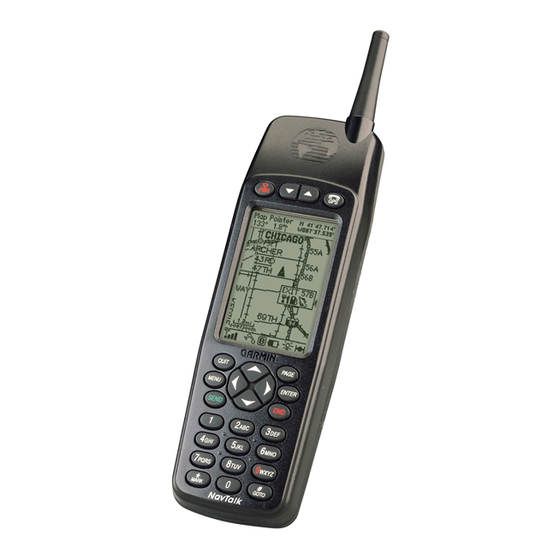
- Page 14 Antenna GPS/Phone Mode Select Volume Adjust ON/OFF LCD Display Arrow Rocker Pad Phone Keypad Speaker Battery Microphone DTMF Location Reporting with Query, and Peer-To-Peer Display on Map Page PhoneBook for 100 Names and Numbers Spell N’ Find Three Cellular Phone Number Assignment (NAMs) One Button Speed Dial Last Number Redial with List and Time/Date Stamp Auto Remote Location Query...
- Page 15 Built-In International or Americas Basemap to 20 Miles; Including Lakes, Rivers, Railroads, Coastlines, Interstates, National and State Highways Map Scale: 800 feet to 500 miles MapSource Compatible ™ 250 Total Waypoints, Each with Name, Symbol and Map Display Option Nine Continuous, Automatically Updated Nearest Waypoints Twenty Reversible Routes with up to 30 Waypoints Each.
- Page 16 Now it’ s time to learn the basics of operating the cellu- lar phone. Let’ s begin with a brief overview of the cellular telephone system. Your NavTalk cell phone uses FM radio waves instead of conventional telephone lines to place and receive calls.
- Page 17 Once you initialize the unit to a position, it will typ- ically compute a fix within a few minutes. We’ll show you how to initialize your new NavTalk on page 65. Initialization is only necessary under the following conditions: •...
- Page 18 Once the NavTalk has calculated a position fix, you’ll usually have anywhere from five to twelve satellites in view. The receiver will then continuously select satellites in view to update your position.
- Page 19 The getting started tour is divided into two sections: Cell Phone and GPS. To begin using your NavTalk for navigation purposes, review the first part of the getting started “tour” and then complete the simulation exercise starting on page 29. To begin using the cellular phone, review the information starting on...
- Page 20 To familiarize yourself with the placement of function keys on the NavTalk, refer to the fold-out example in the Quick Reference Guide supplied with this manual. The keys on the NavTalk often have multiple functions and specific applications for Cellular and GPS features.
- Page 21 The GPS/PHONE Key switches between the Cellular Phone and GPS Receiver operation. When held for one second it can turn off the GPS receiver as a battery-saver feature. The ALPHANUMERIC Keys enter numbers for manual dialing and are used for Speed Dialing when held for more than one second.
- Page 22 Before you can begin to explore the features and operational characteristics of the NavTalk, you must first install the NiMH Battery Pack and charge it for 14 to 16 hours (Trickle Charger).
- Page 23 If the battery pack has been stored at tempera- tures above or below the specified operating range for the NavTalk, allow the unit to cool down or warm up accordingly before use to achieve maximum battery power.
- Page 24 Page Contrast Adjustment To turn the NavTalk on and off: Each time the Navtalk is turned on, the Welcome Page will appear while the unit conducts a self test. Once the internal test is complete (after a few seconds), the Land Data Warning Page will appear, asking you to read and acknowledge important information regarding the proper use of the land data that is provided.
- Page 25 GPS and Cellular Page. The Status Bar is important because it lets you know at a glance the status of all the primary functions of your NavTalk. The Status Bar appears in two sizes: large and regu- lar.
- Page 26 1 to 5 signal bars. The number of bars shows the strength of the signal received by your Navtalk. No bars means you may not be able to call. The display will change as you move with your unit.
- Page 27 If you ignore theses warnings, the NavTalk will automatically turn itself off when the battery has a very small charge left. Simply charge the battery to resume normal operation. A two prong plug icon indicates that you are using AC or DC power adapters. The ‘Chrg’...
- Page 28 All of NavTalk’ s cell phone menus and options are accessible through the four main cell phone pages. You can quickly scroll through the four pages in either direction by...
- Page 29 There are two sub menu pages which are accessed from the Cellular Status Page: the Missed Calls Page and the Dialing Page. These two pages are discussed in detail on pages 42 and 43. • The PhoneBook Page gives you a handy way of recording and storing names and phone numbers for later use.
- Page 30 All of the NavTalk’ s GPS setup and options are keys. Let’ s briefly look at each Let’ s start with the Satellite Status Page. If you’re...
- Page 31 40 different symbols, with the waypoint name shown directly above the symbol. We’ll cover more about the NavTalk’ s waypoint features and the Map Page in the reference section, including how to change the map orientation if you desire.
- Page 32 Highway Page List of GOTO Waypoints Like the Compass Page, the Highway Page also provides graphic steering guidance to a destination waypoint. You can use the Highway Page instead of the Compass Page as your primary navigation page when your main concern is to follow a defined course.
- Page 33 The NavTalk uses on-screen messages to alert you to important information. Whenever a message appears, press to acknowledge the message and return to the previous page you were viewing. On the main pages you will be notified of incoming calls and you must...
- Page 34 (the Electronic Communi- cations Privacy Act of 1986 makes it a criminal offense to monitor cellular phone calls) but you’ll still want to be careful of what you say on your NavTalk. Antenna Power ON/OFF Volume Adjust GPS/Phone...
- Page 35 The first time you use your NavTalk Cellular Phone you don’t need to be completely familiar with every system feature to place and answer calls. Once the phone portion of the NavTalk has been programmed for cellular usage by your Cellular Service Provider you...
- Page 36 -The cellular system could not complete the call. You may have tried to place a call before the NavTalk was fully opera- tive or poor signal strength is preventing the cel- luar system from receiving the NavTalk signal. To...
- Page 37 Phone setup page accessed from the Setup portion of the Main Menu. See page 48 for information. The NavTalk counts up to 20 unanswered and Auto Pager calls. The number of missed calls are displayed below the telephone icon located in the message center on the Cellular Status Page.
- Page 38 Find a Name Quickly by Using “Spell ‘n Find” Enter this Number to Speed Dial from any- where on the NavTalk The PhoneBook is your repository for all recorded names and phone numbers. It can store up to 100 num- bers.
- Page 39 NavTalk. You can also set the NavTalk to sig- nal each time a minute of your current call has elapsed. It...
- Page 40 Internal GPS Antenna Power ON/OFF Key Map Page Zoom IN/OUT Keys GPS/Phone Mode Key Display Screen Quit Key Arrow Rocker Pad Page Key Enter Key Menu Key Mark Key GOTO Key...
- Page 41 The first time you use your NavTalk GPS Receiver you won’t need to be com- pletely familiar with every feature to successfully navigate to and from locations of your choice.
- Page 42 (given an opportunity to determine where it is located on the globe). To initialize the NavTalk, take the unit outside and find an open area where the antenna has a clear view of the sky. Hold the unit at a comfortable height with the GPS patch antenna par- allel to the ground.
- Page 43 “select initialization method”. You’ll know you have a fix when the NavTalk auto- matically transitions from the Satellite Status Page to the Map Page. The NavTalk is now ready to use.
- Page 44 Using the Simulator Mode is the easiest method for learning the basics of GPS naviga- tion and using the NavTalk GPS features. Main Menu GPS Simulator Setup Directory Satellite Page with simulated satellite reception...
- Page 45 In normal mode the unit would automati- cally sequence from the Satellite Status Page to the Map Page once enough satellites were received to determine your position. At that point the receiver would be ready to use for navigation. Because the unit is in simulation, you won’t see this sequencing, but you will see simulation of signal strength and other attrib- utes of satellite reception simulated on the...
- Page 46 Nearby waypoints are depicted on the map with any one of over 40 different symbols, with the waypoint name displayed directly above the symbol. To help you understand this fea- ture, let’ s create a waypoint directly on the map and then navigate to this new waypoint.
-
Page 47: New Waypoint
Choose from a list of symbols to help you recognize a way- point feature Waypoint marked on the Now use the GPS receiver to navigate to the Map Page new waypoint. - Page 48 GOTO Directory with tab indexes and extended list with scroll bar Mark Waypoint Page Select Symbol & Name a Waypoint for entry into the Waypoints List List of recorded Waypoints You should notice that a course line now appears on the map showing the way to your destination.
- Page 49 You should now have two waypoints in memo- ry and on the map: “SIMUL8” and “HOME”. Notice that the information displayed on the Map Page is slowly moving as it would in actual use. Other primary navigation displays are the Compass and Highway Pages. The Compass Page provides you with graphic steering guidance to a destination way- point.
- Page 50 bearing pointer that indicates the direction of the destination (bearing) relative to the course over ground. The compass ring and pointer arrow work independently to show, at a glance, the direction of your movement and the direc- tion to your destination. If the arrow points up, you are going directly to the waypoint.
- Page 51 ahead when you begin moving toward the des- tination waypoint. Try moving on and off course again by using the Rocker Pad keys and watch as the dis- play and bearing pointer changes. Keep in mind, that for many of the features such as Routes, Track Logs and Waypoints List to function, you must first create some data to store in these directories.
- Page 52 Antenna Power ON/OFF Volume Adjust GPS/Phone Mode Switch Display Screen Menu Key (Access to Feature Options) Arrow Rocker Pad (Cursor and Data Entry) Enter Key (Selects Fields and Options) Send Key End Key Phone Keypad (Dialing and Data Entry) Emergency Dial Key “9”...
- Page 53 SECTION 5...
- Page 54 Cellular Status Page Missed Calls Page The NavTalk Cell Phone provides you with a full range of cell phone features as well as some unique to a GPS/Cell Phone device. This reference section will instruct you in how to use these features to enhance the efficiency of the cell phone.
- Page 55 enter a PhoneBook Number, use Spell n’ Find, Start/Stop Cellular, select from Manu- al Answer, Auto Answer or Auto Pager, Change Data Fields and to reset the page to default settings. This page will also display ‘Inbound Call Notifi- cation’ and ‘Inbound Call Answered’. a phone number manually, using the PhoneBook, Speed Dial or answer a call.
- Page 56 The PhoneBook is your repository for up to Volume Control Panel with Control Bar 100 phone numbers arranged in alphabetical Indicators order with tabs that group names in categories matching the alpha-numeric keys on your key- pad. You can quickly select a tab by pressing the Rocker Pad and then scrolling down to a listed name and number.
- Page 57 Page you can recall from the list of last dialed num-- You are always prompted before a deletion is performed anywhere in the NavTalk Programming. When a Number from the Last Dialed List is Redi- aled, it Moves to the Top of The List with a New Time/Date Stamp.
- Page 58 Speed Dial List number for more than one sec- ond to dial that phone number from anywhere on the NavTalk. There are nine entry spaces on the Speed Dial list. Names and numbers may be added to the Speed Dial list when they are recorded using the “New PhoneBk #”...
- Page 59 (Auto Answer, Auto Pager, or Manual Answer). Auto Data selection can be locked and unlocked using the Security Password. Rocker The three types of fields used for programming the NavTalk: 1. Data Entry 2. Pop - Up Menus 3. Buttons...
- Page 60 To automate calling card dialing you can store your PIN number in the NavTalk for entry into a dialing string as a code “C” as explained on pages 56 and 57.Your PIN is password pro-...
- Page 61 The Navtalk employs two types of passwords (actually number codes that can be created using the Phone Keypad to spell words) to secure use of the NavTalk and its stored data. It can be pro- grammed so that a to Lock or Unlock the Phone.
- Page 62 Password Programming for Lock and Security Passwords You can program the NavTalk to lock auto- matically each time you turn it On. Auto Lock Selected. Enter Security Password to secure Auto Lock and Call Blocking...
- Page 63 You can store up to three cellular numbers in the NavTalk. This page displays your Active NAM, The Phone Number for that NAM, the Home System Number, Side A or B and ESN Number. The Programming Call Blocking NavTalk can be programmed with up to three phone numbers.
- Page 64 (with excep- tion of the map page where Zoom is functional). If you are using the NavTalk unit with the GARMIN Vehicular Adapter (Hands-Free) Kit, you can adjust the ‘External Mic Gain’ by...
- Page 65 Extensive use of backlighting will cause a significant reduction in battery life when powering the NavTalk from the batteries only. Enabling the ‘Always On’ backlighting setting during charging will significantly lengthen charging time.
- Page 66 Minute Timer will emit two total lifetime use of your NavTalk call time. You beeps each minute unless can also set the NavTalk to signal each time a turned Off. minute of your current call has elapsed.
- Page 67 Call timers for Last Call and Elapsed Time are always active and can be reset through the Call Timer function of the Main Menu. Life- time use timing cannot be reset. The Minute Timer can be turned On or Off through the Call Timers function of the Main Menu.
- Page 68 DTMF tones. Dial String codes are used to tell the NavTalk how and when to send DTMF tones to a call’ s destination and can allow you access to any ser- vice that employs DTMF tones.
- Page 70 code or long distance service number prefix in front of a phone number selected from the PhoneBook. This is helpful when you are outside your home cell or area code and want to dial a number from your PhoneBook, Speed Dial, Last Dialed, and Missed Calls pages.
- Page 71 The NavTalk can transmit information about your geographic location to another NavTalk or other type device that can interpret DTMF tones to plot your GPS position. You can also record a GPS position from another NavTalk unit and store that location in the GPS receiver data stor- age.
- Page 72 The NavTalk can be programmed to auto-dial a programmed emergency number such as 911, a security agency, or other emergency assistance service. The NavTalk will allow emergency auto- dialing even if the unit is “Locked”. Press and hold the red key for more than three sec- onds.
- Page 73 SECTION 6...
- Page 74 Rocker Pad to enter data in a field. Use the cancel any entry before it is completed. 6.1 Satellite Status Page The NavTalk’ s Satellite Status Page provides a visual reference of various GPS receiver functions, including current satellite coverage, receiver operating mode, bat- tery level and position accuracy.
- Page 75 ‘Track Up’ configuration, causing the top of the sky view to align along your current track heading. As soon as the NavTalk has collected the necessary data to calculate a fix, the status field will indicate a 2D or 3D status.
- Page 76 500 miles with the receiver off (this message will automatically appear when you first use your NavTalk. The prompt may also appear during normal use if the antenna is shaded or the unit is used indoors.) 6.1.4 EPE and DOP...
- Page 77 AutoLocate. To initialize your starting position: Set 2D Altitude - designates your approximate altitude, when the NavTalk is acquiring satellites or navigating in 2D mode. By default, 2D navigation will attempt to use the last known altitude. If the altitude...
- Page 78 The NavTalk uses this basic information to mark The following options are available: Average Position - averages position samples over To average position samples and save the...
-
Page 79: Zooming And Panning
The NavTalk also features dedicated zoom keys for instant zooming (see page 9). The map portion of the page displays your present position as a pointer icon,... -
Page 80: Panning Arrow
SECTION 6 If the name wasn’t originally displayed it will appear when the arrow is placed on the object. This feature applies to everything displayed except route lines and track log data. When a waypoint name is highlighted, you can review information about the waypoint, list waypoint options, or execute a GOTO right from the Map Page. - Page 81 Change Fields - allows you to choose from 29 types of data you want displayed in the four data fields. See page 112 for descriptions of GPS terms. Setup Map - allows you to customize the map display. The following setup options are available: Map - This tab allows to choose from the following settings.
- Page 82 SECTION 6 City - allows you to control text size and zoom levels at which the following map features will display. : Text - Zoom control : Text - Zoom control : Text - Zoom control : Text -Zoom control Other - allows you to control text size and zoom levels at which the following map features will display.
- Page 83 6.4 Compass Page Whenever a destination waypoint has been select- ed, the NavTalk’ s Compass Page will guide you to your destination using a graphic compass display and digital readouts. The rotating ‘compass ring’ shows the direction of your movement and the pointer arrow shows the direc- tion to your destination (track and bearing, respectively).
- Page 84 SECTION 6 6.5 Highway Page In addition to the Compass Page, the NavTalk’ s Highway Page also provides graphic steering guidance to your destination, by using a graphic highway display. At the top of the Highway Page are four user-selec-...
-
Page 85: Creating Waypoints
Restore Defaults - resets all of the data field head- ings to their factory default settings. 6.6 Creating Waypoints The NavTalk stores up to 250 waypoints, including selectable symbols and comments. Waypoints can be created using four methods: Mark Present Position - your present position can... - Page 86 SECTION 6 6.6.2 Marking Waypoints on the Map Page Waypoints can also be quickly created from the Map Page, which allows you to “point and shoot” at any map position to create a new waypoint. To create a new waypoint on the map: 6.6.3 Creating Waypoints by Text Entry Waypoints may be created by manually entering the position coordinates or by entering the bearing and dis-...
- Page 87 To enter a name for the new waypoint: To enter position coordinates for the new waypoint: To create the new waypoint by referencing another position: 6.7 Waypoint List Options Menu To display the Waypoint List options menu: In addition to ‘New Waypoint’, there are four addi- tional options: Show Map allows you to view the map area around the highlighted waypoint.
-
Page 88: Editing Waypoints
SECTION 6 To Spell ‘n Find a waypoint: Delete Waypoint - allows you to delete the way- point which is highlighted on the Waypoint List. Delete by Symbol - allows you to select a waypoint symbol and all waypoints with this corresponding symbol will be deleted from memory. -
Page 89: Navigation Methods
To view the Nearest Waypoint List: To GOTO a nearby waypoint: 6.10 Navigation Methods The NavTalk can navigate to a destination using any of the following four methods: GOTO - lets you select a waypoint as your destina- tion and quickly plot a direct course from present position to that waypoint. - Page 90 SECTION 6 6.10.1 GOTO Navigation The easiest way to select your destination is by using the key. The key can be used by itself, after highlighting a waypoint name on a list, or after designating a position on the map display. To GOTO a waypoint: To designate a GOTO waypoint from a list of waypoints:...
-
Page 91: Goto Options
6.10.2 GOTO Options GOTO Options are also provided to initiate a TracBack route or cancel the current GOTO destina- tion. The following options are available: TracBack - allows you to retrace your path using the track log automatically stored in the receiver’ s memory. - Page 92 TracBack allows you to retrace your path without the need to manually store waypoints along the way. The NavTalk can be set to automatically record track log points any time the receiver is on and locked onto satel- lites (see page 91).
- Page 93 SECTION 6...
-
Page 94: Route Navigation
Route navigation allows you to manually create a sequence of intermediate waypoints which lead you to your final destination. The NavTalk will store up to 20 reversible routes, with up to 30 waypoints in each route. Routes can be created and modified by text entry (using the Rocker Pad to enter waypoint names) or directly from the map display. - Page 95 The NavTalk’ s Route List displays all the routes cur- rently stored in memory, along with a descriptive name for each route. Once a route has been created, it can be activated and used for navigation from the Route List.
-
Page 96: Route Editing
SECTION 6 The Route List also allows you to enter a 13-charac- ter name for any listed route. By default the name includes the first and last waypoints in the route. To enter a custom route name: 6.11.1 Route Editing Once a route is added to memory you can review and/or edit the route from the Route Plan Page. -
Page 97: Route Planning
To use the trip planning features: Fuel flow rates on your NavTalk are measured in “units per hour”. System setting changes for units of measure (statute, nautical or metric) do not affect the fuel flow measure. - Page 98 SECTION 6 When a route is highlighted on the Route List, additional functions are available from the Route Options menu. The following options are available: New Route - allows you to create a new route, as described on page 82. Activate Route allows you to navigate the route in the same sequence it was originally created, as described on page 83.
- Page 99 From the Active Route Page you can change the name of the active route, review information on a route waypoint or bypass route waypoints and GOTO any waypoint in the route (see page 82) . The user-selectable data field on the right side of the page also keeps you informed of current conditions.
- Page 100 SECTION 6 Remove Wpt- removes the currently highlighted waypoint from the route. If no waypoint is highlighted, this option is not available. See page 84 for route edit- ing information. Review Wpt - allows you to view information for the currently highlighted waypoint in the route. If no route waypoint is highlighted, this option is not avail- able.
- Page 101 SECTION 6...
- Page 102 SECTION 6 To view the exit on the Map Page: To save an exit as a waypoint: To edit exits that do not have the types of services you desire from the list of exits: To edit exit service information that is dis- played on the map page and on the list of services near the exit: Routes - allows you to create, edit, activate or...
- Page 103 SECTION 6...
- Page 104 SECTION 6 ‘Fill’ - A track log will be recorded until the track memory is full. ‘Wrap’ (default) - A track log will be continu- ously recorded, wrapping through available memory; replacing the oldest track data with new data. ‘Interval’ - defines the frequency with which the track plot is recorded.
- Page 105 To select a user timer setting: Battery Timer - provides a running count of how long the NavTalk has been in operation with the current batteries. The timer automatically stops when using an external power source. The timer will automatically reset when depleted batteries are replaced, but can also be manually reset.
- Page 106 SECTION 6 6.14 Main Menu Setup Pages Setup Pages for GPS- provides a group of pages to perform various system setup functions, including selection of position format, units of measure, setting various alarms, configuring the display and backlight- ing. Each available page is denoted by a ‘file tab’ which identifies the function of that page.
-
Page 107: Time Settings
6.14.1 Time Settings Time Format allows current time to be displayed using a 12- or 24- hour clock. This field is also used to select between local and UTC time readouts. To select a time format: or... Local Time Zone - is used to define the current local time. -
Page 108: Simulator Settings
SECTION 6 6.14.2 Simulator Settings simulator is enabled. automatically align track heading to the desired course (when using a GOTO or route), or allows you to manu- ally adjust the track heading, as desired. ing. This setting is only available when Track Control is set to ‘User Track’. - Page 109 SECTION 6...
-
Page 110: Units Settings
Failure to update this setting may result in substantial differences between the information dis- played on your NavTalk and external references, such as a magnetic compass. • German Grid... -
Page 111: Alarms Settings
6.14.5 Alarms Settings Clock Alarm - uses the internal clock to provide an ‘Alarm Clock’ message at the time you set. To enable/disable the alarm clock Arrival Alarm - provides an alarm message once you’re within a set distance from your destination way- point. -
Page 112: Input/Output Settings
SECTION 6 6.14.6 Input/Output Settings Format lets you control the input/output format used when connecting your NavTalk to external NMEA devices, a DGPS beacon receiver, a personal computer, etc. Five format settings are available: GARMIN - the proprietary format used to exchange waypoint, route, track log data with a PC or another NavTalk unit. - Page 114 Recharges the Battery Pack and provides external power to the NavTalk. Refer to page 10 for installation information. Trickle Charger Provides a convenient method for carrying the NavTalk. Attaches to a slot in the top of the NavTalk. Provides extended power supply life, faster recharging time and wider range of operating temperatures for the NavTalk.
- Page 116 Width: Depth: Specifications subject to change without notice. * With optional GARMIN GBR21 Beacon Receiver Input. ** Subject to accuracy degradation to 100 m 2DRMS under the U.S.DOD-imposed Selective Availability Program *** With GPS Power Saver feature enabled. 824.04-848.97 MHz Transmit, 869.04-893.97 MHz Receive...
- Page 117 - Calling card PIN, insert were PIN should be used as a DTMF string, the user enters PIN from the Phone Setup page. - DTMF Tones, e.g. D728987 plays the DTMF tones for 728987 when in a call. - Link telephone number, stops and moves to the PhoneBook page, highlight a number and press SEND, the number will be sent as a DTMF string.
- Page 119 - You are left or right of course, beyond the limits set on the Alarms submenu NavTalk has detected excessive drift in its internal crystal oscillator which may result in longer acquisition time. The unit should be taken to an authorized GARMIN dealer.
- Page 120 NavTalk and extended product life, please follow these recommended procedures for care and maintenance. Do not store the NavTalk in hot areas, such as a closed automobile. High temperatures can shorten the life of electronic components, damage the bat- tery pack and cause malfunction of the NavTalk.
- Page 121 : An accessory that allows power for the NavTalk while charging the battery pack using a 120 VAC wall outlet. A socket on the bottom of the NavTalk where you can attach accessories such as an AC adapter, trickle charger, DC adapter or data accessories.
- Page 122 The automated redialing of a phone number that did not answer or was busy when you first tried to place the call. The NavTalk can be programmed to attempt up to ten retries before stopping.
- Page 123 A rapid method for dialing a frequently used phone number by selecting the number from the speed dial list and pressing the SEND key. The amount of time that your NavTalk is left on to receive calls. A secondary level of access for advanced feature program- ming and activation.
- Page 124 - Height above mean sea level (MSL). - The average of all second-by-second speed readings since last reset. - The compass direction from your present position to destination waypoint. - The desired course between the active ‘from’ and ‘to’ waypoints. - The great circle distance from present position to a des- tination waypoint.
- Page 125 - A running tally of distance traveled, based upon the dis- tance between second-by-second position readings. Both the ‘Odome- ter’ and the ‘Trip Odometer’ are resettable, however the “odometer’ is typically used to keep track of total distance covered, where the ‘Trip Odometer’...
- Page 126 A/B System Selection AC Adapter Accessory Options 102-103 Active Route Page Alarms Answering Calls Antenna 22, 25 Automatic Answer AutoLocate Automatic Lock Automatic Redial Auto-Data Auto-Paging Backlight Timer Backlighting On/Off Battery Pack Installation Battery Level Indicator Beeper Call Timers 27, 54 Calling Card Dialing Cautions ii-v...
Need help?
Do you have a question about the NavTalk and is the answer not in the manual?
Questions and answers