Table of Contents
Advertisement
Quick Links
Advertisement
Table of Contents

Related Manuals for Baumatic BC391.3TCSS 90cm


Summary of Contents for Baumatic BC391.3TCSS 90cm
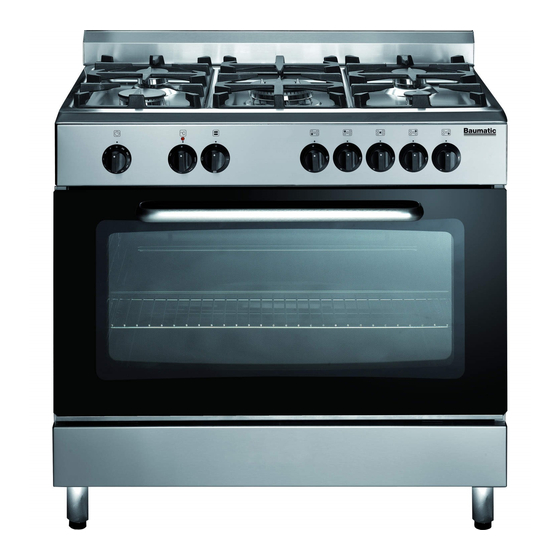
- Page 1 BC391.3TCSS 90cm Single cavity dual fuel range cooker with flame failure...
- Page 2 User Manual for your Baumatic BC391.3TCSS 90 cm Single cavity dual fuel range cooker with flame failure NOTE : This User Instruction Manual contains important information, including safety & installation points, which will enable you to get the most out of your appliance. Please keep it in a safe place so that it is easily available for future reference;...
-
Page 3: Table Of Contents
Gas adjustment (Conversion to LPG for the hob top) 30-32 Minimum flow adjustment for hob gas taps Electrical connection Connecting the mains supply cable Replacing the mains supply cable 34-35 My appliance isn’t working correctly 35-37 Baumatic consumables Contact details... -
Page 4: Environmental Note
Environmental note o The packaging materials that Baumatic uses are environmentally friendly and can be recycled. o Please discard all packaging material with due regard for the environment. -
Page 5: Important Safety Information
Baumatic Ltd. will invalidate any warranty or liability claim. o Your new appliance is guaranteed against electrical or mechanical defects, subject to certain exclusions that are noted in Baumatic’s Conditions Of G uarantee. The foregoing does not affect your statutory rights. - Page 6 Child Safety Baumatic strongly recommend that babies and young children are prevented from being near to the appliance and not allowed to touch the appliance at any time.
- Page 7 o Do not place heavy objects on the oven door or lean on the oven door when it is open, as this can cause damage to the oven door hinges. Nobody should be allowed to sit or stand on any part of the cooker.
- Page 8 Baumatic Ltd. declines any responsibility for injury or damage, to person or property, as a result of improper use or installation of this appliance. o Heat, steam and moisture will be created during use of the...
-
Page 9: Specifications
Specifications Product dimensions: Height: 928-998 mm idth: 895 mm epth: 600 mm Product specifications: o 5 burner gas hob: o 1 x 3.50 kW wok burner o 1 x 3.00 kW rapid burner o 2 x 1.75 kW semi-r apid burners o 1 x 1.00 kW auxiliary burner Heavy duty cast iron pan stands o Automatic ignition... - Page 10 Electrical details Rated Voltage: 220-240 V ac 50 Hz Supply Connection: 13A (double pole switched fused outlet with 3mm contact gap) ax Rated Inputs: 3.00 kW ains Supply Lead: 3 core x 1.5 mm² Oven Light B ulb: 15 W/300°C screw type pygmy Gas details Gas Connection Type: 1/2”...
-
Page 11: Control Panel
ontrol Panel Oven function sele ctor knob o Use this control knob to select the oven function that you want to cook with. Oven thermostat control knob o Use this control knob to set the temperature in the oven. Hob control knob o Use these control knobs to light and control the hob burners. -
Page 12: Using Your Range Cooker
Minute minder co ntrol knob o Use this control knob to set a minute minder countdown. Using your ran e cooker Before first use o To remove any residue from the oven cavity that may have been left from the manufacturing process, you should select the fan oven function and select its maximum temperature setting. -
Page 13: Selecting A Cooking Function And Temperature
Selecting a cooking func tion and temperature Selecting an oven function The oven function selector knob should be used to select the particular mode of cooking that you require. The appliance will utilise different elements within t he oven cavity, depending on the oven function that you select. -
Page 14: Using The Minute Minder
Oven operating light This light is situated above the thermostat control knob. It will switch on to indicate that the oven’s heating elements are in operation. The light will switc h off when the temperature set on the thermostat control knob has been reached. -
Page 15: Warnings
heat when using the fan oven mode; however you should extend the cookin g time given on the food packaging by at least ten minutes. o IMPORT ANT: You should ALWAYS pre-heat the oven if you are baking. o If there is no guidance given on the food packaging specifically for cooking in fan oven mode, you can generally reduce the cooking time and temperature by 10% from the information given for... -
Page 16: Shelf Levels
When removing any item from the oven, you should ALWAYS use an oven glove. Warning: Accessible parts may become hot during use. Young children should be kept well away from the oven when it is in use. Shelf positions o The numbers 1 – 5 indicate the different shelf p ositions that you... -
Page 17: Cooking Table
Cooking able Temperature Shelf Approximate (°C) position cooking time Meat Pork Roast 160 - 170°C 70 – 100 minutes Beef Roast 170 - 180°C 65 – 90 minutes (calf) Beef Roast 170 - 190°C 40 – 60 minutes Veal Roast 160 - 180°C 65 –... -
Page 18: Using The Grill
Using the grill o IMPORTANT: When using the grill function, the oven door MUST be kept closed. o The enamelled baking tray should be placed on shelf level 1 or 2. o The thermostat control knob SHOULD NOT normally be turned above 150°C when using the grill function. -
Page 19: Automatic Ignition With Flame Failure Safety Device
Automatic ignition with flame failure safety device To ignite a burner: o Press in the control knob of the burner that y ou wish to light and turn it clockwise t o the maximum position. o If keep control knob depressed, the a utomatic ignition for the burner will operate. -
Page 20: Cleaning And Maintenance
o The burner flame must nev er extend yond the diametre of the pan. o Use flat bottomed pans only o When possible, keep a lid on the pan whilst cooking. o Cook vegetables with as little water as possible, to reduce cooking times. -
Page 21: Cleaning The Hob Burners
o You should make sure that the cooking temperature that is selected is appropriate for the food that you are cook ing. You should also ensure that the food is placed in an adequately sized dish and use the enamelled baking tray where appropriate. o Outer parts of th e oven should only be cleaned with warm soapy water, using either a sponge or soft cloth. -
Page 22: Maintaining The Cast Iron Pan Stands
Maintaining the cast iron pan stands o IMPORTANT: Make sure that the hob surface and pan stands have cooled before you attempt to touch them. o Wipe the pan stands over with a sof t, damp cloth that has been put into warm soapy water. -
Page 23: Removing The Oven Doors For Cleaning
emov ing the oven door for cleaning o Open the oven door fully. o The hinges (A) are provided with tw o movable hooks (B). o Rotate the hooks into the slot (C). o You should grip the sid es of the door at the centre and incline it slightly towards the oven cavity. -
Page 24: Removing The Inner Door Glass For Cleaning
Removing the inner door glass for cleaning To facilitate cleaning, the inner door glass can be lifted out of the oven door. o Open the door fully; you will see four screws on the edges of the door glass. You should use a screwdriver to remove these screws. -
Page 25: Installation
nstallation The installation must be carried out by a suitably qualified person, in accordance with the current version of the following. UK Regulations and S afety Standards or their European Norm Replacements. Building Reg ulations (issued by the Department of the Environment). - Page 26 700 mm above the highest point on the hob top (including the burners). o Baumatic do not recommend that the cooker is positioned below wall cupbo ards, as the heat and steam from the appliance and what is being cooked, may damage the cupboard and its contents.
-
Page 27: Gas Connection
Conversion for use on LPG and other gases mus t only be undertaken by a qualified person. For information on the use of other gases, please contact the Baumatic Advice Line. o The cooker must be installed by a qualified person, in accordance... -
Page 28: Ventilation Requirements
Ventilation requirements o The room containing the cooker should have an air supply in accordance with the current edition of BS 5440: Part 2: The room must have opening windows or equivalent; some rooms may also require a permanent vent. o If the room has a volume betw een 5 and 10m³, it will require an air vent of 50cm²... -
Page 29: Gas Safety (Installation And Use) Regulations
Gas Safety (Installation and Use) Regulations It is the law that all gas appliances are installed by competent rsons in accordance with the current edition of the Gas Safety Installation and Use Regulations. o It is in your interest and that of safety to ensure compliance with the law. -
Page 30: Gas Adjustment (Conversion To Lpg For The Hob Top)
o A straight female to female equal black connector must then be attached. The approved flexible connection should be made to this. o If the cooker has been converted for use with LPG, then it should be connected to the gas supply using an appropriate bayonet type hose. - Page 31 o Unscrew the injector and replace it with the stipulated injector for the new gas supply (see table below). Burner Types Pressure Injector Power of gas (mbar) Marking consumption (kW) (1/100 Max. Min. Auxiliary Natural 1.00 0.48 (G20) Butane (G30) Propane (G31) Semi-...
-
Page 32: Minimum Flow Adjustment For Hob Gas Taps
Minimum flow adjustment for hob gas taps. work must carried GASSAFE registered engineer. o Light the burner and set the knob minimum position. o Remove the k nob from the tap and place a small bladed screwdriver in the centre of the tap shaft. -
Page 33: Electrical Connection
This appliance must be installed by a qualified person in acc ordance with the latest edition of the I.E.E. Regulations and in compliance with Baumatic’s instructions. WARNING: THIS APPLIANCE MUST BE EARTHED. o Before connectin g the appliance, make sure that the supply voltage marked on the rating plate corresponds with your mains supply voltage. -
Page 34: Connecting The Mains Supply Cable
Connecting the ma ins supply cable IMPORTANT The wires in t he mains lead are oloured in accordance with the following code: GREEN AND YELLOW EARTH NEUTRAL ROWN LIVE o Open the mains terminal block cover as shown, unscrew the cable clamp ( A) and unscrew (not fully) the screws in the mains terminal block (L, N, E) which secure the three wires of the... -
Page 35: My Appliance Isn't Working Correctly
The “blue” neutral wire must be c onnected to the terminal marked with letter (N) - the live wire must be connected to the terminal marked with letter (L). My appliance isn’t working correctly o The oven isn’t coming on. * Check that the oven is in manual operation mode. - Page 36 o The oven light is not working. * Refer to the “Replacing the oven bulb” sectio o I am getting condensation in my oven. Steam and condensation is a natural by product of cooking any food with high water content, such as frozen food, chicken etc. * You may get condensation in the o ven cavity and forming between the oven door glasses.
- Page 37 Or any installation other than the one specified by Baumatic Ltd. has been completed. Please refer to the conditions of guarantee that appear on the warranty card that you receive with the appliance.
-
Page 38: Baumatic Consumables
BC005 Stainless Steel Cleaner and Prote ctor (250ml) o BC007 E-Cloth – General Purpose Cloth o BC008 Microwave Cover o order a Baumatic c onsumable product please call 0123 5437 244 nd quote the product code. You can also order online from shop.baumatic.co.uk... -
Page 39: Contact Details
United Kin gdom zech Republic Baumatic Ltd., Baumatic CR spol s. r.o. Baumatic Buildings, Lípovà 665 6 Bennet Road, 60 01 Liberec 4 Reading, Berkshire Czech Rep ublic RG2 0QX United Kingdom +420 483 577 www.baumatic.cz Sales Telephone (0118) 933 6900...
Need help?
Do you have a question about the BC391.3TCSS 90cm and is the answer not in the manual?
Questions and answers