Table of Contents
Advertisement
Quick Links
Advertisement
Table of Contents

Related Manuals for Baumatic BC908SS


Summary of Contents for Baumatic BC908SS
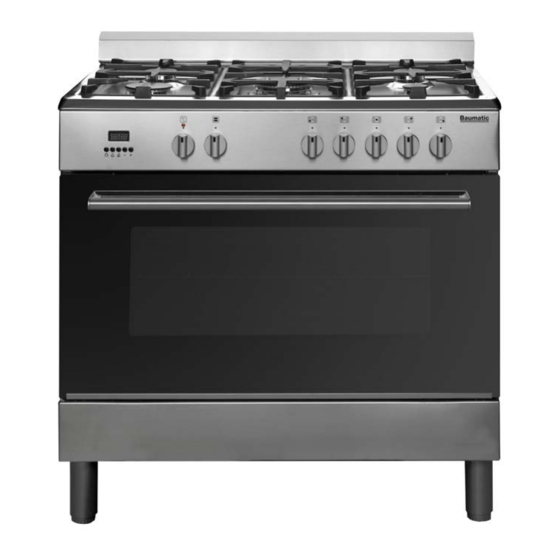
- Page 1 BC908SS 90 cm Single cavity dual fuel cooker...
- Page 2 User Manual for your Baumatic BC908SS 90 cm Single cavity dual fuel cooker NOTE : This User Instruction Manual contains important information, including safety & installation points, which will enable you to get the most out of your appliance. Please keep it in a safe place so that it is easily available for future reference;...
-
Page 3: Table Of Contents
Contents Environmental note Important safety information 5 – 9 Specifications 9 – 12 Dimensions Specifications 9 - 10 Electrical details Gas details Control panel 11 - 12 LED full programmer Setting and using the oven programmer/timer 13 - 16 Setting the time of day Selecting manual operation mode Setting the minute minder function 13 - 14... -
Page 4: Environmental Note
Environmental note o The packaging materials that Baumatic uses are environmentally friendly and can be recycled. o Please discard all packaging material with due regard for the environment. -
Page 5: Important Safety Information
Important safety information Your safety is of the utmost importance to Baumatic. Please make sure that you read this instruction booklet before attempting to install or use the appliance. If you are unsure of any of the information contained in this ooklet, please contact the Baumatic Advice Line. - Page 6 This appliance complies with all current European safety legislation. Baumatic do wish to emphasise that this compliance does not remove the fact that the appliance surfaces w become hot during use and retain heat after operation.
- Page 7 o Do not place heavy objects on the oven door or lean on the oven door when it is open, as this can cause damage to the oven door hinges. Nobody should be allowed to sit or stand on any part of the cooker.
- Page 8 Please see the specific section of this booklet that refers to installation. o Baumatic Ltd. declines any responsibility for injury or damage, to person or property, as a result of improper use or installation of this appliance.
-
Page 9: Specifications
o The above directives comply with 93/68/EEC regarding CE marking. o The manufacturer declares that the oven is built using certified materials requires appliance installed accordance with the standards currently in force. This appliance must be used by a trained person for domestic purposes only. Specifications Product dimensions: Height:... -
Page 10: Electrical Details
o 9 function oven o Energy efficiency class: B o LED full programmer o 92 litre oven capacity o Triple-glazed removable inner door glass o Removable door o Cooling fan o Enamelled oven cavity o Adjustable feet Standard accessories: o Enamelled baking tray o Safety shelf o Removable side racks o LPG conversion kit... -
Page 11: Control Panel
Control Panel Hob burner selection dial o A symbol above each burner selection dial indicates which burner the control knob is for. The burner shaded in black is the relevant one for that dial. o Turn the relevant dial anticlockwise to ignite and select a power level for a chosen burner. -
Page 12: Led Full Programmer
Oven function selection dial o The oven function selection dial is indicated by an oven symbol above it. o Rotate the dial to select the required function for the oven. Please refer to the “Using the oven” section on pages 20 – 25 for more information. -
Page 13: Setting And Using The Oven Programmer/Timer
Setting and using the oven programmer/timer Setting the time of day After switching on your oven for the first time you should set the time of day. o After connecting the appliance to the electricity supply, or after a power cut, the time of day will need to be set before you can use any of the timer functions. -
Page 14: Setting The Duration Function
o Important: The oven will continue to heat once the alarm has been silenced. If you have finished cooking, then you should turn the thermostat control knob to 0. Setting the duration cooking function This function will allow you to set a countdown time similar to the minute minder function. -
Page 15: Setting The Start And End Time Function
o When the programmed time of day is reached, the cookpot symbol will turn off and the “A” symbol will flash. An alarm will sound to indicate the end of cooking time and the oven will switch off automatically. The alarm will sound for 7 minutes and can be silenced by pressing any button. -
Page 16: Returning To Manual Operation Mode / Cancelling A Function
Returning to manual operation mode / cancelling a function o You should return the oven timer to manual operation mode after a timer function has completed. If you return the oven to manual operation mode during a timer function, the timer function will be cancelled. -
Page 17: Before First Use
Before first use IMPORTANT: You should clean the hob surface (see “Cleaning and maintenance” section). o You should switch on one cooking zone at a time, for 5 minutes at the maximum setting. This will help to eliminate any new smell that exists and evaporate any humidity that has formed on the heating elements during transit. -
Page 18: Optimum Use Of The Burners
Low power Optimum use of the burners o In order to achieve maximum results with the minimum consumption of gas, it is important to adjust the flame according to your needs and to use the appropriate size pans (see table below). - Page 19 Especially if pointed or hard objects are allowed to fall on it with some force. o DO NOT USE THE HOB IF THE SURFACE BECOMES BROKEN OR CRACKED. YOU SHOULD CONTACT THE BAUMATIC SERVICE DEPARTMENT IMMEDIATELY.
-
Page 20: Using The Oven
Using the oven Before first use o To remove any residue from the oven that may have been left from the manufacturing process, you should select either the main or grill oven function and turn the thermostat dial to its maximum temperature setting. -
Page 21: Cooking Functions
The oven temperature control knob should be turned clockwise to select an oven temperature between 50°C and 250°C. o When an oven function and a temperature have been selected, the orange oven operating light will come on. The light will go off when the oven temperature exceeded selected... -
Page 22: Cooling Fan
medium portions of bacon, toast, meat etc. HALF GRILL: This cooking method is normal grilling, utilis the inner part of the top element only, which directs heat downwards onto th e food. Suitable for grilling small portions of bacon, toast, meat etc. LOWER ELEMENT: This method of cooking uses the lower element to direct heat upwards to the food. -
Page 23: Cooking Table For Conventional Oven
Cooking table for conventional oven o The values indicated in the table below should be viewed as a guide only. Other factors such as food size, quantity and quality and personal preference can affect the cooking temperature and times required. Food type Temperature Shelf position... -
Page 24: Using The Grill
Roast beef 180-190 40-45 Roast hare 170-180 30-50 Roast rabbit 160-170 80-100 Roast turkey 160-170 160-240 Roast goose 160-180 120-160 Roast duck 170-180 100-160 Roast chicken 70-90 Fish 160-180 25-45 Cakes and pastries Fruit cake 180-200 40-50 Sandwich cake 200-220 40-45 Brioches 170-180... -
Page 25: Cooking Guidelines
Cooking guidelines o Please refer to the information given on food packaging for guidance on cooking temperatures and times. Once familiar with the performance of your appliance, temperatures and times can be varied to suit personal preference. o Make sure that frozen foods are thoroughly thawed before cooking, unless the instructions on the food packaging advise that you can “cook from frozen”. -
Page 26: Cleaning And Maintenance
Any damage that is caused to the appliance by a cleaning product will not be fixed by Baumatic free of charge, even if the appliance is within the guarantee period. -
Page 27: Cleaning The Gas Hob Top
Cleaning the gas hob top o Remove the dirty pan supports from the hob and place in warm soapy water for some time. Then wash and dry before replacing. After each use o Wipe the appliance over with a damp cloth and a little washing up liquid. -
Page 28: Replacing The Oven Bulb
Replacing the oven bulb IMPORTANT: The oven must be disconnected from your mains supply before you attempt to either remove or replace the oven bulb. o Draw out the side guide rails in order to provide access to the bulb. o Unscrew the protection cap that protrudes out inside the oven. -
Page 29: Removing The Inner Door Glass For Cleaning
o Partially close the door, forcing it upwards at the same time to free the stop tooth and hinge sector. o Once the hinge is free, pull the door forwards tilting it slightly upwards to free the sector. o To reassemble, proceed in the reverse order, paying attention to the correct position of the sectors. -
Page 30: Removing The Side Racks For Cleaning
pulled upwards, the force of the hinges can close the door roughly. o IMPORTANT: You should make sure that the door is supported at all times and that you place the door on some padded material whilst cleaning it. o The oven door and door glass should only be cleaned using a damp cloth and a small amount of detergent. -
Page 31: Positioning
Positioning The adjacent furniture and all materials used in the installation must be able to withstand a minimum temperature 85°C above ambient temperature of the room it is located in, whilst in use. o Your appliance is heavy, so you should be careful when moving or positioning it. -
Page 32: Ventilation
There should be gaps of at least 20 mm either side of the cooker when it is installed between cabinets. o Baumatic do not recommend that the cooker is positioned below wall cupboards, as the heat and steam from the appliance and what is being cooked, may damage the cupboard and its contents. -
Page 33: Securing The Appliance
o These apertures must be positioned in such a way as not to be obstructed. o Indirect ventilation is also allowed by taking air from adjacent rooms to the one to be ventilated and must comply with current standards. o If it is impossible to use a cooker hood, a fan should be installed in a window or an external wall. -
Page 34: Electrical Connection
Electrical connection This appliance must be installed by a qualified person in accordance with the latest edition of the I.E.E. Regulations and in compliance with Baumatic’s instructions. Before connecting the appliance, make sure that the supply voltage marked on the rating plate corresponds with your mains supply voltage. -
Page 35: Connecting The Main Supply Cable
Conversion for use on LPG and other gases must only be undertaken by a qualified person. For information on the use of other gases, please contact the Baumatic Advice Line. o The cooker must be installed by a qualified person, in... - Page 36 (Installation and Use) (Amendment) Regulations and the relevant building/I.E.E. Regulations. o Failure to install the appliance correctly could invalidate Baumatic’s guarantee and lead to prosecution under the regulations quoted above. o In the UK, GASSAFE registered installers are authorised to undertake the installation and service work, in compliance with the above regulations.
-
Page 37: Gas Conversion To Lpg
o A 15 mm end feed (male) must be connected to the fixed elbow. A fibre washer must be placed in the end of the feed that connects to the fixed elbow. o A straight female to female equal black connector must then be attached. - Page 38 o Unscrew the injector and replace it with the stipulated injector for the new gas supply (see below). Burner Types Pressure Injector Power of gas (mbar) Marking consumption (kW) (1/100 Max. Min. Auxiliary Natural (G20) 1.00 0.48 Butane (G30) Propane (G31) Semi- Natural...
-
Page 39: Minimum Flow Adjustment For Hob Gas Taps
IMPORTANT: After changing the injectors YOU MUST follow the minimum flow adjustment section on the next page. Minimum flow adjustment for hob gas taps. work must carried GASSAFE registered engineer. o Light the burner and set the knob at the minimum position. -
Page 40: My Appliance Isn't Working Correctly
My appliance isn’t working correctly o The oven isn’t coming on. * Check that the oven is in manual operation mode. * Check that you have selected a cooking function and a cooking temperature. o There appears to be no power to the oven and grill. * Check that the appliance has been connected to the electrical mains supply correctly. - Page 41 Or any installation other than the one specified by Baumatic Ltd. has been completed. Please refer to the conditions of guarantee that appear on the...
-
Page 42: Contact Details
Czech Republic Baumatic CR s.r.o. United Kingdom Lípová 665 Baumatic Ltd., 460 01 Liberec 4 Baumatic Buildings, Czech Republic 6 Bennet Road, Reading, Berkshire +420 483 577 200 RG2 0QX United Kingdom www.baumatic.cz Sales Telephone Slovakia (0118) 933 6900 Baumatic Slovakia, s.r.o.
Need help?
Do you have a question about the BC908SS and is the answer not in the manual?
Questions and answers