
Subscribe to Our Youtube Channel
Related Manuals for SPT WA-9061H


Summary of Contents for SPT WA-9061H
- Page 1 ® PORTABLE AIR CONDITIONER WITH HEATER ..WA-9061 H" 9,000 WA- 1061 H" 10,000BTU...
- Page 2 Model no. WA-9061 H WA-1061H 9000 BTU/hr 10000 BTU/hr Cooling capacity 2637 W 2930 W 8500 BTU/hr 9500 BTU/hr Heating capacity 2491 watts 2783 watts 9.38 9.35 960W / 8.29 A 1070W / 8.7 A Power/Ampere consumption - Cooling* 840W / 7.75 A 950W / 8.18 A Power/Ampere consumption - Heating*...
-
Page 3: General Safety
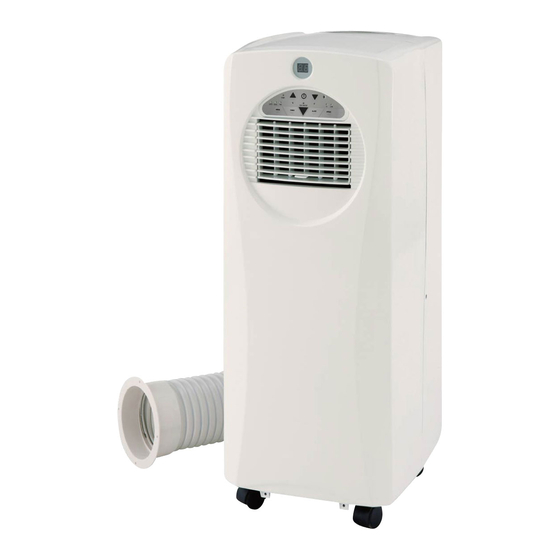
GENERAL SAFETY • Only use in the upright position on a flat level surface and at least 14in. from any walls or objects (fig 1 & 4). • Do not place any objects on the unit or block the FIG. 1 air inlet / outlet (fig. - Page 4 Front Back FIG.5 FIG.6 Display window Cord storage Control panel Air filter Air outlet Air inlet Carrying handle Exhaust air outlet Caster Air inlet Water stopper/drainage Accessories FIG.7 13. Exhaust hose 16. Plastic slider kit- piece 2 of 2 17. Drain tube 14.
- Page 5 The unit is a portable air conditioner that may be moved from room to room. Installing plastic slider kit. _! 2 i¸ i¸ / /I/_J _Window _: o_,_/i r ....... FIG.8 Extend both ends of the exhaust hose by few inches. Connect hose to the back of unit by turning clockwise - do not over tighten.
-
Page 6: Carbon Filter Installation
Carbon Filter Installation 1. Remove filter frame from unit. 2. Remove the filter fixer from the filter frame. 3. Remove active carbon filter from plastic bag. 4. Insert active carbon filter to filter frame. 5. Replace filter fixer to frame. The active carbon filter is now held in between the filter frame and filter fixer. - Page 7 FIG.15 Mode (function) select button "Temperature down" button Timer button ON/OFF (power) button "Water Full" indicator "Temperature up" button Sleep button Timer operation indicator Fan speed button Compressor operation indicator Heat mode indicator Low fan speed indicator Fan mode indicator High fan speed indicator Receiver for remote control Cooling mode indicator...
- Page 8 Setting fan speed Press SPEED button to choose the desired fan speed, high or low. The corresponding indicator (Hi or LOW) will illuminate. If the unit is operating in AUTO mode, the SPEED button is invalid. Unit will automatically choose the fan speed based on the ambient temperature. Setting timer If unit is in operation, pressing the TIMER button will set the operating hours (from 1 to 12...
- Page 9 Remote control All functions can also be performed with the supplied remote control. The remote control requires two (2) AAA batteries. Fig.16 Directing air flow Manually adjust the louvers left & right or up & down to direct air flow. FIG.
- Page 10 During the cooling process, some water will be extracted from the air into the unit. If the reservoir is full, both of the compressor (cooling) and motor (fan) will stop and unit will emit a Buzz (press any button to stop the buzz); the Water Full indicator will also be flashing.
- Page 11 Always unplug the air conditioner from power source before cleaning. Clean regularly to maximize the efficiency of the air conditioner. Cleaning the housing • Use a soft, damp cloth to wipe the body clean. • Never use aggressive chemicals, gasoline, detergents, chemically treated cloths, or other cleansing solutions.
-
Page 12: Your Guarantee
The warranty after repair will not be extended beyond the original one-year period. • All replacement parts will be new or reconditioned. • Parts, which are replaced, become the property of Sunpentown. • The warranty applies for the use of the product in the USA only. What is NOT COVERED: •...
Need help?
Do you have a question about the WA-9061H and is the answer not in the manual?
Questions and answers