Advertisement
Available languages
Available languages
Table of Contents
CLICKER
Universal Garage Door Opener Remote Control
Model No. CLT1
The Clicker remote can be programmed to operate up to 2
garage door openers or gates, including different brands. All
programming is done using the:
• Brand switches
• Remote control DIP switches
• Remote control push buttons
A and B, and LED indicator
ON
BRAND Switches
UP position is ON
DOWN position is OFF
ON
DIP Switches
UP position is ON
DOWN position is OFF
NOTE: Use pen or small screwdriver
to move dip switches.
PREPARATION
Determine the BRAND of the existing garage door opener or
handheld remote controls. If all remote controls are lost, the
BRAND is located on the ceiling mounted motor unit or on the
external receiver near the flexible wire antenna. Also determine
if your motor unit/receiver system has DIP switches or a
smart-learn button. (Some models require removing the light
lens.) Proceed to Step 1 for your specific BRAND switch. For
further information consult your garage door opener manual.
Motor Unit
& Receiver
External Ceiling or
DIP Switches or
Wall Mounted Receiver
Smart-Learn Button
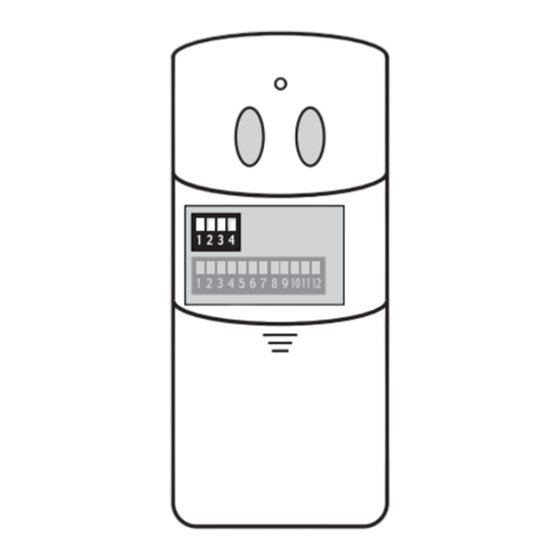
Remote
Control
LED
Button A
Button B
BRAND
Switches
DIP
Switches
Battery
Slide Battery
cover down
to remove
WARNING
To prevent possible SERIOUS INJURY or DEATH from a moving gate
or garage door:
CAUTION
• ALWAYS keep remote controls out of reach of children. NEVER
permit children to operate, or play with remote control transmitters.
• Activate gate or door ONLY when it can be seen clearly, is properly
adjusted, and there are no obstructions to door travel.
• ALWAYS keep gate or garage door in sight until completely closed.
NEVER permit anyone to cross path of moving gate or door.
Step 1 - Set Brand Switch
■ Set brand switches on Clicker
remote. Refer to Table 1.
Table 1 (Brand Switches)
SYSTEM
STANLEY 10 DIP Switches
MULTI-CODE 10 DIP Switches
LINEAR/MOORE-O-MATIC 8 DIP Switches 310 OFF ON OFF OFF
GENIE 9 DIP Switches
GENIE 12 DIP Switches
CHAMBERLAIN, SEARS,
LIFTMASTER, MASTER MECHANIC,
OR DO IT 7 Dip Switches
CHAMBERLAIN, SEARS,
LIFTMASTER, MASTER MECHANIC,
OR DO IT 8 Dip Switches
CHAMBERLAIN, SEARS,
LIFTMASTER, MASTER MECHANIC,
OR DO IT 9 Dip Switches
CHAMBERLAIN, SEARS,
LIFTMASTER,
MASTER MECHANIC, DO IT:
YELLOW/WHITE/GRAY Smart-Learn Button 390
Proceed to Step 2.
If you have a Green or Orange/Red Smart-Learn Button
proceed to Step 3.
CHAMBERLAIN, SEARS,
LIFTMASTER,
MASTER MECHANIC, DO IT,
GREEN Smart-Learn Button
CHAMBERLAIN, SEARS,
LIFTMASTER,
MASTER MECHANIC, DO IT:
ORANGE/RED Smart-Learn Button
➡
FREQ.
MHZ
BRAND SWITCHES
310 OFF OFF OFF OFF
300
ON OFF OFF OFF
390 OFF OFF ON OFF
390
ON OFF ON OFF
390
ON OFF OFF ON
390 OFF OFF OFF ON
390
ON
ON OFF OFF
ON
ON OFF OFF
390
ON
ON
ON OFF
390 OFF ON
ON OFF
Advertisement
Table of Contents

Related Manuals for Clicker CLT1


Summary of Contents for Clicker CLT1
- Page 1 Refer to Table 1. Table 1 (Brand Switches) Remote Control FREQ. The Clicker remote can be programmed to operate up to 2 SYSTEM BRAND SWITCHES garage door openers or gates, including different brands. All programming is done using the:...
-
Page 2: Remote Control Battery
Match the Clicker’s DIP switches to already existing Green, Orange or Red Smart-Learn button, the light bulb will receiver/remote DIP switches. Set extra DIP blink signifying it has learned the Clicker remote control code. switches in the Clicker remote to the off position. NOTE: For Chamberlain/Sears/LiftMaster/Master Mechanic. - Page 3 Table 1 (Conmutadores de marca) Control Remoto FREC. CONMUTADORES SISTEMA El Clicker remoto puede programarse para operar hasta 2 puertas o DE MARCA compuertas de garaje, incluyendo marcas diferentes. Toda la STANLEY con 10 Conmutadores DIP OFF OFF programación se efectúa usando: •...
- Page 4 éxito. Si la unidad de motor/receptor tiene un botón de código. Smart-Learn verde, anaranjado o rojo, la bombilla parpadeará para indicar que la unidad ha aprendido el código del control remoto Clicker. Configure los conmutadores DIP del control remoto Clicker para que coincidan con la configuración de los conmutadores DIP del receptor o control remoto existente.
Need help?
Do you have a question about the CLT1 and is the answer not in the manual?
Questions and answers