CLICKER CLT1CD - Universal Garage Door Opener Remote Control Manual
- Manual (2 pages)
Advertisement
INTRODUCTION
The Clicker remote can be programmed to operate up to 2 garage door openers or gates, including different brands. All programming is done using the:
- Brand Switches
- Remote Control DIP Switches
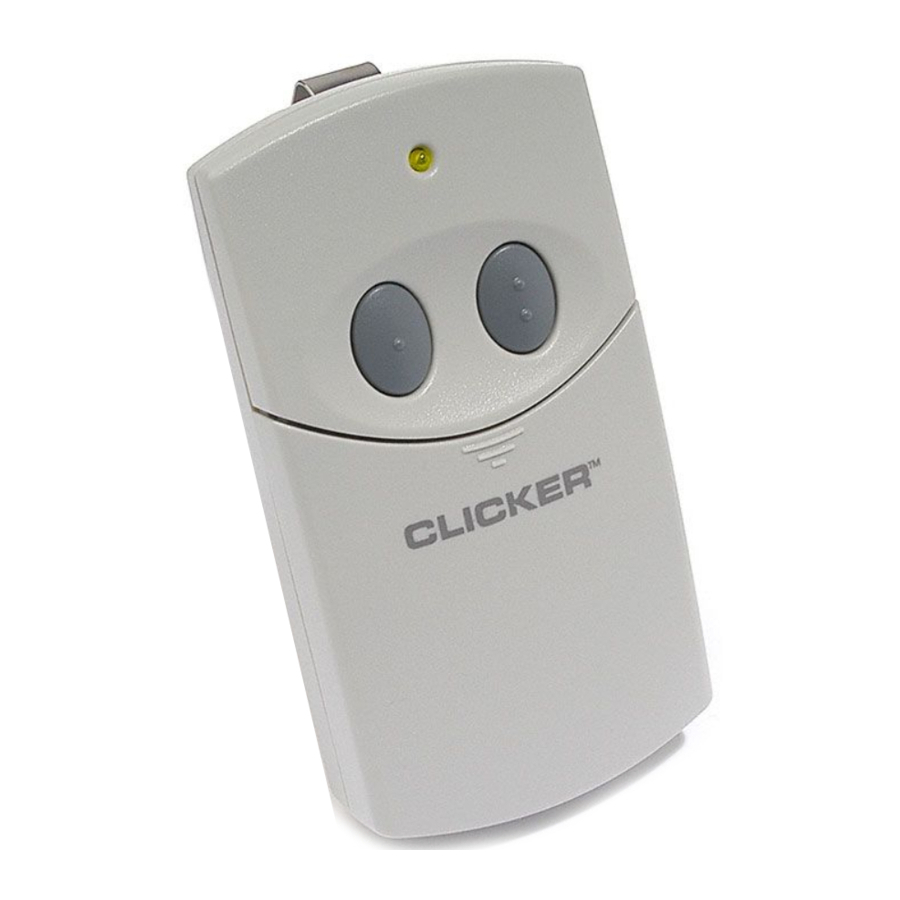
- Remote Control Push Buttons, A and B, and LED Indicator


To prevent possible SERIOUS INJURY or DEATH from a moving gate or garage door:
- ALWAYS keep remote controls out of reach of children. NEVER permit children to operate, or play with remote control transmitters.
- Activate gate or door ONLY when it can be seen clearly, is properly adjusted, and there are no obstructions to door travel.
- ALWAYS keep gate or garage door in sight until completely closed. NEVER permit anyone to cross path of moving gate or door.
BUTTONS AND PARTS

BRAND Switches

UP position is ON DOWN position is OFF
DIP Switches

UP position is ON DOWN position is OFF
 NOTE: Use pen or small screwdriver to move dip switches.
PREPARATION
Determine the BRAND ID of the existing garage door opener or handheld remote controls. If all remote controls are lost, the BRAND ID is located on the ceiling mounted motor unit or on the external receiver near the flexible wire antenna.
Also, determine if your motor unit/receiver system has DIP SWITCHES or a SMART-LEARN BUTTON. Some models require removing the light lens. For further information, consult your garage door opener manual. Proceed to the appropriate section for your type of opener.
SET BRAND SWITCH

Using the chart below that pertains to your brand, set brand switches on Clicker remote.
NOTES:
- Some garage door openers use wire connectors instead of DIP switches. If wire is present it is "ON." If wire is absent or cut, it is "OFF." Consult your garage door opener manual for further information.
- If you have a unit with Yellow, White or Gray Smart-Learn button and you do not have a remote, set the first 9 dip switches to your choice. The remaining 10-12 should be set to off. Proceed to step 4.
| BRAND ID / SYSTEM | BRAND SWITCHES | |||
| CHAMBERLAIN, SEARS, LIFTMASTER, HOME BUILDER (7 Code Switch Systems - 315MHz) | ON | ON | OFF | ON |
| CHAMBERLAIN, SEARS, LIFTMASTER, HOME BUILDER (8 Code Switch Systems - 315MHz) | OFF | ON | OFF | ON |
| CHAMBERLAIN, SEARS, LIFTMASTER, HOME BUILDER (9 Code Switch Systems - 315MHz) | ON | OFF | OFF | OFF |
| CHAMBERLAIN, SEARS, LIFTMASTER, HOME BUILDER (Yellow, White or Grey Learn Button - 390MHz) | ON | ON | OFF | OFF |
| GENIE (9 Code Switch Systems - 390MHz) | OFF | OFF | ON | OFF |
| GENIE (12 Code Switch Systems - 390MHz) | ON | OFF | ON | OFF |
| LINEAR, MOORE-O-MATIC (8 Code Switch Systems - 310MHz) | OFF | ON | OFF | OFF |
| STANLEY (10 Code Switch Systems - 315MHz) | OFF | OFF | OFF | OFF |
| CHAMBERLAIN, SEARS, LIFTMASTER, HOME BUILDER (9 Code Switch Systems - 390MHz) | ON | ON | OFF | OFF |
| CHAMBERLAIN, SEARS, LIFTMASTER, HOME BUILDER (8 Code Switch Systems - 390MHz) | OFF | OFF | OFF | ON |
| CHAMBERLAIN, SEARS, LIFTMASTER, HOME BUILDER (7 Code Switch Systems - 390MHz) | ON | OFF | OFF | ON |
Proceed to step 3.
| BRAND ID / SYSTEM | BRAND SWITCHES | |||
| CHAMBERLAIN, SEARS, LIFTMASTER, HOME BUILDER (Green Learn Button - 390MHz) | ON | ON | ON | OFF |
| CHAMBERLAIN, SEARS, LIFTMASTER, HOME BUILDER (Orange/Red Learn Button - 390MHz) | OFF | ON | ON | OFF |
| CHAMBERLAIN, SEARS, LIFTMASTER, HOME BUILDER (Purple Learn Button - 315MHz) | OFF | OFF | ON | ON |
Proceed to step 4.
SET THE DIP SWITCHES

Match existing DIP switches. Remaining switches are off.
Open existing remote to expose code switches or obtain the switch settings from your receiver.
Match the Clicker's DIP switches to already existing receiver/remote DIP switches. Set extra DIP switches in the Clicker remote to the off position.
NOTE: For Chamberlain, Sears, LiftMaster and Master Mechanic, if the receiver/remote DIP switch has three positions labeled "+," "0" and "-," do not use the "0" position. If you have a three button remote, #1 switch must be set to "-" if you would like the large button to open the door.
PROGRAMMING THE PUSH BUTTON

Press and hold both buttons until LED begins to flash. When LED flashes, release both buttons and immediately press the button that you want to activate the door and release. Your clicker is now programmed, proceed to step 5 or 6.
- For Chamberlain, Sears, LiftMaster and Master Mechanic if your garage door opener has a Smart-Learn button, continue on to step 5.
- For all other types continue to step 6.
SMART-LEARN BUTTON PROGRAMMING
- Press and release Smart-Learn button.
![]()
- Press and hold button selected in step 4 for 3 seconds.
![]()


NOTE: If you have a Chamberlain, Sears, Liftmaster, Master Mechanic or Do It motor unit/receiver with a Yellow, White or Gray Smart-Learn button, it will activate immediately upon successful programming. If your motor unit/receiver has a Green, Orange, Red or Purple Smart-Learn button, the light bulb will blink signifying it has learned the Clicker remote control code.
PROGRAMMING IS COMPLETE
Programming is complete. To test, press the button selected to activate garage door.
NOTE: For Genie, Stanley, Linear and Moore-O-Matic if programming does not work, review brand and dip settings and repeat steps 4 through 6. Also, try reversing the dip switch settings (Turn ON to OFF and OFF to ON). Brand code switches remain the same.
NOTE: If programming to more than one motor unit; after successfully programming button "A," determine the brand of the second garage door opener. Follow the instructions pertaining to that particular brand to program button "B." Programming a different code into button "B" will not affect button "A." The codes and brand switch settings are retained within their specific Clicker button.
REMOTE CONTROL BATTERY
When the remote range is diminished, operation is intermittant, or the LED dims, replace the battery. Memory is not lost when the battery is removed.
NOTE: Dispose of old batteries properly.
TECHNICAL SUPPORT
1-800-442-1255

Documents / Resources
References

Download manual
Here you can download full pdf version of manual, it may contain additional safety instructions, warranty information, FCC rules, etc.
Download CLICKER CLT1CD - Universal Garage Door Opener Remote Control Manual
Advertisement


Need help?
Do you have a question about the CLT1CD and is the answer not in the manual?
Questions and answers