Table of Contents
Advertisement
Quick Links
Advertisement
Table of Contents

Related Manuals for Uniden Guardian UBR223


Summary of Contents for Uniden Guardian UBR223
- Page 1 Portable Digital Wireless Baby Monitor UBR223 User’s Guide...
-
Page 2: Important Safety Precautions
Quickly find answers to your questions by: 1. Reading this owner’s manual. 2. Visiting our customer support website at www.uniden.com. 3. Calling our customer care specialists at 1-800-297-1023. ImPortaNt saFetY PreCautIoNs This manual contains important information about this product’s operation. If you are installing this product for others, you must leave this manual or a copy with the end user. -
Page 3: For Best Results
Clean only with a dry cloth. • Failure to follow the instructions in this operating manual will void the warranty. Uniden assumes no liability for damages to property or injury to persons caused by improper handling or failure to comply with these safety instructions. -
Page 4: Table Of Contents
ALERT ...................25 Uniden surveillance products are not manufactured and/or sold with the intent to be used for illegal purposes. Uniden expects consumer’s use of these products to be in compliance with all local, state and federal law. For further information on video surveillance and audio recording legal requirements, please consult your local, state and federal law enforcement agency. -
Page 5: Overview
oVerVIeW Features Digital wireless technology provides excellent image quality and clarity • Interference free, secure, and private signal • Up to 500 ft. transmission range • Maximum open space transmission range. The actual range varies depending on building materials and other obstructions in wireless signal path. Exceptional sound clarity •... -
Page 6: Monitor
Basic Operations. This section describes your equipment’s function keys in detail. It also provides • a list of basic operations in an abbreviated format, referencing screen details in the next section. Uniden UBR223 Screen Descriptions. Here you will find detailed descriptions of each screen and • how it is used. - Page 7 Maintaining Your System. This section provides tips on how to keep your UBR223 hardware • clean and in excellent working condition. Solving Problems. Troubleshooting tips are located here. • Specification. This last section contains hardware and software specifications. •...
-
Page 8: Getting Started
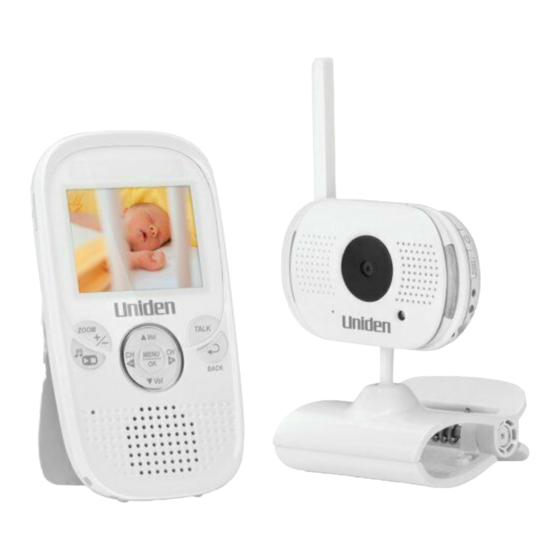
GettING starteD WHat’s INCLuDeD The system comes with the following components: Digital Wireless Monitor (1) Digital Wireless Camera (1) Suction Cup Adapter Bar (1) AC Power Adapter (2) Screws and Anchors Owner’s Manual If any items are missing or damaged, contact our Customer Care Line immediately. Never use damaged products! moNItor INstaLLatIoN 1. -
Page 9: Camera Installation
5. Out of range displays until you turn on the camera, . Camera INstaLLatIoN The UBR223 camera and mounting clip are a complete unit. The UBR223 does come with a separate suction cup bar. With it installed, you can mount the camera on glass or smooth metallic surfaces. -
Page 10: Wall Mount
Wall mount The UBR223 camera mounting clip has two slots that fit over screws to mount the unit on the wall. 1. Mark the position of the screw holes on the wall. 2. Drill holes and insert the anchors and screws provided. -
Page 11: Basic Operation
BasIC oPeratIoN WIreLess Camera Left side Front Right side NOTE: The RESET button is on the back. Item What it is Camera Antenna: Sends and receives signals to or from the monitor. Temperature sensor: Detects temperature at camera side and displays it on the monitor LCD. - Page 12 Item What it is Light sensor: Measures light intensity on the camera side. Lens: Camera lens. Microphone: Receives sounds for the area near the camera, and transmits sound from the camera to the monitor. Speaker: Produces the sound transmitted from the monitor. : Turns the camera ON or OFF.
-
Page 13: Wireless Monitor
WIreLess moNItor NOTE: The RESET button is on the back behind the kickstand. Item What it is Monitor Antenna: Sends & receives signals to or from the camera. LED light bar. The left LED indicates power and the remaining LEDS indicate sound. : Turns the camera on and off. - Page 14 Item What it is CH◄ • In Menus: Scroll left. • In Zoom: Scroll left. • In Live view: Switch between available cameras. Microphone. ▼Vol: • Decrease speaker volume. • In Menus: Scroll down. • In Lullaby: decrease volume. • In Zoom: Scroll down. : Select a menu option or accept a setting. meNu/oK : Activate Intercom function (see page 29). taLK In Menus: Back one level. BaCK CH►: • In Menus: Scroll right. • In Zoom: Scroll right. • In Live view: Switch between available cameras. : Remotely turn the camera night light ON or OFF. NIGHt LIGHt The monitor’s night light function is only available when the camera is paired to the monitor.
-
Page 15: Lcd Display
LCD DIsPLaY CAM1 77°F 01.02.2013 12:26:00 Item Icon What it is Signal Indicator (displays in full screen mode only). The number of bars in the signal indicator shows the strength of the signal received from the camera. One or no bars indicates the signal is poor, and 4 bars indicate a very strong signal. -
Page 16: Using The Ubr223
Date and Time (displays in full screen mode only). Displays the time as set through the monitor. 01.02.2013 12:26:00 = month.day.year hour:minute:second ZOOM indicator. If you press , X2 displays after the Lullaby indicator (item ZOOM 8). The zoomed image displays as the background image. usING tHe uBr223 Viewing modes Live view displays live images from the cameras in the following modes:... -
Page 17: Common Operations
Press to cycle through the Live modes in the following order: CH► view, single view, and scan CAM1—CAM2—CAM3—CAM4—QUAD—AUTO Scan — CAM1 for Live view Check the temperature The temperature displays on the monitor screen when the camera is in full screen mode. See page 21. Turn on the night light Press on the side of the camera (page 11) or on the NIGHT LIGHT monitor (page 13). See page 28 for details. Set the date and time See page 19. Set the room temperature See page 22. range for the temperature alert Use the Lullaby function See page 28. Adjust UBR223 volume Press ▲ (increase volume) or ▼ (decrease volume) on either the camera or the monitor. Use the Intercom 1. Press and hold on the monitor. TALK 2. Speak into the microphone. 3. Release to hear reply. -
Page 18: System Menu Descriptions
sYstem meNu DesCrIPtIoNs Press to access system menus. Use the navigating buttons to navigate up ( down ▲Vol meNu/oK ), and right ( ) in the menus, then press left ( to confirm a setting. Use ▼Vol CH◄ CH► meNu /oK CH►... -
Page 19: Date/Time
Temp. alert range • Date/time This option allows you to set the system date and time. The display format is Month.Day.Year Hour:Minute (Default = 01.02.2013 12:26) 1. From the System menu, select Date/Time and press . The Date/Time screen displays. meNu/oK 2. -
Page 20: Brightness
Brightness This option allows you to adjust the brightness level for each camera. (Default = 3) 1. From the System menu, select Brightness and press . The Brightness screen displays. meNu/oK 2. Press to increase or decrease the brightness level (6 levels). CH►... -
Page 21: Language
3. Press to save the setting and return to the main System options. meNu/oK Camera pairing settings and Date/Time setting will NOT be affected by a reset. Cameras will remain paired with the monitor. Language This option allows you to select the system’s display language from English, Español, or Français. (Default = English) 1. -
Page 22: Temperature Alert Range
Your UBR223 measures the ambient room temperature where the camera is. If the temperature falls outside of a preset range, the system alerts you. Temp. alert range lets you set that range. [Default = Low Temperature: 61°F ; High Temperature; 77°F; Off] 1. -
Page 23: Alert
5. Press to toggle between On (Enable) or Off (disable). Either button will work. CH► CH◄ 6. Press to save the settings and return to the main System options. meNu/oK aLert Temperatures out of range or a camera out of range triggers alerts. This option allows you to set the alert volume. -
Page 24: Vox
This option allows you to set the sound sensitivity for the camera. (Default = High) 1. From the main menu selections, select VOX and press . The VOX sensitivity screen meNu/oK displays. 2. Press to select a level (High, Low, or Off). ▲Vol ▼Vol 3. -
Page 25: Camera
Camera This option allows you to pair the monitor with cameras (up to 4 cameras supported) or to turn on/ off an individual camera. The cameras are still powered on but no longer visible to the monitor. 1. From the main menu selections, select Camera and press meNu/oK 2. -
Page 26: On/Off
1. Select Pair from the Camera options screen. The camera selection screen displays. 2. Press to select the camera you want to pair, then press ▲Vol ▼Vol PAIR . The monitor prompts you to press on the back of the meNu/oK PaIr camera within 30 seconds. -
Page 27: Power Save
4. Press to select another camera. ▲Vol ▼Vol 5. Press to accept that setting and return to the Camera options screen. meNu/oK PoWer saVe Activating the Power Save feature turns off the LCD after two minutes of inactivity. This option allows you to enable or disable this function. -
Page 28: Special Features
Zoom NIGHt LIGHt You can control the UBR223 night light using the button on the right side of either the NIGHt LIGHt monitor or the camera. However, if you want to control it from the monitor, you must place that camera in full screen mode. -
Page 29: Using The Intercom
4. Press to skip to Lullaby #3. The system plays Lullaby #3 then repeats it. LuLLaBY sKIP 5. Press to skip to Lullaby #4. The system plays Lullaby #4 then repeats it. LuLLaBY sKIP 6. Press to skip to Lullaby #1. The system plays Lullaby #1 then cycles through all LuLLaBY sKIP lullabies. -
Page 30: Maintaining Your System
maINtaINING Your sYstem moNItor As you use your monitor, keep the screen clean by wiping it with a microfiber cloth to remove fingerprints, dust, etc. Camera When dust and grime builds up on the camera lens and glass, it affects the camera’s “vision.” Use a microfiber cloth to regularly clean the camera(s) or when night vision video is cloudy or unclear. -
Page 31: Solving Problems
soLVING ProBLems If you have problems with the system, there is often a quick and simple solution. Please try the following: There is no picture from the camera • checking all connections to the camera. Make sure the adapter is plugged in. • making sure that the cameras and monitor are both ON. • making sure that the camera is in range of the monitor. The picture is dropping • moving the camera closer to the monitor. • repositioning the camera, monitor or both to improve the reception. • adjusting the monitor and camera antennas to vertical position. There are audio problems • making sure that there is sound within range of the camera microphone. • moving the camera or monitor farther apart if the unit emits a loud screeching noise (feedback). The picture has become choppy The picture may become choppy when experiencing a lower frame rate. Try: • moving the camera closer to the monitor. -
Page 32: Specifications
sPeCIFICatIoNs GeNeraL Camera Monitor Operating Frequency Range 2.400 ~ 2.4835GHz TX Power 15dBm RX Sensitivity –81dBm Type of Spread Spectrum Used FHSS Type of Modulation Used GFSK Communication Range 500ft. Line of Sight Camera Image Sensor Type Manufacturer/ Model # 1/6.5” Color CMOS Image sensor Effective Pixel 640 x 480 Image Processing... -
Page 33: Monitor
moNItor Display Size/Type 2.3” TFT LCD Resolution 320 x 240 Power Requirement 5.0VDC +/–5% 260mA Max (Normal) Power Consumption 740mA Max (Charging) Operating Temperature Range 14°F ~ 104°F ( –10°C ~ 40°C ) Operating Humidity Range Within 85% RH RoHS Compliance Battery Life 4.5 hours Housing Material Plastic FCC Notices... -
Page 34: Rf Exposure Information
(D) serviced or repaired by someone other than an authorized Uniden service center for a defect or malfunction covered by this warranty, (E) used in any conjunction with equipment or parts or as part of any system not manufactured by Uniden, or (F) installed or programmed by anyone other than as detailed by the owner’s manual for this product. - Page 35 & accessories originally packaged with the Product. Include evidence of original purchase & a note describing the defect that has caused you to return it. The Product should be shipped freight prepaid, by traceable means, to warrantor at: Uniden America Service 743 Henrietta Creek Rd.
Need help?
Do you have a question about the Guardian UBR223 and is the answer not in the manual?
Questions and answers