
Related Manuals for Frymaster FE155


Summary of Contents for Frymaster FE155
- Page 1 Frymaster, a member of the Commercial Food Equipment Service Association, recommends using CFESA Certified Technicians. 24-Hour Service Hotline 1-800-551-8633 SEPT 2008 *8196399* www.frymaster.com PRINTED IN THE USA Email: service@frymaster.com...
- Page 2 Do not store or use gasoline or other flammable vapors and liquids in the vicinity of this or any No structural material on the fryer should be altered or removed to accommodate placement of the fryer under a hood. Questions? Call the Frymaster Service Hotline at 1-800-551-8633. NOTICE...
- Page 3 Do not bang fry baskets or other utensils on the fryer’s joiner strip. The strip is present to seal the joint between the frypot. Banging fry baskets on the strip to dislodge shortening will distort the strip, adversely affecting its fit. It is designed for a tight fit and should only be removed for Safe and satisfactory operation of Frymaster equipment depends upon its proper installation.
- Page 4 (e.g., a circuit breaker) is provided. If the electrical power supply cord is damaged, it must be replaced by a Frymaster Dean Factory Authorized Service Center technician or a similarly qualified person in order to avoid a hazard.
-
Page 5: Table Of Contents
Annotated View...3-1 Controller/Operation/Programming ...3-2 Start Up Procedure ...3-3 Boil Out Procedure ...3-4 CHAPTER 4: Preventive Maintenance Daily Service Checks ...4-1 Quarterly Checks ...4-1 Annual Service Checks...4-2 CHAPTER 6: Operator Troubleshooting Introduction ...5-1 Troubleshooting Guide...5-2 FE155 Rethermalizer TABLE OF CONTENTS PAGE... -
Page 6: Chapter 1: Introduction
CHAPTER 1: Introduction Parts Ordering and Service Information In order to assist you as quickly as possible, the Frymaster Authorized Service Agency (ASA) or Service Department representative requires certain information about your equipment. Most of this information is printed on a data plate affixed to the inside of the door. -
Page 7: Equipment Description
Equipment Description The FE155 Series is specifically designed to rethermalize meats, sauces, and other vacuum pack- aged foods at a safe temperature range. The system features a controller and an easy to clean vat. Each unit can rethermalize up to 30 lbs. -
Page 8: Shipping Damage Claim Procedure
Frymaster equipment parts. A list of Frymaster Authorized Service Agencies (ASA) was included with the unit when it was shipped from the factory. The location and telephone number of ASAs can also be found at the Frymaster website, www.frymaster.com/service. -
Page 9: Chapter 2: Installation Instructions
Frymaster computers have been tested and found to comply with the limits for a Class A digi- tal device, pursuant to Part 15 of the FCC rules. While these devices are verified as Class A devices, they have been shown to meet the Class B limits. -
Page 10: Caster/Leg Installation
Adequate means must be provided to limit the movement of this appliance without depending on or transmitting stress to the electrical conduit. A restraint kit is pro- vided with the fryer. If the restraint kit is missing contact your local Frymaster Au- thorized Service Agency (ASA) for part number 810-3574. - Page 11 If the unit is to be moved frequently (for cleaning or preventive maintenance), Frymaster recommends installing flexible water lines. If the cooker is hard- plumbed then moved, the connections may loosen and eventually cause leaks. Whichever option is chosen, Teflon thread-seal tape, Loctite™...
-
Page 12: Power Requirements
4. Install a CE-approved plug rated for a minimum of 32 amps at 415 VAC. In must be a 3-phase, 5-wire type with neutral and ground and be oil and water resistant. Use copper wire ONLY, suitable for at least 170ºF (75ºC) ELECTRIC COOKER MODEL FE155 Volts Phase... -
Page 13: Wiring Diagrams
Field Connection Wiring Diagrams... -
Page 14: Chapter 3: Operating Instructions
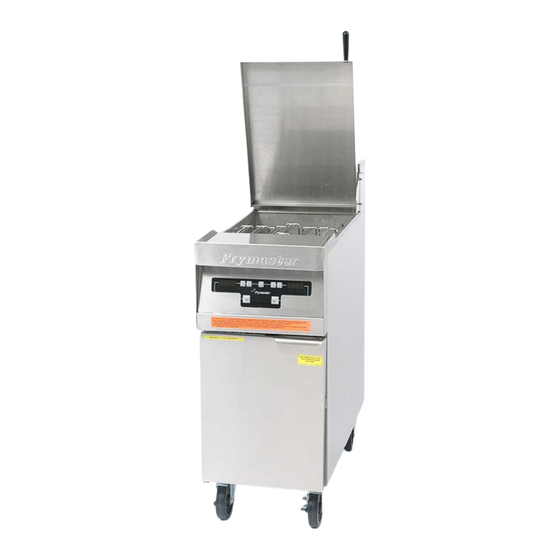
CHAPTER 3: Operating Instructions Finding Your Way Around the FE155 Bezel Introduction FE155 Drain extension Upper Level Float Switch Drain Low Level Float Switch Controller FE155 Vat Main Power Switch Drain handle Cabinet Interior NOTE: The water inlet is controlled by the main power switch. - Page 15 Controller This equipment uses a specialized controller. Computer Operation • Ensure the main power switch (behind cabinet door) is on. • Press either ON/OFF button to turn the computer on. • The computer displays LO as it rises to the preset 190°F setpoint for simmer. •...
-
Page 16: Start Up Procedure
• Press Boil key a second time to return to simmer mode. Programming • Remove the bezel (see annotated photo on page 3-1) Lift up and then rotate out at the bottom, which exposes a keypad beside each timer button. •... - Page 17 Drain the solution and clean the vat thoroughly. 5. Rinse the vat at least twice by filling with clean water and draining. Shutting the FE155 Down 1. Turn the unit off by pressing the main power switch in the cabinet.
-
Page 18: Chapter 4: Preventive Maintenance
CHAPTER 4: Preventive Maintenance Daily Checks and Services Inspect Cooking System and Accessories for Damage Look for loose or frayed wires and cords, leaks, foreign material in cookpot or inside cabinet, and any other indications that the rethermalizer and accessories are not ready and safe for operation. Clean Cabinet Inside and Out Clean inside the cabinet with a dry, clean cloth. - Page 19 5.3 Periodic/Annual Checks Frymaster recommends that the unit be inspected annually by a Factory Authorized Service Techni- cian for the following checks and adjustments: • Verify that the heating element wires are in good condition and that leads have no visible fraying or insulation damage.
-
Page 20: Chapter 5: Troubleshooting\Inspection
Although the chapter covers the most common problems reported, you may very well encounter a problem not covered. In such instances, the Frymaster Technical Service Department will make every effort to help you identify and resolve the problem. -
Page 21: Troubleshooting Guide
Operator Troubleshooting Guide PROBLEM POSSIBLE CAUSES A. No power to unit. Computer does not B. Computer not turned on. activate. C. Main power switch off. A. Water not turned on. B. Upper float stuck in up Autofill does not add position. - Page 22 Frymaster, L.L.C., 8700 Line Avenue, Shreveport, Louisiana 71106 TEL 1-318-865-1711 FAX (Parts) 1-318-688-2200 FAX (Tech Support) 1-318-219-7135 SERVICE HOTLINE 819-6399 PRINTED IN THE UNITED STATES 1-800-551-8633 SEPT 2008...
Need help?
Do you have a question about the FE155 and is the answer not in the manual?
Questions and answers