Table of Contents
Advertisement
Advertisement
Table of Contents

Related Manuals for Blaupunkt Kingston MP47


Summary of Contents for Blaupunkt Kingston MP47
- Page 1 Radio CD USB MP3 WMA Kingston MP47 7 647 603 310 Bedienungsanleitung Operating instructions Mode d’emploi Istruzioni d’uso Gebruiksaanwijzing Bruksanvisning Instrucciones de manejo Instruções de serviço Betjeningsvejledning Instrukcja obsługi Návod k obsluze Návod na obsluhu...
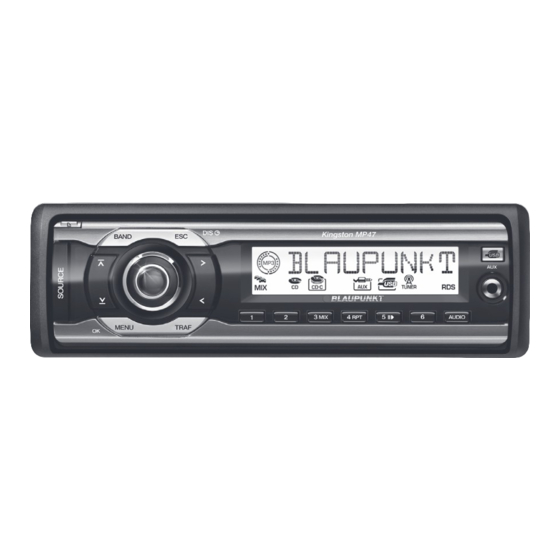
- Page 3 Controls ; MENU/OK button button Short press: Calls up the menus for ba- to open the detachable control panel sic settings and confi rms settings. (fl ip-release panel). Ending the scan function. 2 BAND button Long press: Starts the Scan function. Short press: Selects the FM memory <...
-
Page 4: Table Of Contents
Contents About these instructions ....43 Storing stations automatically (Travelstore) ......... 53 Symbols used........ 43 Use as directed ......43 Listening to stored stations ..... 54 Scanning receivable stations (SCAN) ...54 Declaration of conformity ....43 Setting the scanning time ....54 For your safety ........ - Page 5 Contents CD-changer mode ......64 Equalizer presettings (PRESETS) ..73 Switching to CD changer mode ..64 Adjusting the display settings ... 73 Selecting CDs ........ 64 Adjusting the display brightness ..73 Selecting tracks ......64 Setting the display illumination Fast seek tuning (audible) ....
-
Page 6: About These Instructions
Always pass on the device to third par- The Blaupunkt GmbH declares that the ties together with these instructions. Kingston MP47 device complies with the In addition, observe the instructions of the basic requirements and the other relevant devices used in conjunction with this de- regulations of the directive 89/336/EWG. -
Page 7: For Your Safety
The device is worthless to a thief with- out the control panel. Always remove For this reason, we recommend using an- the control panel whenever you leave gled jack plugs, e.g. the Blaupunkt acces- the vehicle. sories cable (7 607 001 535). •... -
Page 8: Cleaning Instructions
You cannot switch the device on/off using the remote control! You can fi nd out from your Blaupunkt dealer or on the Internet at www.blaupunkt.com which remote controls can be used with your car sound system. -
Page 9: Warranty
• Never drop the control panel. Service • Do not expose the control panel to di- In some countries, Blaupunkt offers a repair rect sunlight or another heat source. and pick-up service. • Avoid direct skin contact with the Information about the availability of this control panel’s electrical contacts. -
Page 10: Attaching The Control Panel
Detachable control panel Notes: Switch-off time (OFF TIMER) • The device is switched off after a time After opening the control panel, the device preset by you. For further details, is switched off after an adjustable time. You please read the section "Switch-off can set this time from 15 to 30 seconds. -
Page 11: Switching On/Off
Switching on/off Volume Switching on/off Adjusting the volume There are various ways of switching the de- You can adjust the volume in increments vice on/off: from 0 (off) to 66 (maximum). To increase the volume, Switching on/off with the On/Off button turn the volume control 4 clockwise. -
Page 12: Quickly Reducing The Volume (Mute)
To return to your previously set volume scribed in the installation instructions. level, You can fi nd out from your Blaupunkt dealer briefl y press the On/Off button 3 which navigation systems can be used with again. -
Page 13: Switching The Confi Rmation Beep On/Off
Volume When you have fi nished making your chang- Automatic Sound This function automatically adjusts the vol- press the ESC/DIS button 5. ume of the car sound system to the vehicle speed. For this purpose, the car sound sys- Note: tem must be connected as described in the You can use the volume control 4 to installation instructions. -
Page 14: Radio Mode
Radio mode Radio mode Switching to radio mode If you are in CD, CD changer, USB or AUX This device is equipped with an RDS radio mode, receiver. Many of the receivable FM stations press the BAND button 2. broadcast a signal that not only carries the programme but also additional information such as the station name and programme press the SOURCE button = repeat-... -
Page 15: Selecting The Waveband/Memory Bank
Radio mode "OFF" or "ON" is displayed alongside "REG". Tuning into a station To switch REGIONAL on/off, There are various ways of tuning into a sta- or button 9. tion. press the When you have fi nished making your chang- Automatic station seek tuning button <. -
Page 16: Setting The Sensitivity Of Station Seek Tuning
Radio mode button 9 to switch Press the Storing stations to the next station on the broadcasting network. Storing stations manually Select the desired memory bank (FM1, Note: FM2, FMT) or one of the wavebands When using this feature, you will only (MW or LW). -
Page 17: Listening To Stored Stations
Radio mode When you have fi nished making your chang- Listening to stored stations Select the memory bank or waveband. press the ESC/DIS button 5. Press one of the station buttons 1 - 6 Note: The stored station is played if it can be re- The defi... -
Page 18: Confi Guring The Display
Radio mode type at a later point in time, the radio When you have fi nished making your chang- will automatically switch from the cur- rently tuned station or from CD mode press the ESC/DIS button 5. or CD-changer mode to the station whose programme type matches the Selecting a programme type and one you selected. -
Page 19: Traffi C Information
Traffi c information Traffi c information Setting the volume for traffi c announcements Your device is equipped with an RDS-EON Press the MENU/OK button ;. receiver. EON (Enhanced Other Network) ensures that whenever a traffi c announce- button < repeat- Press the ment (TA) is broadcast, the system switch- edly until "TA VOLUME"... -
Page 20: Cd Mode
Playback begins from the point at which it with the Compact-Disc logo. Copy-pro- was last interrupted. tected CDs can cause playback problems. Blaupunkt cannot guarantee the proper Selecting tracks functioning of copy-protected CDs! Press an arrow button 9 or < to se- Besides being able to play audio CDs on this lect the next or previous track. -
Page 21: Random Track Play (Mix)
CD mode Random track play (MIX) Repeating tracks (REPEAT) Press the 3 MIX button 8. If you want to repeat a track, press the 4 RPT button 8. "MIX ALL" appears briefl y on the display and the MIX symbol is displayed. The next ran- "RPT TRACK"... -
Page 22: Displaying Cd Text
CD mode Displaying CD text Ejecting a CD button 1. Some CDs include CD text. The CD text Press the might contain the names of the artist and The control panel opens to the bottom. the album. > next to the CD Press the button The CD text is shown as scrolling text on the compartment. -
Page 23: Mp3/Wma Mode
MP3/WMA mode This device supports up to 999 tracks in 99 MP3/WMA mode directories. The directories and tracks on You can also use this car sound system to the CD can be selected individually. play CD-Rs and CD-RWs as well as USB data carriers that contain MP3 music fi... -
Page 24: Switching To Mp3 Mode
• Do not try changing the fi le extension to ".MP3" of any fi les other than MP3 Blaupunkt cannot guarantee the proper fi les and then attempt to play them! functioning of all USB data carriers avail- The device will ignore these invalid able on the market. -
Page 25: Confi Guring The Display
MP3/WMA mode be routed, for example, to the glove com- • Artist and album name are each partment or a suitable place of the center displayed for approx. 10 seconds. console. Afterwards, the fi le name is displayed again. Note •... -
Page 26: Fast Search
MP3/WMA mode Fast search Scanning tracks (SCAN) To fast seek tuning backwards or forwards, You can scan (briefl y play) all the tracks on the MP3 data carrier. press and hold down the or button 9 until fast searching backwards/for- Press the MENU/OK button ;... -
Page 27: Interrupting Playback (Pause)
MP3/WMA mode CD-changer mode Cancelling Repeat CD-changer mode To stop the current track or current direc- Note: tory from being repeated, Information on handling CDs, inserting press the 4 RPT button 8 once or sev- CDs and operating the CD changer can eral times until "RPT OFF"... -
Page 28: Repeating Individual Tracks Or Whole Cds (Repeat)
CD-changer mode Cancelling MIX Repeating individual tracks or press the 3 MIX button 8 once or sev- whole CDs (REPEAT) eral times until "MIX OFF" is displayed. To repeat the current track, The MIX symbol disappears from the dis- press the 4 RPT button 8 once or play. -
Page 29: Confi Guring The Display
CD-changer mode Clock – Time Confi guring the display Clock – Time You can choose from various display op- Setting the time tions in CD changer mode: • Track number and playing time To set the time, • Track number and time press the MENU/OK button ;. -
Page 30: Displaying The Time Continuously When The Device Is Off And The Ignition Is On
Clock – Time Sound Displaying the time continuously Sound when the device is off and the You can perform the sound settings (bass, ignition is on middle and treble) separately for every source (radio, CD, CD changer, USB, AUX, To display the time when the device is off traffi... -
Page 31: Adjusting The Bass
Sound The following table shows an overview of for bass and middle only) as well as GAIN the setting options: (level, for middle only): BASS TREBLE MIDDLE AUDIO Level BASS TREBLE (GAIN) Level GAIN GAIN GAIN Frequency Frequency FREQ FREQ FREQ (FREQ) Quality... -
Page 32: Setting The Left/Right Volume Distribution (Balance)
Sound button < to adjust Press the Adjusting equalizer bass (E-BASS) the level between -7 and +7. You can select 1 of 4 bass frequencies To exit the menu, (60 Hz, 80 Hz, 100 Hz, 200 Hz) and set the press the ESC/DIS button 5. -
Page 33: Adjusting Equalizer Middle (E-Middle)
Sound Adjusting equalizer middle Adjusting equalizer treble (E-MIDDLE) (E-TREBLE) You can select 1 of 4 middle frequencies You can select 1 of 4 treble frequencies (0,5 Hz, 1 Hz, 1,5 Hz, 2,5 Hz) and set the (10 kHz, 12.5 kHz, 15 kHz, 17.5 kHz). level for the selected frequency between -7 Note: and +7. -
Page 34: Preamplifi Er Output (Preamp-Out/Sub-Out)
Preamplifi er output button < to switch Press the Preamplifi er output between the setting options "GAIN" (Preamp-Out/Sub-Out) (level) and "FREQ" (cut-off frequency). You can use the preamplifi er outputs Set the level and cut-off frequency with (Preamp-Out) of the car sound system to or button 9. -
Page 35: X-Bass
X-BASS X-BASS Adjusting equalizer X-BASS (E-XBASS) X-Bass allows you to increase the bass at low volume. You can select 1 of 3 X-BASS frequencies (50 Hz, 100 Hz, 200 Hz) and adjust the The selected X-Bass setting is effective for boost from 0 (X-BASS function off) to 3 for all audio sources (radio, CD, CD changer or the selected X-BASS frequency. -
Page 36: Equalizer Presettings (Presets)
Equalizer presettings Display Equalizer presettings Adjusting the display (PRESETS) settings This device features an equaliser in which Adjusting the display brightness the settings for the music genres "ROCK", "POP" and "CLASSIC" are already pro- If your car sound system is installed as de- grammed. - Page 37 Display Mixing a colour for the display Selecting a display illumination during a illumination colour scan Press the MENU/OK button ;. To customise the display illumination to suit your tastes you can either mix a colour your- button < repeat- Press the self using the three primary colours red, edly until "COL SCAN"...
-
Page 38: External Audio Sources
AUX input. You can obtain this ca- edly until "NORM ON" appears on the ble (Blaupunkt no.: 7 607 897 093) display. from your Blaupunkt dealer. The device switches off and immediately With the SOURCE button =, you can •... -
Page 39: Technical Data
Factory settings Technical data Factory settings: Technical data Volume of traffi c Amplifi er announcements (TA VOL) Output power: 4 x 18 watts sine Power-on volume LAST VOL at 14.4 V and (ON VOL) 1% distortion factor at 4 ohms. Volume of muting (MUTE LEVEL) 4 x 26 watts sine... - Page 40 Bitte den ausgefüllten Gerätepass sicher aufbewahren! Please keep the fi lled-in radio pass in a safe place! Prière de conserver soigneusement la carte d’autoradio remplie ! Tenete per favore il libretto di apparecchio, debitamente riempito, in un posto sicuro! Bewaar de ingevulde apparaatpas op een veilige plaats! Vänligen förvara ifyllt apparatpass på...
- Page 41 (USA) 800-950-2528 708-6817188 Brasil (Mercosur) (BR) 0800 7045446 +55-19 3745 2773 Malaysia (Asia Pacifi c) (MAL) +604-6382 474 +604-6413 640 Gerätepass Kingston MP47 Name: ..............7 647 603 310 Typ: ..............Serien-Nr: BP ..............Blaupunkt GmbH, Robert-Bosch-Straße 200, D-31139 Hildesheim...
Need help?
Do you have a question about the Kingston MP47 and is the answer not in the manual?
Questions and answers