
Related Manuals for Bacharach High Performance Oilless Commercial Refrigerant Recovery Unit


Summary of Contents for Bacharach High Performance Oilless Commercial Refrigerant Recovery Unit
- Page 1 High Performance Oilless Commercial Refrigerant Recovery Unit User Manual 2079-1130 Rev. 6 – May 2010...
-
Page 2: Introduction
Congratulations on your purchase of the STINGER high performance oilless recovery unit. Bacharach has worked hard to make the STINGER the highest performing, most portable, and easiest to use recovery unit on the market. We are committed to your complete... -
Page 3: Stinger Specifications
STINGER Specifications STINGER R-12, R-22, R-114, R-134a, R-401A, R-401B, R-401C, R-402A, Compatible R-402B, R-404A, R-406A, R-407A, R-407B, R-407C, R-407D, Refrigerants R-408A, R-409A, R-410A, R-411A, R-411B, R-412A, R-500, R-502, R-507, R-509 • 110/120 VAC, 1 Phase, 50/60 Hz, 8 Amps See label on Power •... -
Page 4: Table Of Contents
Standard Recovery Hose Connections..........10 Liquid Push-Pull Recovery Operations ..........11 Liquid-Pull Recovery / Charging Method ..........13 R-410A Recovery – Special Notes ............14 Purging the STINGER ................15 DOT Recovery Cylinder Safety ............16 Recovery Tips ..................17 Troubleshooting ..................18 Schematic Diagrams ................ -
Page 5: General Safety
R-410A. Failure to use the proper cylinder can be extremely dangerous! Use weight scale A scale must be used to indicate when the recovery tank is 80% full when the STINGER does not have the 80% Shutoff Kit option installed. -
Page 6: Operational Safety
Eye: In case of liquid contact, immediately flush eye with water. Seek medical attention. Skin: Flush with water. Treat for frostbite by gently warming the affected area. CAUTION: All refrigerant hoses, recovery tanks, refrigerant lines, the STINGER unit, and other vessels containing refrigerants should be handled at all times as if under high... -
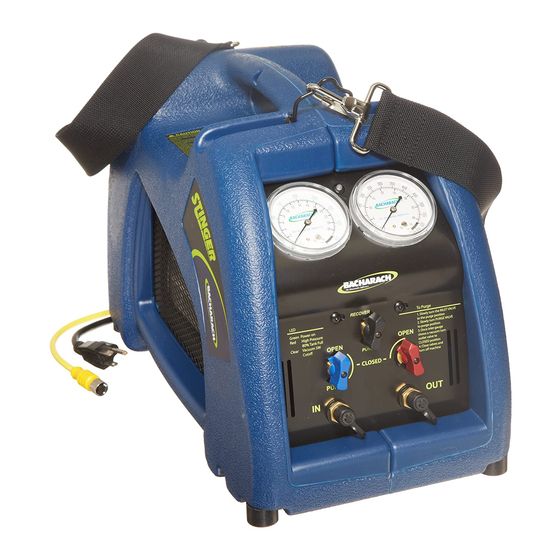
Page 7: Description Of Features
(Optional) STINGER off when the recovery cylinder reaches 80% of its liquid-fill limit. Note: If this option is installed, the STINGER will not operate unless it is connected to a recovery cylinder with a compatible level-float switch. If the recovery cylinder does not have a float switch, then a shorting cap must be installed on the shutoff cord. - Page 8 Description of Features Continued 1. Inlet Gauge 5. Outlet Gauge 2. Purge Valve 3. Inlet Port Valve 6. Outlet Port Valve 7. Outlet Port 4. Inlet Port 8. Circuit Breakers 11. Power Switch 9. Location of optional 80% tank full shutoff cord 12.
-
Page 9: Vapor/Liquid Recovery Operations
Turn the inlet and outlet valves to their “OPEN” position, and the PURGE valve to its “RECOVER” position. Open the vapor valve on the DOT recovery tank. Use the rear mounted power switch to turn ON the STINGER. The compressor will now begin to recover refrigerant. -
Page 10: Standard Recovery Hose Connections
Attention: You must use an agency approved in-line filter when recovering liquid. Contaminants (particularly from the bottom of recovery cylinders) can enter the STINGER and become lodged in the valve seats causing damage and resulting in leaks. We recommend using Bacharach in-line filter P/N 0007-1700 to guarantee optimum... -
Page 11: Liquid Push-Pull Recovery Operations
A scale or liquid-sight glass can be used to determine when all the liquid is recovered. The STINGER will not pull a vacuum using the liquid push-pull recovery operation. To finish the recovery operation, you must perform vapor recovery operations as described on Page 9. - Page 12 Liquid Push-Pull Operations Continued Open both the vapor and liquid valves on the DOT recovery tank. Turn ON the STINGER. The compressor will begin to “pull” vapors from the cylinder and “push” the liquid out of the system and into the recovery cylinder.
-
Page 13: Liquid-Pull Recovery / Charging Method
STINGER. The virgin refrigerant is pulled directly into the system being charged. The STINGER keeps the pressure low in the system by removing vapor. For every pound of vapor removed, as much as 25 pounds of liquid refrigerant may be... -
Page 14: R-410A Recovery - Special Notes
“throttling” the inlet valve until the STINGER begins to run normally. WHEN RECOVERING LIQUID: If a loud knocking noise occurs, the inlet pressure on the STINGER should be throttled back by slowly closing the inlet valve until the knocking noise stops. This action will prevent compressor damage. -
Page 15: Purging The Stinger
Turn the purge valve (black knob center) slowly to the “PURGE” position (pointer DOWN position). The STINGER will now start purging itself of refrigerant. Allow the unit to run until the inlet gauge indicates that there is an adequate vacuum present in the system. -
Page 16: Dot Recovery Cylinder Safety
If your STINGER is not equipped with an 80% tank full shutoff cord, or if you are using a recovery cylinder that does not have a float switch, then you must use a scale to prevent overfilling the cylinder. -
Page 17: Recovery Tips
• Use an agency approved in-line filter (P/N 0007-1700) to prevent contaminants from entering the STINGER. • If the STINGER has the optional 80% tank full shutoff cord installed, connect this cord to the recovery cylinder’s float switch. If the cylinder does not have a float switch, then be sure to install a shorting cap on the shutoff cord;... -
Page 18: Troubleshooting
Troubleshooting PROBLEM CAUSE ACTION Unit will not start – Power Cord not attached Attach Power Cord Fan does not run; No voltage at receptacle Verify voltage at job site compressor does not start Unit will not start – Optional 80% tank full shutoff cord Connect cord Fan starts and runs;... -
Page 19: Schematic Diagrams
Schematic Diagrams... -
Page 20: Stinger Parts List
STINGER Parts List See STINGER Exploded View on Page 21. Item Part Description Number 2045-0620 Compressor (110/120 VAC) 2045-0720 Compressor (220 VAC) 2023-0100 Manifold 2014-0310 High Pressure Switch, 550 psi 2013-0090 Fan, 4", 110/120 VAC 2013-0040 Fan, 4", 220 VAC... -
Page 21: Stinger Exploded View
STINGER Exploded View... -
Page 22: Compressor Parts List
Compressor Parts List See Compressor Exploded View on Page 23. Part No. Item Description 2081-0410 Motor Shaft Head Bearing 2081-0370 Crank Housing 2043-0030 Shaft Seal 2051-1900 Screw, Machine, M5 x 10MM 2081-0310 Piston Cup Seal Retainer 2043-0020 Piston Cup Seal 2081-0270 Piston 2081-0400... -
Page 23: Compressor Exploded View
Compressor Exploded View... -
Page 24: Warranty / Repair Procedures
Warranty / Repair Procedures Bacharach warrants this product for 1 year from the date of purchase indicated on the original sales receipt. The warranty covers all parts within the unit but excludes damage to the unit caused by misuse or mishandling. The unit’s motor brushes carry an extended warranty of 5 years.
Need help?
Do you have a question about the High Performance Oilless Commercial Refrigerant Recovery Unit and is the answer not in the manual?
Questions and answers