Table of Contents
Advertisement
Advertisement
Table of Contents

Related Manuals for Freecom MediaPlayer Drive-In Kit

Summary of Contents for Freecom MediaPlayer Drive-In Kit
- Page 1 FREECOM Network MediaPlayer Drive-In Kit MANUAL Rev. 520...
-
Page 2: Dear Customer
It may not be used near or with any life-sustaining systems. Freecom Technologies is not liable for any damages that may occur from the use of a Freecom system. All rights reserved. We reserve the right to upgrade our products in keeping with technological advances. -
Page 3: Table Of Contents
Product Overview ... page 8 Chapter 1: Use as External USB HDD ... page 10 Chapter 2: Access PC via Network ... page 31 Chapter 3: Use as Multimedia Player ... page 49 Technical Specifications ... page 77 © 2005 Freecom Technologies... -
Page 4: Package Content
Freecom MediaPlayer Drive-In Introduction • Dual Data Access Mode via 10/100Mbps LAN and 3.5" HDD (when assem- bled in the device) • Digital Multimedia Player via Home TV or Car TV • USB 2.0 External Storage via PC (NTFS, FAT32) •... -
Page 5: Minimum System Requirements
Minimum System Requirements USB Requirements • Windows 98SE, ME, 2000, XP / MAC OS X 10.1 or higher / Linux 2.4.x or higher • Available USB 2.0, 1.1 Port (USB 2.0 recommended)* Network Requirements • Windows 98SE, ME, 2000, XP •... -
Page 6: Warnings And Safety Instructions
Freecom MediaPlayer Drive-In Precautions • We strongly recommend you to regularly back up the data from the hard drive that you have built in, to another safe media. Freecom can never be held responsible for data damage or data loss of the built-in HDD. •... -
Page 7: Warnings And Safety Instructions
• Do not drop the Freecom Network MediaPlayer-35 drive in kit or expose it to other kinds of sudden mechanical shocks as this may result in data loss and damage to the hard drive. • Do not use the Freecom Network MediaPlayer-35 drive in kit when the ambient temperature is below 10°C or above 45°C. -
Page 8: Product Overview
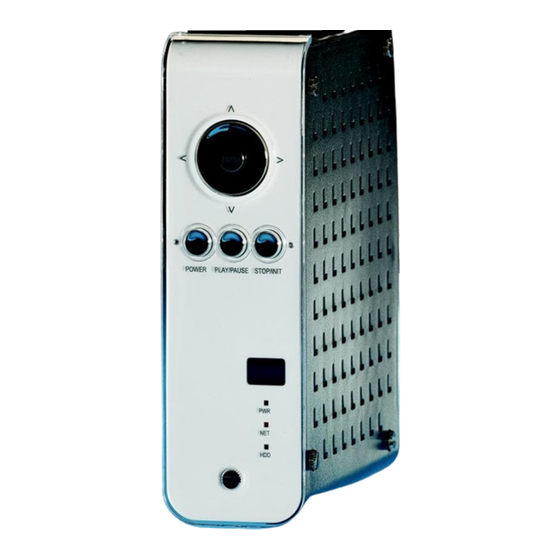
Freecom MediaPlayer Drive-In Product Overview 1. FRONT VIEW All basic operation functions can be done with the buttons on the device without use of the remote control. ENTER POWER PLAY / PAUSE STOP / INIT Enter Power Play / Pause Select or play a file Navigation Key, Up, Down, Left, Right Power On, Off... - Page 9 2. BACK VIEW CVBS Stereo L - R IR-EXT Connect external remote control IR receiver Connect USB cable OPTICAL Connect Optical cable for 5.1 ch. digital audio output S-VIDEO Connect s-video for video output COAXIAL Connect coaxial cable for 5.1 ch. digital audio output Y, PB, PR Connect component Y, Pb, Pr cable for video output Connect lan cable for networking...
-
Page 10: Chapter 1: Use As External Usb Hdd
Freecom MediaPlayer Drive-In Chapter 1: Use as External USB HDD 1.1 Insert Hard Disk • Only use a 3.5" IDE Hard Disk for Desktop. • Hard Disk should be jumpered as "Master". However, if the Hard Disk supports "Single" mode, you need to try to set "Single "mode. 1. -
Page 11: Connecting The Player To The Pc
1.2 Connecting the player to the PC 1. Connect the USB cable to the player and connect the power adapter to the DC jack on the player. 2. Connect the adapter into an AC outlet. 3. Connect the player to the PC's USB port. 4. - Page 12 Freecom MediaPlayer Drive-In File System features Please refer to the tables below for an overview: File systems supported by different operating systems File system Operating system Windows 98SE Windows ME Windows 2000 Windows XP Maximum size of a partition File system Operating system Windows 98SE Windows ME...
- Page 13 Use as External USB HDD 1.3.1 Partitioning your Network MediaPlayer-35 drive in kit under Windows 98SE / Windows ME Windows 98SE only: The fdisk version which is installed together with your operating system does not recognize the correct size of hard disks larger than 64 GB.
- Page 14 Freecom MediaPlayer Drive-In 5. Choose Option "5 (Change current fixed disk drive)" by pressing '5' and 'Return'. 6. Select the hard disk by its number where the "Usage" contains no value but only a percent symbol. Select the number of the corresponding hard disk and confirm by pressing the "Return"...
- Page 15 8. Select Option 1 "(Create primary DOS partition)" by pressing '1' and confirm with 'Return'. Wait until drive integrity is completely checked. 9. If only one partition is required then answer "Y" to the question: "Do you wish to use the maximumavailable size for a Primary DOS partition?" If more than on partition is required go to the next section "Create two or more partitions on the Network MediaPlayer-35 drive in kit under Windows 98 / Windows ME".
- Page 16 Freecom MediaPlayer Drive-In 4. Press the 'ESC' key to return to the fdisk options. 5. Select Option 1 "(Create DOS partition or Logical DOS drive)" by pressing '1' and confirm with 'Return'. 6. Select Option 2 "(Create Extended DOS Partition)" by pressing '2' and confirm with 'Return'.
- Page 17 Deleting a partition on the Network MediaPlayer-35 drive in kit under Windows 98SE / ME The following steps will explain how to delete a partition on your Network MediaPlayer-35 drive in kit. 1. Click on the "Start" button. 2. Select "Run". 3.
- Page 18 Freecom MediaPlayer Drive-In 1.3.2 Partitioning your Network MediaPlayer-35 drive in kit under Windows XP / 2000 Creating a partition on the Network MediaPlayer-35 drive in kit under Windows XP / 2000 The following steps will guide you through the process of creating partitions on your Network MediaPlayer-35 drive in kit.
- Page 19 5. Click with the right mouse button on the "unallocated" area and select the option "New Partition" (Windows 2000: "Create Partition Wizard"). The "New Partition Wizard" opens. Click on "Next". 6. Select "Primary partition" and click on "Next". Use as External USB HDD...
- Page 20 Freecom MediaPlayer Drive-In 7. Now you can adjust the size of your partition. Click on "Next" if only one partition is to be created. See next chapter (Creating two or more partitions on the Network MediaPlayer-35 drive in kit under Windows XP/2000) how to create more than one partition.
- Page 21 Creating two or more partitions on the Network MediaPlayer-35 drive in kit under Windows XP / 2000 1. Repeat the steps from the previous chapter (Creating a partition on the Network MediaPlayer-35 drive in kit under Windows XP/2000) for creating the first partition.
- Page 22 Freecom MediaPlayer Drive-In 7. Now you can adjust the size of your partition. Enter the size and click on "Next". 8. Click on "Finish" to create the "Extended partition". The unallocated space now changed to "Free space".
- Page 23 Use as External USB HDD 9. Right-click on "Free Space" and select "New Logical Drive" (Windows 2000: "Create Logical Drive"). The "New Partition Wizard" (Windows 2000: "Create Partition Wizard") opens. Click on "Next".
- Page 24 Freecom MediaPlayer Drive-In 10. "Logical drive" is already selected. Click on "Next". 11. Specify the partition size and click on "Next". 12. Assign a drive letter and click on "Next". 13. Select the formatting option. Choose either "FAT32" or "NTFS", the "Allocation Unit Size"...
- Page 25 1.4 Copy Data via USB You can use the device as an external USB hard drive when you have assembled a hard disk into it. You can copy data from your PC to the built-in HDD of the player via USB. These files (when they are audio, video or photos) you can play back directly from the device on a TV or HiFi set.
- Page 26 Freecom MediaPlayer Drive-In 2. Check 'My Computer' or 'Explorer', there should be a new volume. You can copy any data to this volume. If a new volume does not appear, check if the HDD is formatted, and check the HDD file system. Windows 98SE can only detect FAT32 file system.
- Page 27 1.4.2 Windows ME 1. After connecting the player and plugging the power cable, Windows will automatically install the driver. After this, please check the driver installa- tion at Windows [Start > Settings > Control Panel > (view all Control Panel options) >...
- Page 28 Freecom MediaPlayer Drive-In 3. After copying data, remove the player using the remove icon Windows taskbar. Not following this procedure may cause data loss and damage to the device. 1.4.3 Windows 2000, XP 1. After connecting the player and plug power cable, Windows will automati- cally install the driver.
- Page 29 2. Check 'My Computer' or 'Explorer', there should be a new volume. You can copy any data to this volume. If new volume is not be appeared, check if HDD is formatted. Windows 2000, XP can detect both FAT32 and NTFS file system. 3.
- Page 30 Freecom MediaPlayer Drive-In 1.4.4 Linux [Automatic Mount] After booting, do log-in. Connect the Network MediaPlayer-35 drive in kit -> Power On the Network MediaPlayer-35 drive in kit -> Check the detection with [fdisk] -> make Mount Pointer (ex. mediatest) at Folder Mount(/mnt) -> Edit [/etc/fstab] -> add the following: •...
-
Page 31: Chapter 2: Access Pc Via Network
Use as External USB HDD Chapter 2: Access PC via Network 2.1 Connect LAN Cable When connecting Computer to the Network MediaPlayer-35 drive in kit directly Connect LAN cable to LAN port between player and PC. In this case, you have to use a Cross-wired LAN cable. -
Page 32: Set Network Configurations
Freecom MediaPlayer Drive-In 2.2 Set Network Configurations After connecting the LAN cable, you have to set network configurations of Computer and Player. You need to share a folder on Windows computer and use same 'IP Address range' and same 'Subnet Mask ' between Windows computer and Player. - Page 33 3. After that, the shared folder will be displayed like in following picture. 4. Move to [Control panel > Network], and double click 'TCP/IP->LAN card' that you want to use on your computer. In order to see LAN Card name, move to [Control Panel>System>Device Manager>Network adaptors].
- Page 34 Freecom MediaPlayer Drive-In 5. Check 'Specify an IP address', and write 'IP address' & 'Subnet mask' that you want to use. For example: IP address: 192.168.1.3 Subnet mask: 255.255.255.0...
- Page 35 If you have already been 'obtained an IP address automatically' from DHCP Server or IP Router on your local area network, you don't need to enter a specific IP address. Use 'Obtain an IP address automatically' or write IP address & Subnet mask that DHCP Server or IP Router provides.
- Page 36 Freecom MediaPlayer Drive-In The MediaPlayer IP Address 2.2.2 Windows 2000 1. Select a folder which you want to share. Right-click the folder and click 'Sharing' in pop menu.
- Page 37 2. Check 'Share this folder' and write 'share name'. For example, "My Movie": "Share Name": maximum length is 12 characters. 3. Click 'Permissions' and check whether "Everyone" account is present or not. If not, add "Everyone" account. We Recommend only to use 'Read>Allow' at Permissions. Access PC via Network...
- Page 38 Freecom MediaPlayer Drive-In 4. After that, the shared folder will be displayed as following picture. 5. Move to [Settings>Control Panel>Administrative Tools>Computer management>Local Users and Groups>Users], and double click 'Guest'..6. Check 'User cannot change password' and 'Password never expires'.
- Page 39 7. Move to [Control Panel>Network and Dial-up Connections], and select Properties 'Local Area Connections' by right click of mouse. If you see two or more 'Local area connections', select one that you will use for connecting to the player. 8. Double click 'Internet Protocol (TCP/IP)' that you want to use on your computer.
- Page 40 Freecom MediaPlayer Drive-In 9. Check 'Use the following IP address', and write 'IP address' & 'Subnet mask' that you want to use. For example: If you have already been provided a dynamic IP address from DHCP Server or IP Router on your local area network, you don't need to enter a static IP address.
- Page 41 After entering the numbers, press [SETUP] again to save the configuration. If you have already been provided dynamic IP address from DHCP Server or IP Router on your local area network, you don't need to enter a static IP address. Use 'DHCP on' or write IP address & Subnet mask that DHCP Server or IP Router provids.
- Page 42 Freecom MediaPlayer Drive-In 3. After that, the shared folder will be displayed as following picture. 4. Move to [Settings>Control Panel>Administrative Tools>Computer management>Local Users and Groups>Users], and double click 'Guest'..
- Page 43 This is for Windows XP Professional. Windows XP Home users can't see this figure. Go to next number 6). If you can't find 'Administrative Tools' at Control Panel, click "Switch to classic view" in left-up corner on screen. 5. Check 'User cannot change password' and 'Password never expires'. 6.
- Page 44 Freecom MediaPlayer Drive-In If you can't find 'Administrative Tools' at Control Panel, click "Switch to classic view" in left-up corner on screen. If you see two or more 'Local area connections', select one that you will use for connecting to the player. 7.
- Page 45 8. Check 'Use the following IP address', and write 'IP address' & 'Subnet mask' that you want to use. For example: IP address: Subnet mask: If you have already been provided dynamic IP address from DHCP Server or IP Router on your local area network, you don't need to enter a static IP address.
- Page 46 Freecom MediaPlayer Drive-In 9. At above number 7 figure, click 'Advanced' Tab. Disable 'Internet Connec- tion Firewall'. If you use service pack 2, refer to the following figures. Click 'Settings' at 'Windows Firewall'...
- Page 47 Check 'Off' and click 'OK' 10. Set the network configurations of the player. You have to connect the player to a TV set for this setup. See "3.1.1 Connect Video Cable". Press [SETUP] on the remote control for moving to setup screen. Select 'DHCP off' and write IP address &...
- Page 48 Freecom MediaPlayer Drive-In • If you have already been provided dynamic IP address from DHCP Server or IP Router on your local area network, you don't need to enter a static IP address . Use 'DHCP on' or enter the IP address & Subnet mask that DHCP Server or IP Router provides.
-
Page 49: Chapter 3
Chapter 3: Use as Multimedia Player 3.1 Connect to External AV Device 3.1.1 Connect Video Cable The player supports 3 types of video output; "Composite, S-video and Compo- nent". Use the video connection that your TV supports. Normally, TV supports composite video connection;... - Page 50 Freecom MediaPlayer Drive-In 3. After you see normal screen, you have to save video configu- ration of the player. See "3.2.1 Video Setup". 3.1.2 Connect Audio Cable The player supports 3 type of audio output; "Stereo, Coaxial and Optical". Use audio connection that your TV or Audio set supports.
-
Page 51: Basic Setup
3.2 Basic Setup 3.2.1 Video Setup This chapter shows you how to setup the video output of the player. You have to setup the player's video output mode to correspond to the video input mode of your TV. When you do not see a normal screen after connecting video cable, check the following: 1. - Page 52 Freecom MediaPlayer Drive-In Setup Procedure 1. Turn on the player and press [SETUP] on Mode Selection screen. 2. Move to 'TV Out' icon and press [ENTER]. Setup box will be displayed under icon menu. 3. Move to Video Output Mode that you want and press [ENTER]. 4.Press [SETUP] again to save the configurations.
- Page 53 Setup Procedure 1. Turn on the player and press [SETUP] in Mode Selection screen. 2. Move to 'Audio' icon and press [ENTER]. Setup box will be displayed under icon menu. 3. Move to Audio Output Mode that you want and press [ENTER]. 4.
- Page 54 Freecom MediaPlayer Drive-In DHCP On Setup Procedure 1. Turn on the player and press [SETUP] in Mode Selection screen. 2. Move to 'Network' icon and press [ENTER]. Setup box will be displayed under icon menu. 3. Move to DHCP On and press [ENTER]. 4.
- Page 55 DHCP Off Setup Procedure 1. Turn on the playerand and press [SETUP] in Mode Selection screen. 2. Move to 'Network' icon and press [ENTER]. Setup box will be displayed under icon menu. 3. Move to DHCP Off and press [ENTER]. 4.
- Page 56 Freecom MediaPlayer Drive-In 5. Move to 'Subnet' and press [ENTER]. Subnet mask Input box will be displayed. Enter Subnet mask using arrow and number buttons of remote control. After this, press [ENTER] again. 6. Press [SETUP] again tor save configurations. Check 'The specific IP address you wrote' When you use 'DHCP off', you can see the IP address in MENU screen after selecting 'PC-Network] icon in Mode Selection screen.
- Page 57 Use as Multimedia Player 3.2.4 Screen Setup This chapter shows you how to set the TV Type. You can select 4:3 Letter Box, 4:3 Pan Scan, and 16:9. Setup Procedure 1. Turn on the player and press [SETUP] in Mode Selection Screen. 2.
- Page 58 Freecom MediaPlayer Drive-In 3.2.5 Preview Setup You can enable or disable preview the photo file as a thumbnail image before playing. Setup Procedure 1. Turn on the player and press [SETUP] in Mode Selection screen. 2. Move to 'LED' icon and press [ENTER]. Setup box will be displayed under icon menu.
- Page 59 Use as Multimedia Player 3.2.6 LED Setup You can turn on or off the backlight LED of the arrow buttons on the front side of the player. For instance, should the LED disturb you at night, you can turn off the LED. Setup Procedure 1.
- Page 60 Freecom MediaPlayer Drive-In 3.3 Basic Screen Menu 3.3.1 Mode Selection, Media Type Selection After turning on the player, you will see the Mode Selection screen. In this screen, you can select Built-in HDD or Networking Computers. Just press [ENTER] after moving to the desired icon with the arrow buttons. If there is no HDD or networking PC, these icons are not acti- vated.
- Page 61 Use Networking Computer 1. [Mode Selection] Move to 'PC-Network' icon and press [ENTER] for playing files from computer(s) within your network. 2. [Media Type Selection] Select a media type which you want to play and press [ENTER]. • Video: Select for playing Video files •...
- Page 62 Freecom MediaPlayer Drive-In 3.3.2 File Selection After selecting a Media type, 'File Selection' screen will be displayed. Move to the file that you want to play and press [ENTER] or [PLAY/PAUSE]. • [ENTER] button: Play one file that you select. After finishing playback, return to 'file selection screen'.
-
Page 63: Play Video Files
3.4 Play Video Files You can play video files like AVI, MPG, MPEG, DAT, M2V, and VOB. Select 'Movie' icon in Media Type Selection screen. Video file list will be displayed. Move to a file and press [ENTER] or [PLAY/PAUSE] button. Select 'Movie' icon in Media Type Selection screen. - Page 64 Freecom MediaPlayer Drive-In 4, 5, 6 Number Button Scr. SIZE TIME SEARCH CANCEL Brt. CONT FILE INFO arrow button arrow button VOLUME + arrow button VOLUME - arrow button MUTE ENTER PLAY / PAUSE PLAY / PAUSE PREV NEXT Subtitle It is possible to set the subtitle sync.
- Page 65 Screen Reset Number button MENU Menu Icon Popup Use as Multimedia Player If a frame of a video file is broken, green color will be shown on the overall screen. Press number [0 "Zero"] for screen reset. Popup menu will be appear including 'File Info, Time Search, Subtitle, Scr.Size' functions.
- Page 66 Freecom MediaPlayer Drive-In 3.5 Play DVD Files The DVD manager function supports playing ripped DVD Files in same way as an original DVD. Make a separate folder for each ripped DVD, then save all ripped files into the folder. After connecting TV, select VIDEO_TS.IFO file in the folder.
- Page 67 Function and Button Descriptions Remote Control Function AUDIO Select Audio Type SUBTITLE Select Subtitle Type Scr. SIZE Screen Size MENU Go to Menu SLOW Playback Slow REPEAT Chapter, Title Repeat A-B REPEAT A-B repeat TITLE Go to Title Menu ANGLE Angle FILE INFO Show File Infor-...
-
Page 68: Play Music Files
Freecom MediaPlayer Drive-In 3.6 Play Music Files You can play music files like MP3, OGG, WAV, WMA. Select Music icon in Media Type Selection screen. The Music file list will be displayed. Just move to a file and press [ENTER] or [PLAY/PAUSE] button. Select Music icon in Media Type Selection screen. - Page 69 PREV Playback Previous File NEXT Playback Next File Go to 10 Sec. in Forward Go to 10 Sec. in Backward ENTER Playback a File PLAY / PAUSE Playback Next All Files PLAY / PAUSE Pause VOLUME + Volume Up VOLUME - Volume Down MUTE Sound Off...
- Page 70 Freecom MediaPlayer Drive-In How to Play MP3 without TV set. MP3 Quick Play Make a 'music' folder (in a small letter not a capital letter) at root directory of built-in HDD and save MP3 files at the folder. If the HDD is divided into two or more partitions, make a 'music' folder at first partition.
-
Page 71: Play Photo Files
3.7 Play Photo Files You can play photo files like JPG(JPEG). Select the Photo icon in Media Type Selection screen. Photo file list will be displayed. Just move to a file and press [ENTER] or [PLAY/PAUSE] button. Select the Photo icon in Media Type Selection screen. Move to a file and press [ENTER] or [PLAY/PAUSE] button. -
Page 72: Photo Slide Show
Freecom MediaPlayer Drive-In PLAY / PAUSE PLAY / PAUSE ANGLE ENTER Brt. CONT Photo Slide Show If you play all files with 'PLAYALL' icon or [PLAY/PAUSE], photo slide show will be started. Music Slide Show Make a 'music' folder (in a small letter not a capital letter at root directory) of built-in HDD and save MP3 files in this folder. -
Page 73: Make A Play-List
3.8 Make a Play-List Your can create a playlist of all media files like video, music, and photo. It is not possible to play every registered file independently. Use 'Random, PLAY all' icon or [PLAY/PAUSE] button. Also, the regis- tered play-list will be deleted after rebooting. 1. - Page 74 Freecom MediaPlayer Drive-In 3. Play-List screen appears. You can see just added files. Play as follows: • Random icon: play random. • Allplay icon: play in order of selected file. • Play/Pause button: play in order of selected file. • In order to move up to Menu Icon Tray, press [ ] button.
-
Page 75: Remote Control
3.9 Remote Control This chapter shows the basic use of the remote control. For more details, '3.3 Basic Screen Menu', '3.4 Play Video Files', '3.5 Play DVD Files', '3.6 Play Music Files', '3.7 Play Photo Files', '3.8 Make a Play-List'. ENTER: Play a File : Arrow Key . - Page 76 Freecom MediaPlayer Drive-In 3.10 Others 3.10.1 Music Slide Show Make a 'music' folder (in a small letter not a capital letter) in the root directory of built-in HDD and save MP3 files in this folder. If the HDD is divided into two or more partitions, make a 'music' folder at first partition.
-
Page 77: Technical Specifications
Technical Specifications Product Name Power Weight Dimension Available OS USB Interface Network Interface HDD Type HDD File System TV Type Supported Format Video Output Audio Output Operating Temperature Technical Specifications Freecom Network MediaPlayer-35 Drive-In kit 5V 1.5A /12V 1.5A 450g (without HDD) 57 x 150 x 185 mm Windows 98/SE/ME/2000/XP, Mac OS X 10.1 or higher,... -
Page 78: Warranty
WARRANTY (valid in Europe/Turkey only): We thank you for purchasing this Freecom product and hope you will enjoy using it. In order to avoid unnecessary inconvenience on your part, we suggest reading the quick install guide, instruction manual and any additional electronic and or printed manuals. When problems occur we have a database with Frequently Asked Questions (FAQ) on our Freecom website (www.freecom.com), please check this site before you contact the helpdesk.
Need help?
Do you have a question about the MediaPlayer Drive-In Kit and is the answer not in the manual?
Questions and answers