Advertisement
Table of Contents
- 1 Table of Contents
- 2 Operation
- 3 Maintenance
- 4 Exploded Parts Diagram
- 5 Replacement Parts
- 6 Wiring Diagram
- 7 Switch Replacements
- 8 On/Off & 3-Position Heater Switches
- 9 Flicker Motor/ Flicker Rod Replacement
- 10 Heater Assembly Replacement
- 11 Remote Control Receiver Replacement
- 12 Troubleshooting Guide
- Download this manual
See also:
Owner's Manual
IMPORTANT SAFETY INFORMATION: Always read this manual first before attempting to service this
fireplace. For your safety, always comply with all warnings and safety instructions contained in this
manual to prevent personal injury or property damage.
Dimplex North America Limited
1367 Industrial Road Cambridge ON Canada N1R 7G8
1-888-346-7539 www.dimplex.com
In keeping with our policy of continuous product development, we reserve the right to make changes without notice.
© 2011 Dimplex North America Limited
Service Manual
Model Number:
BF362SD
BF392SD
UL Part Number
6901550159
7400150000R02
Advertisement
Table of Contents

Related Manuals for Dimplex BF362SD


Summary of Contents for Dimplex BF362SD
- Page 1 Dimplex North America Limited 1367 Industrial Road Cambridge ON Canada N1R 7G8 1-888-346-7539 www.dimplex.com In keeping with our policy of continuous product development, we reserve the right to make changes without notice. © 2011 Dimplex North America Limited 7400150000R02...
-
Page 2: Table Of Contents
NOTE: Procedures and techniques that are considered important enough to emphasize. CAUTION: Procedures and techniques which, if not carefully followed, will result in damage to the equipment. WARNINg: Procedures and techniques which, if not carefully followed, will expose the user to the risk of fire, serious injury, or death. www.dimplex.com... -
Page 3: Operation
NOTE: If operating the unit with a remote control, the remote may require re-initializing after turning the power off. CAUTION: If you need to continuously reset the heater, Figure 2 disconnect power and call Dimplex customer service at 1-888-DIMPLEX (1-888-346-7539). Button Remote Control Off Button... -
Page 4: Maintenance
Secured with a rubber gasket - pull and twist the gas- Back Ledge ket away from the motor simultaneously until it comes Rear Tab off the motor shaft. CAUTION: Ensure that the flicker rod does not get bent during removal and re-connecting, ensure the rod is Front Edge www.dimplex.com... -
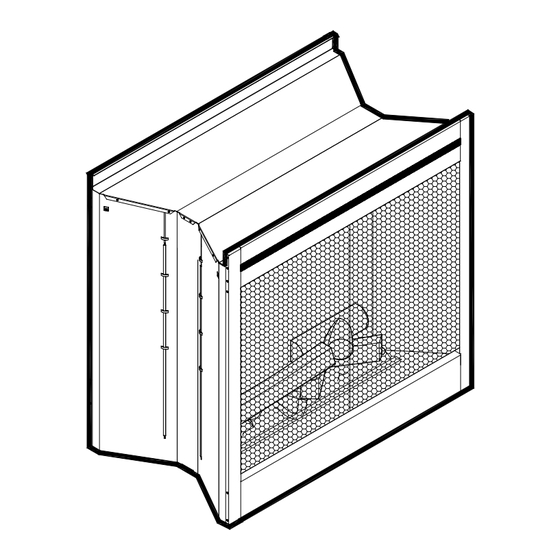
Page 5: Exploded Parts Diagram
ExPLODED PARTS DIAgRAM REPLACEMENT PARTS LOGSET ..... . . 0438550300RP REMOTE CONTROL RECEIVER MOD 0-A ..... 3000200700RP FLICKER MOTOR . -
Page 6: Wiring Diagram
Black Black White Bulb Motor Flicker 2 Heater 1 Blower 1 Motor Blower 2 White Bulb Thermal Cut Off Jumper 2 Black Black Flicker 2 Black White Black Bulb Flicker 1 Connector Bulb Connector White Black Motor Flicker 1 www.dimplex.com... - Page 7 Wiring Diagram - Pre 2004 Ground Black Neutral Green PC Board Connector White Orange Connector White Yellow White Green Black R3R2 L2L2 R1 N Connector Blue Power Switch Connector White Black Black White Black Black Black Black White On/Off Momentary Switch Motor Blower 1 Bulb Motor Flicker 2...
-
Page 8: Switch Replacements
WARNINg: If the fireplace was operating prior to servic- the connections or the wires can be cut and stripped by: ing allow at least 10 minutes for light bulbs and heating www.dimplex.com... -
Page 9: Heater Assembly Replacement
tween the end of the connector and the heater to release Figure 5 the wires. Remove the two mounting screws and pull forwards to release the heater assembly from the top cover. Remove the heater assembly mounting screws and remove the heater assembly. Properly orient the replacement heater assembly and connect all of the wiring connections in their original locations. - Page 10 8” inches in and Low Heat, Stage 3 – Lights and High Heat. length from the new receiver. vi) Using wire cutters, cut one of the small gauge wires off the old receiver approximately 1” inch from the base, www.dimplex.com...
- Page 11 Figure 7 Remote Control Receiver 3000200800 Line In From Blower and Heater From Lights From Flicker Motor 120vAC RL1 From Blower From Heater From Lights & Flicker motor Remote Control Receiver 3000430800RP Line In From Blower and Heater Switch From Lights From Flicker Motor From Lights From Blower...
-
Page 12: Troubleshooting Guide
Replace light harness Log set dim, not glowing Burnt out light bulbs Replace light bulbs Flame Shudder Defective flicker motor Replace flicker motor Light leaking around the log set Log set not positioned properly Check log set for proper fit www.dimplex.com... - Page 13 PROBLEM CAUSE SOLUTION Heater Heater is not turning off Improper operation Refer to Operation Section Defective 3-Position Heater Switch Replace 3-Position Heater Switch Defective Remote Control Receiver Replace Remote Control Receiver. Initialize to Re- mote Control. Heater is not turning on Improper operation Refer to Operation Section Loose wiring...
Need help?
Do you have a question about the BF362SD and is the answer not in the manual?
Questions and answers