
Related Manuals for Teac Esoteric DV-50


Summary of Contents for Teac Esoteric DV-50
- Page 1 D00742000A DVD/DVD-A/SACD/CD PLAYER OWNER’S MANUAL ....MANUEL DU PROPRIÉTAIRE . . .
-
Page 2: Important Safety Instructions
< Do not install this apparatus in a confined space such as a Changes or modifications to this equipments not expressly book case or similar unit. approved by TEAC CORPORATION for compliance will void the user's warranty. < The apparatus draws nominal non-operating power from the... - Page 3 For CANADA This product has been designed and manufactured according to FDA regulations “title 21, CFR, chapter 1, subchapter J, based on the Radiation Control for Health and Safety Act of 1968“, and is AC POWER CORD CONNECTION classified as class 1 laser product. There is not hazardous CAUTION: invisible laser radiation during operation because invisible laser radiation emitted inside of this product is completely confined in...
-
Page 4: Table Of Contents
Contents Thank you for choosing TEAC. Read this manual carefully to get Component Video ........41 the best performance from this unit. -
Page 5: Before Use
Before Use What's in the box DO NOT MOVE THE UNIT DURING PLAYBACK During playback, the disc rotates at high speed. Do NOT lift or Please confirm that the following accessories are in the box move the unit during playback. Doing so may damage the disc when you open it. -
Page 6: Discs
Discs Type of Discs That Can be Played on This About DVD-RW < DVD-RW discs that were recorded with copy-once only System permission cannot be played. The message, "COPY PROTECT This player can playback discs bearing any of the following logos: PROGRAM, UNPLAYABLE"... - Page 7 CD standard may not play back correctly in this player. If you use such discs in this unit, TEAC Corporation and its subsidiaries cannot be responsible for any consequences or guarantee the quality of reproduction. If you experience problems with such non-standard discs, you should contact the producers of the disc.
-
Page 8: Connection To An Amplifier
Connection to an amplifier Decoder DIGITAL IN Digital recording equipment such as CD recorder, MD deck, etc. DIGITAL IN XLR (balanced) pin numbers CENTER SURROUND FRONT LINE IN WOOFER LINE IN LINE IN 5.1CH AUDIO IN Amplifier Surround Amplifier TV (Monitor) - Page 9 CAUTION: < Switch off the power to all equipment before making connections. < Read the instructions of each component you intend to use with this unit. < Be sure to insert each plug securely. To prevent hum and noise, avoid bundling the signal interconnection cables together with the AC power cord or speaker cables.
-
Page 10: Connection To A Tv
Connection to a TV Connect one of these cables Supplied Power cord D1/D2 S-VIDEO VIDEO D-VIDEO IN Wall socket COMPONENT VIDEO IN TV (Monitor) - Page 11 Connect the unit using one of the following terminations to Changing the Color System (NTSC/PAL) your TV or monitor. The connections are listed in order of The default color setting of this player is AUTO, and unless quality of picture from the best possible first. Additional you experience picture distortion with some discs, you can information on each connection type is provided below: leave the setting as it is.
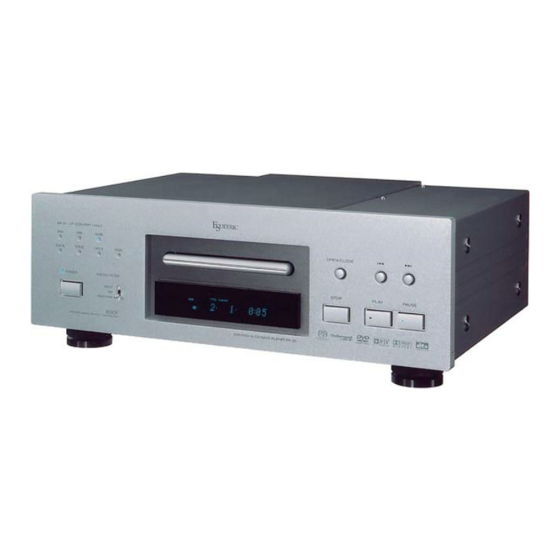
- Page 12 Front Panel Front Panel Display Remote Control Unit...
-
Page 13: Names Of Each Control
Names of Each Control Front Panel Illuminates during playback of a DVD MENU disc recorded in DOLBY DIGITAL Displays a DVD disc menu. POWER switch format. When power is ON, the indicator lights. Illuminates when CONDITION DIRECTION (UP/DOWN/LEFT/RIGHT), < When moving the player, remove any MEMORY function is active. -
Page 14: Remote Control Unit
Remote Control Unit How to insert the batteries Notes on use < Point the remote control unit at the player’s remote sensor and Remove the cover of the remote control unit with a use it within seven meters’ distance of the player. There screwdriver. -
Page 15: Getting Started (Setup Navigator) 1
Getting Started (Setup Navigator) 1 Select a language for OSD (On Screen Display) by pressing the UP/DOWN buttons, and press the ENTER button. DIRECTION ENTER SETUP Audio1 A2 Video1 V2 Language General Setup Navigator English français Language Deutsch OSD Language Italiano The Setup Navigator will help you to make the basic settings. - Page 16 Getting Started (Setup Navigator) 2 If you select "5.1 Channel" in step , confirm which speakers Confirm whether your amplifier is compatible with 96kHz are connected to your amplifier. audio. Audio1 A2 Video1 V2 Language General Audio1 A2 Video1 V2 Language General Setup Navigator Setup Navigator...
-
Page 17: Playback 1
DVD VCD CD SACD MP3 Playback 1 Press the PLAY button (y) to start playback. < In this manual, the term "DVD" means DVD-Video, DVD-Audio DVD: and DVD-R/RW. If a function is specific to a particular kind of If a title menu appears on the screen, select an item by DVD disc, it is specified. - Page 18 DVD VCD CD SACD MP3 Playback 2 DVD-RW: Select "Original" or "Play List" by pressing the DIRECTION buttons, select an item by pressing the DIRECTION buttons, and press the ENTER button. Original: Titles recorded automatically during recording. Play List: Titles edited after recording. (Not all DVD-RW discs contain a Play List.) To suspend playback temporarily (pause mode)
-
Page 19: Select An Audio Language
Select a Subtitle Language Screen Saver When you leave the unit in pause or stop mode for 5 minutes, (or no button is pressed during playback of CD and MP3), the screen saver image appears on the screen. Press any button to stop the screen saver. Screen Saver function can be set off. -
Page 20: Playback From A Specific Part
DVD VCD CD SACD MP3 Playback from a specific part Direct Playback Search for a part of a chapter/track If the numeric buttons are pressed in the stop mode of DVD, During playback, press the SCAN button (mor,) of the playback will start from the selected title (or group). -
Page 21: Title Search
DVD VCD CD SACD MP3 Title Search You can directly access any point on a disc using one of the Enter the number of title, chapter, group or track by pressing search modes. Playback jumps to the point specified. the numeric buttons. Select a search mode by pressing the SEARCH MODE button. -
Page 22: Time Search And Frame Search
DVD VCD Time Search and Frame search < This function is not available for DVD-Audio, CD, SACD and Press the ENTER button or the PLAY button. MP3. DVD-Video During playback of DVD-Video, press the SEARCH MODE button twice. Playback starts from the selected part. When the frame search option is on, playback pauses at the selected frame. -
Page 23: Change The Angle
DVD VCD Change the Angle Single Stepping Playback When a scene recorded with multiple angles is played, the To play a disc frame by frame, press the STEP/SLOW button angle icon appears on the screen. Each time you press the during playback (or in the pause mode). -
Page 24: Slow-Motion Playback
DVD VCD DVD VCD CD MP3 Slow-Motion Playback Shuffle Playback To play a disc in slow-motion, press and hold the STEP/SLOW Tracks of a disc can be played randomly. button during playback (or in the pause mode). When the Slow-Motion function is activated and "1/16" appears on the screen, release the button. -
Page 25: Repeat Playback
DVD VCD CD SACD MP3 DVD VCD CD Repeat Playback A-B Repeat Each time the REPEAT button is pressed during playback, the Repeat Playback of a Designated Section mode is changed as follows : Start playback and designate the point at which the A-B DVD-Video repeat should start (point A) by pressing the A-B button. -
Page 26: Programmed Playback
DVD VCD CD Programmed Playback Press the numeric button to select a title/chapter/track. 1, 2, 3... PROGRAM Program Chapter Program Title Current : Title 1 Chapter ENTER Title 1 (Chapter 1~35) DIRECTION ..Program Memory Move Play Exit ENTER PROGRAM Up to 24 chapters or tracks can be programmed in the desired order. - Page 27 Programming the current chapter or track CLEAR 1, 2, 3... PROGRAM PROGRAM ENTER DIRECTION ENTER Checking the programmed content During playback, press and hold the PROGRAM button for Press the PROGRAM button to display the program list. about a second. The chapter number and program number will be displayed on the screen for 2 seconds.
-
Page 28: Programmed Playback Of Mp3
Programmed Playback of MP3 How to Program Using the MP3 Navigator 1, 2, 3... It is also possible to program tracks using the MP3 navigator. PROGRAM ENTER PROGRAM MENU ENTER DIRECTION Press the PROGRAM button in the stop or play mode. MP3 Program 1. -
Page 29: Last Memory
DVD VCD Last Memory Memorizing disc settings (Condition Memory) You can bookmark a place to resume playback later. Using the Condition Memory function, settings for a disc can be memorized. Once memorized, your settings will be recalled < Up to 5 latest discs can be memorized. automatically whenever you load the disc. -
Page 30: Display (During Playback)
DVD VCD CD SACD MP3 Display (during playback) DVD-Audio elapsed time of the current track current group number and track number Play 0.03 Track -6.27 / 6.30 remaining time of the current track total playback time of the current track Each time the DISPLAY button is pressed during playback, following information will appear on the screen. - Page 31 CD/SACD elapsed time of total number of tracks in the folder current track number the current track elapsed time of the current track track number Play 0.15 Track -4.26 / 4.41 5/52 0.53 Play Track TRACK005 remaining time of the current track total playback time of the current track track name...
-
Page 32: Display (In The Stop Mode)
DVD VCD CD SACD MP3 Display (in the stop mode) CD/Video CD total playback time of the disc Information : Compact Disc Total Time 63.25 Track Time Track Time 4.35 3.59 3.25 3.30 3.59 3.39 3.30 4.50 5.35 3.15 Exit DISPLAY When the DISPLAY button is pressed in the stop mode, following track number... -
Page 33: Digital Filter
DVD VCD CD MP3 Digital Filter UP CONVERT indicator This switch changes the digital filter for the 2 channel high quality analog audio output terminal. RDOT: This is a digital filter using Fluency theory. The RDOT filter has a slow roll-off and natural extended audio characteristics and provides frequency multiplication. -
Page 34: Settings
Settings Select an item you want to change using the DIRECTION buttons. DIRECTION ENTER SETUP This chapter describes how to use the Setup menu. Using the Setup menu, you can adjust the picture size, set a language for If you want to select another tab, move the cursor to the the OSD (on screen displays), limit playback by children, et current tab by pressing the UP button, and press the RIGHT or cetera. -
Page 35: How To Initialize The Settings
Settings (Audio) How to initialize the settings Audio DRC (Dynamic Range Controlling) Audio1 A2 Video1 V2 Language General Audio DRC Dolby Digital Out DTS Out DTS PCM Down Sample On Linear PCM Out MPEG Out MPEG PCM Digital Out SACD Playback 2ch Area Move Exit... -
Page 36: Dts Out
Settings (Audio) DTS Out MPEG Out Audio1 A2 Video1 V2 Language General Audio1 A2 Video1 V2 Language General Audio DRC Audio DRC Dolby Digital Out Dolby Digital Dolby Digital Out Dolby Digital DTS Out DTS Out DTS PCM DTS PCM Down Sample On Linear PCM Out Linear PCM Out... -
Page 37: Sacd Playback
Audio Out SACD Playback EXPERT Audio1 A2 Video1 V2 Language General Audio2 Video1 V2 Language General Audio DRC Virtual Surround Dolby Digital Out Dolby Digital Audio Out 2 Channel DTS Out DTS PCM Speaker Setting 5.1 Channel Down Sample On Linear PCM Out Gain Setting MPEG Out... -
Page 38: Speaker Setting
Settings (Audio) Speaker Setting Press the RIGHT button to select "Distance". This setting is necessary only when your amplifier is connected via the 5.1CH AUDIO OUT jack. This setting does not affect digital audio output. Select "Start" and press the ENTER button. Audio2 Video1 V2 Language General Virtual Surround... -
Page 39: Gain Setting (Test Tone)
Gain Setting (Test Tone) Move the cursor to "Test Tone" by pressing the UP button. EXPERT If a surround amplifier is connected via the 5.1CH AUDIO OUT Audio2 Video1 V2 Language General terminals, this function is useful to adjust the relative volume Test Tone between speakers. -
Page 40: Cd Digital Direct
Settings (Audio) Settings (Video) TV Screen CD Digital Direct EXPERT Audio2 Video1 V2 Language General Audio1 A2 Video1 V2 Language General Virtual Surround TV Screen 4:3 (Letter box) Audio Out 2 Channel Component Video 4:3 (Pan&Scan) Speaker Setting Video Out 16:9 (Wide) Gain Setting S-Video Out... -
Page 41: Component Video
Component Video Video Out (European model only) This setting is necessary only when your TV or monitor is This setting is necessary only when your TV or monitor is connected via the COMPONENT VIDEO OUT terminals. connected via the AV CONNECTOR 1(RGB). Select the proper signal to be output from the AV CONNECTOR 1(RGB). -
Page 42: Frame Search
Settings (Video) Settings (Video Adjust) Video Adjust Frame Search EXPERT You can select one of the preset settings optimized for display Audio1 A2 Video1 V2 Language General device (TV, plasma display, professional monitor). You can also TV Screen 16:9 (Wide) set up your own setting and save it in the player's memory. - Page 43 Creating your own setting If you want to save your setting in Memory 1, 2 or 3: Select "Start" by pressing the DIRECTION buttons, and press 1. When all the video adjustment has been finished in step the ENTER button. select "Memory"...
-
Page 44: Still Picture
Settings (Video) Settings (Language) OSD Language Still Picture EXPERT The player uses one of two processes when displaying a still You can select the language for OSD (On Screen Display). This setting allows you to select a preferred language for the Setup frame from a DVD disc. -
Page 45: Subtitle Language
Subtitle Language DVD Language EXPERT You can select a preferred subtitle language. Audio1 A2 Video1 V2 Language General Audio1 A2 Video1 V2 Language General OSD Language English OSD Language w/Subtitle Language Audio Language English Audio Language English Subtitle Language French Subtitle Language French Auto Language... -
Page 46: Subtitle Display
Settings (Language/General) Some DVD-Audio discs have an extra bonus group that Subtitle Display EXPERT requires a 4-digit key number to access. When you try to play the bonus group, the key number input screen will Audio1 A2 Video1 V2 Language General automatically appear. -
Page 47: Parental Lock 1
Parental Lock 1 Playing some DVD discs can be limited depending on the age of How to change the Parental Lock Level the users. The default setting is "Off". Some DVD discs also support the Country Code feature. The player does not play certain scenes on these discs, depending on the country code you set. - Page 48 Parental Lock 2 How to change the country code Country Input Code Country Code The default country code is "US". ARGENTINA 0118 AUSTRALIA 0121 Select "Country Code" and press the ENTER button. AUSTRIA 0120 BELGIUM 0205 Audio1 A2 Video1 V2 Language General Setup Menu Mode Expert...
-
Page 49: Shortcuts To The Setup Menu Items (Function Memory)
Shortcuts to the Setup Menu items (Function Memory) You can create up to 5 shortcuts to the Setup menu items that you How to use the shortcut often access. Rather than navigate through the whole Setup < If you were in the Setup menu, press the SETUP button to exit. menu each time you want to alter a setting, you can access the setting straight from the Function Memory list. -
Page 50: Troubleshooting
Place the unit on a stable place to avoid vibration and shock. problem yourself before you call your dealer or a TEAC service e If the disc is dirty, clean the surface of the disc. -
Page 51: Maintenance
The aspect ratio of the screen cannot be changed. Beware of condensation e The aspect ratio might be fixed by the disc. When the unit (or a disc) is moved from a cold to a warm place, or e Depending on the TV, you may not be able to change the used after a sudden temperature change, there is a danger of aspect ratio. -
Page 52: Glossary
Glossary Aspect ratio The width of a TV screen relative to its height. Conventional Digital audio compression technology that the Digital Theater TVs are 4:3 (in other words, the screen is almost Systems, Inc. developed. This technology conforms to 5.1- square);widescreen models are 16:9 (the screen is almost channel surround. - Page 53 MPEG VIDEO Regions The video format used for Video CDs and DVDs. Video CD uses These associate discs and players with particular areas of the the older MPEG-1 standard, while DVD uses the newer and world. This unit will only play discs that have compatible much better quality MPEG-2 standard.
-
Page 54: Specifications
Specifications General Audio output (Analog Audio) System ....DVD-Video, DVD-Audio, DVD-R/RW, 2CH AUDIO OUT ..RCA jack x2, 2.2 Vrms (1 kHz, 0 dB) Video-CD, SACD, CD and MP3 files 5.1CH AUDIO OUT. -
Page 55: Language Code List
Language Code List Language Code Language Code Language Code Japanese (ja) 1001 Guarani (gn) 0714 Pashto, Pushto (ps) 1619 English (en) 0514 Gujarati (gu) 0721 Quechua (qu) 1721 French (fr) 0618 Hausa (ha) 0801 Rhaeto-Romance (rm) 1813 German (de) 0405 Hindi (hi) 0809 Kirundi (rn) - Page 56 7733 Telegraph Road, Montebello, California 90640 Phone: (323) 726-0303 TEAC CANADA LTD. 5939 Wallace Street, Mississauga, Ontario L4Z 1Z8, Canada Phone: (905) 890-8008 TEAC MEXICO, S.A. De C.V Campesions 184, Col.Granjas Esmeralda, 09810, Mexico Phone: (525) 581-5500 TEAC UK LIMITED 5 Marlin House, Croxley Business Park, Watford, Hertfordshire, WD18 8TE, U.K.
Need help?
Do you have a question about the Esoteric DV-50 and is the answer not in the manual?
Questions and answers
When I insert a CD, there’s a série of 00..0 lighting up
The series of 00..0 lights indicates the C1 error values of the CD when it is inserted into the Teac DV-50. This is displayed as [ER− C1 ****].
This answer is automatically generated