Fostex PD-6 Operation Manual
Fostex dvd location recorder operation manual model no. pd-6
Hide thumbs
Also See for PD-6:
- Service manual (84 pages) ,
- Owner's manual (24 pages) ,
- Supplemental operation manual (8 pages)
Table of Contents
Advertisement
Quick Links
Download this manual
See also:
Owner's Manual
DVD LOCATION RECORDER
Operation Manual
Operation Manual
Operation Manual
Operation Manual
Operation Manual
Model
<DANGER>
VISIBLE OR INVISIBLE LASER RADIATION WHEN OPEN.
AVOID DIRECT EXPOSURE TO BEAM.
<CAUTION>
• Use of controls or adjustments or performance of
procedures other than those specified herein may
result in hazardous radiation exposure.
• The use of optical instruments with this product will
increase eye hazard.
PD-6
8288 498 000
Advertisement
Table of Contents

Related Manuals for Fostex PD-6


Summary of Contents for Fostex PD-6
- Page 1 AVOID DIRECT EXPOSURE TO BEAM. <CAUTION> • Use of controls or adjustments or performance of • The use of optical instruments with this product will PD-6 Model procedures other than those specified herein may result in hazardous radiation exposure. increase eye hazard.
- Page 3 *as of March 2003. <Important notice> Fostex does not guarantee the operation of the PD-6 when using a disk which is not recommended by Fostex. Before starting recording, be sure to format the disk in either of the following ways.a...
-
Page 5: Safety Instructions
CAUTION RISK OF ELECTRIC SHOCK DO NOT OPEN CAUTION: TO REDUCE THE RISK OF ELECTRIC SHOCK, DO NOT REMOVE COVER (OR BACK). NO USER - SERVICEABLE PARTS INSIDE. REFER SERVICING TO QUALIFIED SERVICE PERSONNEL. "WARNING" "TO REDUCE THE RISK OF FIRE OR ELECTRIC SHOCK, DO NOT EXPOSE THIS APPLIANCE TO RAIN OR MOISTURE."... -
Page 6: Table Of Contents
Chapter 1: Introduction ...13 Introduction ...14 Main features / functions ...14 What is in the box ...16 PD-6 options and related Fostex products ...16 Chapter 2: Before using the PD-6 ...17 About power supply ...18 About battery ...18 Charging the battery ...18 Installing the battery ...18... - Page 7 Selecting the sampling frequency ...69 Selecting the system master clock ...69 Recording time code ...70 Selecting the TC frame rate ...70 Selecting the TC generate mode ...71 Setting the time code output ...71 Jam function ...72 PD-6 DVD Location Recorder...
- Page 8 PD-6 DVD Location Recorder Creating cue points ...73 Creating a cue point automatically at the recording start point ...73 Creating a cue point on-the-fly ...73 Viewing the cue point list ...74 Editing a cue point ...74 Creating a new cue point using the cue list screen ...75 Playback ...76...
- Page 9 Remaking an ALE file ...132 Deleting an ALE file ...133 Chapter 10: Exporting files using IEEE1394 ...135 Connection between the PD-6 and a PC ...137 How to disconnect the PD-6 ...137 Example of copying data to an external hard disk ...138 Example of exporting data to a computer application ...138...
-
Page 10: Precautions
Strong physical shocks can cause damage. Handle the unit with care. Avoid damaging the power cord Make certain that the PD-6’s power cord is not located in a position where it is likely to be walked on or pinched by other equipment placed near the cord. -
Page 11: About This Manual
PD-6 DVD Location Recorder About this manual This manual is intended to be used as a guide for using the Fostex PD-6 DVD location recorder. It is divided into Chapters. Each Chapter covers instructions for a specific subject or feature of the PD-6 which you should know for using the unit, as well as safety instructions, precautions, etc. - Page 12 Chapter 8: Utility mode This chapter describes the Utility mode, in which you can make settings related with DVD-RAM disks to be used with the PD-6, as well as format a disk. The following menus are available in the Utility mode.
-
Page 13: Chapter 10: Exporting Files Using Ieee
AVID system, as well as how to edit an ALE file information. Chapter 10: Exporting files using IEEE1394 This chapter describes how to transfer audio files between the PD-6 and a personal computer using IEEE1394. - Page 14 PD-6 DVD Location Recorder...
-
Page 15: Chapter 1: Introduction
PD-6 DVD Location Recorder (Chapter 1: Introduction) Chapter 1: Introduction This chapter describes the introduction and main features/functions of the PD-6. -
Page 16: Introduction
PD-6 DVD Location Recorder (Chapter 1: Introduction) Introduction The model PD-6 is a portable 6-track DVD location recorder using an 8- centimeter DVD-RAM disk as a recording medium. To get the best performance in the circumstance of location recording, the... - Page 17 • A USB port is provided for connecting directly to a USB keyboard. You can make setting and editing from a keyboard instead of the PD-6 panel keys. (Note that you cannot make all setting and editing from a keyboard.) •...
-
Page 18: What Is In The Box
Operation manual (this manual) <Note> No internal battery nor AC adaptor is supplied with the PD-6. Use an NP-1 type or equivalent for the internal battery. Use the Fostex optional AD-15C for the AC adaptor. PD-6 options and related Fostex products The following PD-6 options and related products are available. -
Page 19: Chapter 2: Before Using The Pd-6
About power supply voltage ...21 About Realtime Clock ...22 About DVD-RAM disk ...22 Inserting/removing a disk ...23 Initial format of a disk ...24 About recording modes ...26 PD-6 DVD Location Recorder (Chapter 2: Before using the PD-6) <Table of contents>... -
Page 20: About Power Supply
PD-6 DVD Location Recorder (Chapter 2: Before using the PD-6) The PD-6 is powered either by a battery which allows the unit to be used outside, or by the AC adaptor (Fostex Model AD-15C, optional). <Note> Make sure that the PD-6 power switch is set to “OFF” when changing a battery or when disconnect the AC adaptor from the unit. -
Page 21: Removing The Battery
Do not leave the removed battery within children’s reach. • Saving the battery power The PD-6 offers the following measures for saving the battery power to extend the battery life. • Pressing the [STOP] key stops the disk rotation to save the power consumption. -
Page 22: About Ac Adaptor
While the [POWER] switch of the PD-6 is set to “OFF”, insert the XLR-4-32 type connector of the AD-15C to the [DC IN] connector on the right side panel of the PD-6 until it is locked. Then connect the AC plug to the AC main outlet. -
Page 23: Turning On The Power
The output voltage of the power supply for the PD-6 must be within the range between DC 12 to 18 volts. Never use the PD-6 at more than 18 volts or less than 12 volts. You can check the internal battery voltage on the display (indicated by the arrow in the screen example below). -
Page 24: About Realtime Clock
The realtime clock is adjusted according to the local time when shipped, therefore, set the time to your local time before using the PD-6 (see “Chapter 7: Setup mode” on page 90 for details about realtime clock setting). -
Page 25: Inserting / Removing A Disk
PD-6 DVD Location Recorder (Chapter 2: Before using the PD-6) Inserting / removing a disk You can insert or remove a disk regardless of whether the power is on or off, however, the procedure below is assumed that the power is on. -
Page 26: Initial Format Of A Disk
Initial format of a disk The operation procedure below is assumed that an unused DVD-RAM disk is set to the PD-6. If you have a disk formatted with FAT32, etc., you can format it with the similar procedure. While the message “Non-BWF-DVD FMT!” is shown, press the [ENTER] key. - Page 27 PD-6 DVD Location Recorder (Chapter 2: Before using the PD-6) Press the [ENTER] key twice to highlight “[EXECUTE]” and press the [ENTER] key again. The display changes to show the caution message, in which “Are you sure?” flashes. Press the [ENTER] key.
-
Page 28: About Recording Modes
PD-6 DVD Location Recorder (Chapter 2: Before using the PD-6) About recording modes With a disk formatted in the UDF Rev1.5 “Normal” mode, you can make recording in the “One file mode” or “Two file mode”, which can be selected by the [REC TR] select switch. -
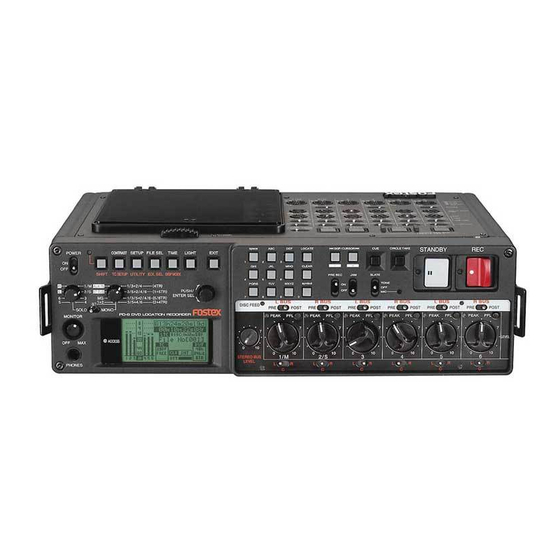
Page 29: Chapter 3: Names And Functions
PD-6 DVD Location Recorder (Chapter 3: Names and functions) Chapter 3: Names and functions <Right side panel section> <Top panel section> <Front panel section> <Left side panel section>... -
Page 30: Left Side Panel (Inputs/Outputs)
PD-6 DVD Location Recorder (Chapter 3: Names and functions) Left side panel (Inputs/outputs) [ANALOG LINE OUT] connectors These connectors feed analog audio signals of tracks 1 through 6. Connectors: XLR-3-32 type (balanced) Internal monitor speaker Outputs track audio signals, error tones, etc. - Page 31 <Caution> Pin 7 (DC 12V) supplies the PD-6 operation voltage. If it is short-circuited to GND, or use it with a heavy load, the PD-6 internal battery life may be exhausted faster or the PD-6 may generate heat abnormally. Be careful not to use it with a heavy load or short-circuit it to GND.
-
Page 32: Right Side Panel (Inputs/Outputs)
Connector: XLR-4-32 type [POWER SEL (INT/EXT)] switch Selects the power supply source for the PD-6. When “INT” is selected, the PD-6 runs with the internal battery (NP-1type). When “EXT” is selected, it runs with an external power supply. [DC OUT] connectors Each connector outputs DC 12 V power. - Page 33 PD-6 DVD Location Recorder (Chapter 3: Names and functions) [TIME CODE OUT] connector Outputs time code. Connector: XLR-3-32 type (balanced) [TIME CODE IN] connector Inputs external time code. Connector: XLR-3-31 type (balanced) [WORD IN] terminate switch Terminates the word input signal by setting the switch to “ON”.
-
Page 34: Front Panel (Part 1)
If you press a key which provides its SHIFTed function while the shift mode is active, the PD-6 goes into the SHIFTed function which is labeled under the key. To enter to another mode, press the [EXIT] key to quit the mode and carry out the same procedure. - Page 35 By pressing the key for more than three seconds, the backlight continues to light up until pressing the key again. <Note> While operating the PD-6 with the internal battery, we recommend not to turn on the backlight unless it is needed. [EXIT] key Used to cancel edit operation or execution, as well as used to exit the setup or Utility mode.
-
Page 36: Front Panel (Part 2)
PD-6 DVD Location Recorder (Chapter 3: Names and functions) [ACCESS] indicator Indicates the access condition of a DVD-RAM disk. It lights in green while it is not accessed, in orange while it is accessed for reading, and in red while it is accessed for writing. - Page 37 While the display shows the normal screen, pressing any of the numeric keys enters the time data edit mode. After editing time data, you can locate to the edited time position (see page 78). While the PD-6 is in any of the edit modes, you can enter time data or name.
- Page 38 PD-6 DVD Location Recorder (Chapter 3: Names and functions) [CIRCLE TAKE] key Adds “@” to the beginning of the name of the current audio file. If the name of the current audio file already has “@” at the beginning, pressing this key deletes “@”.
-
Page 39: Front Panel (Part 3)
[JAM] switch Used to execute the jamming function (see page 72). When this switch is set to “ON” and the PD-6 is receiving external time code, the internal time code generator takes over (jams) time code. Note that the jamming function is only available when the [TC GEN] mode switch is set to “FREE RUN”. -
Page 40: Top Panel (Part 1)
PD-6 DVD Location Recorder (Chapter 3: Names and functions) [LEVEL] controls Each control adjusts the analog input level of the corresponding channel (1 to 6). You can control the signal level sent to the stereo buss. When the [DISC FEED] switch is set to “POST”, the [LEVEL] controlled signal is sent to the corresponding track. - Page 41 “WORD” or “VIDEO” flashes and it runs with the internal clock reference. The external clock available in the external digital signal is the master. “DIGI” is lit on the display. When the PD-6 locks to a clock, “DIGITAL” is also lit on the display. When it does DIGITAL not lock to the clock, “DIGITAL”...
- Page 42 PD-6 DVD Location Recorder (Chapter 3: Names and functions) <Note> See “Chapter 2: Before using the PD-6” on page 26 for details about the recording track modes. <Note> When a “Normal” mode audio file is played back, the level meters show the levels of tracks selected by the [REC TR] select switch.
-
Page 43: Top Panel (Part 2)
PD-6 DVD Location Recorder (Chapter 3: Names and functions) Top panel (part 2) [INPUT MODE] switches Each switch selects the type of analog audio input source for the corresponding channel from among the following. L (Line) D (Dynamic Mic) P (Phantom Power P-48) - Page 44 (of the Setup mode, Utility mode, etc). <Note> While operating the PD-6 with the battery, we recommend using the [STOP] key to stop playback rather than using the [PAUSE] key. Because using the [STOP] key stops the disk rotation, which saves battery power.
-
Page 45: Lcd Display
Initial screen (Normal screen) • When no disk is set If you turn on the PD-6 when no disk is set, the display shows something like the following. After “—No Disk—” is briefly shown and the door lock is released, “-Unlock door-”... -
Page 46: Other Screens
See page 24 for details about disk formatting. • When you set a disk with recorded data If you set a disk with recorded data after turning on the PD-6, the file name and No. are shown in the appropriate fields. - Page 47 Pressing the [SETUP/UTILITY] key (while unSHIFTed) brings up the primary page of the Setup mode screen. Using Setup mode menus, you can set preferences, etc. of the PD-6. See “Chapter 7: Setup mode” on page 87 for details about the Setup mode. • Utility mode screen Pressing the [SETUP/UTILITY] key while SHIFTed brings up the primary page of the Utility mode screen.
- Page 48 PD-6 DVD Location Recorder (Chapter 3: Names and functions) • EDL SEL mode screen Pressing the [FILE SEL/EDL SEL] key while SHIFTed brings up the primary page of the EDL SEL mode screen. By default, the screen something like the following is shown, on which <New file>...
-
Page 49: Chapter 4: Basic Connections
Chapter 4: Basic connections This chapter describes the basic connection between the PD-6 and external devices. Input connection ...48 Analog audio input connection ...48 Digital audio input connection ...49 Time code input connection ...49 Sync signal connection ...49 Monitor signal input connection ...49 Output connection ...50... -
Page 50: Input Connection
PD-6 DVD Location Recorder (Chapter 4: Basic connections) Analog audio input connection The PD-6 provides six analog mic/line input channels (channels 1 through 6) with six- channel mixing capability, which allows location mixing and recording without the need of an external mixing console. Six balanced XLR-3-31 type connectors, which accept a wide range of audio signal level from mic to line, are used. -
Page 51: Digital Audio Input Connection
The PD-6 provides the [AUX IN] connector which receives an external monitor signal. A Hirose 10-pin connector is used for the [AUX IN] connector. The signal received by the [AUX IN] connector is sent to the PD-6 monitor section, and can be monitored via headphones (or internal monitor speaker) in the similar manner... -
Page 52: Monitor Signal Input Connection
PD-6 DVD Location Recorder (Chapter 4: Basic connections) Analog audio output connection Analog audio signals can be output from the [ANALOG LINE OUT] connectors (1 through 6), which are balanced, XLR-3-32 type. The output reference level is +4 dBu which corresponds to -12 dB of the LCD level meters. -
Page 53: Digital Audio Output Connection
PD-6 DVD Location Recorder (Chapter 4: Basic connections) Digital audio output connection The digital audio signals can be output from the [DIGITAL OUT] connector (D-sub 25- pin type) in the IEC 60958 (AES/EBU) or IEC 60958 (S/P DIF) format. You can select the digital output signal format (AES/EBU or S/P DIF) using the “Digital out”... -
Page 54: Connection Examples
The following shows the example of using the PD-6 with microphones, which makes the best use of the PD-6 and can be applied to news gathering, audio recording for film, etc. In the example below, audio signals from microphones and time code generated by the external time code generator are simultaneously recorded to the PD-6, while the same time code is also recorded to the VTR along with a video camera signal. -
Page 55: Connection Example For Recording (2)
(stereo) are connected to the PD-6 six-channel mixer, allowing recording without using an external mixer. Unlike the previous example, the time code generated by the PD-6 internal time code generator is the master which is fed to the VTR. The [ANALOG LINE OUT] connector can always feeds the mixed source signals, which can be recorded to the VTR audio tracks for the backup purpose. -
Page 56: Other Connection Examples
<Notes> • To control the PD-6 from the USB keyboard, make setting of the [Keyboard” menu in the Setup mode appropriately (“US” or “JAPAN”) according to the keyboard connected. See “Chapter 7: Setup mode” for details. -
Page 57: Power Supply For External Devices
ENTER key Acts the same as the [ENTER] key on the panel. Power supply for external devices The PD-6 provides a pair of the [DC OUT] connectors, from which “DC 12 V” power can be supplied to external devices. <Notes>... - Page 58 PD-6 DVD Location Recorder (Chapter 4: Basic connections)
-
Page 59: Chapter 5: Recording/Playback
Locating to the end (REC END) of a file ...78 Locating to the previous locate point ...78 Locating to the desired time ...79 Locating to the desired cue point ...79 PD-6 DVD Location Recorder (Chapter 5: Recording/playback) <Table of contents> ...69 ...69 ...69... -
Page 60: Recording Analog Audio
PD-6 DVD Location Recorder (Chapter 5: Recording/playback) To record analog audio, some control and switch settings are necessary. The following shows the block diagram of the built-in 6-channel mixer of the PD-6. P48V T12V STEREO BUSS AUX IN The following table shows availability of PD-6 record modes both for “Normal” and “Tape”... -
Page 61: Selecting An Input Source
PD-6 DVD Location Recorder (Chapter 5: Recording/playback) You can make recording on both sides A and B of an 8-centimeter DVD-RAM disk. The following table shows the approximate recording time (in minute) for each side according the [FS/24] and [REC TR] switch settings. -
Page 62: Filter Setting
When the [INPUT MODE] switch is set to “L: Filter setting The PD-6 is equipped with the high-pass filter circuit. The cutoff frequency can be adjusted within the range between 50 Hz and 300 Hz, and the filter slope can be selected between -6 dB/oct. and -12 dB/oct. -
Page 63: Selecting The Sampling Frequency
44.1/24 bit, 48/24 bit, 88.2/24 bit and 96/24 bit. The current setting is shown on the screen. While receiving a digital signal, the PD-6 automatically detects the Fs from the receiving digital signal, which takes priority to [FS/24] switch setting. -
Page 64: Selecting Recording Tracks
PD-6 DVD Location Recorder (Chapter 5: Recording/playback) Selecting recording tracks According to the situation, select the recording track mode from among the following using the [REC TR] select switch. Depending on the selected mode, the level meter section on the display is shown differently (except a “Tape”... -
Page 65: Selecting A Recording Source
PD-6 DVD Location Recorder (Chapter 5: Recording/playback) Selecting a recording source Using the [DISC FEED] switches, select a recording source for each track. Channel pre-fader signal is selected. Stereo buss (L or R) signal is selected. The “L” signal can be assigned to the odd L, R BUS tracks, while the “R”... -
Page 66: Monitoring Recording Signals
To turn off the monitor sound completely, rotate the control fully counterclockwise until it clicks. <Note> While running the PD-6 with the internal battery, we recommend not to raise the monitor volume more than required. Raising the volume consumes more battery power. -
Page 67: Making Recording
See “Digital input channel setting” on page 91 for details about the “Digital in” menu. To start recording, slide the [REC] key. With a Normal mode disk, the PD-6 creates a “New File” and starts recording to it. By default, the real-time clock time data is given as the file name when an audio file is created. -
Page 68: Recording With The Pre Rec Mode Active
Then pressing the [ENTER] key cancels the recording you made last time and clears the audio file. After the PD-6 clears the file, the display shows "Com- pleted!" briefly, followed by the screen of the audio file which was loaded be- fore the audio file you have just cleared was made. -
Page 69: Recording A Slate Tone/Slate Mic Signal
PD-6 DVD Location Recorder (Chapter 5: Recording/playback) • Recording a slate tone/slate mic signal While sliding and holding the [SLATE] switch to “TONE” or “MIC”, the slate tone (at 1 kHz, reference level) or the slate microphone signal is fed to all tracks and stereo busses, allowing you to record the slate tone or the slate microphone signal during recording. -
Page 70: File Names Of Created Audio Files
PD-6 DVD Location Recorder (Chapter 5: Recording/playback) • File names of created audio files When making recording in any of the single-file modes (2TR, 4TR, 5TR or 6TR), the real-time clock time data when starting recording is given as the file name by default. -
Page 71: Recording Digital Audio
“DIGI” icon is shown above it (see the screen example below). If the input channel is not locked to the digital input, “INT” is shown on the display. To synchronize the PD-6 to a video or word clock signal, set the [CLOCK] switch to “EXT”. -
Page 72: Recording Time Code
A time code is recorded according to the [TC GEN] select switch setting (see “Recording time code” in the following). The PD-6 is equipped with the internal IEC time code generator/reader, which is used when recording internal time code together with audio. You can also record external time code, or the internal generator time code while jamming to external time code. -
Page 73: Selecting The Tc Generate Mode
PD-6 DVD Location Recorder (Chapter 5: Recording/playback) <Note> When recording external time code, you can check the external time code value and frame rate by switching the time display on the Normal screen to “LTC IN” using the [TIME] key (see the screen example below). If the external time code frame rate does not match the [FRAME] select switch setting, the frame rate shown on the screen flashes for warning. -
Page 74: Jam Function
PD-6 recording in sync with the VTR even if you disconnect the time code input after the PD-6 generator locks to the external time code. In other words, you can use the PD-6 away from the VTR, which is essential for location recording. -
Page 75: Creating Cue Points
PD-6 DVD Location Recorder (Chapter 5: Recording/playback) Creating cue points The PD-6 provides the following three ways of creating a cue point. Each cue point can be used as a marker. A cue point is automatically created at the recording start point (only for a “Tape” mode disk). -
Page 76: Viewing The Cue Point List
PD-6 DVD Location Recorder (Chapter 5: Recording/playback) Viewing the cue point list Pressing the [CUE] key while the recorder is stopped brings up the CUE LIST screen as shown below. In this screen, the existing cue points are listed. You... -
Page 77: Creating A New Cue Point Using The Cue List Screen
PD-6 DVD Location Recorder (Chapter 5: Recording/playback) • Editing time data To edit time data, select “Position” using the [SEL] dial and press the [ENTER] key. The subframe value of the current time data flashes, showing that you can now edit Select the edit point using the [ [SEL] dial, and confirm the setting by pressing the [ENTER] key. -
Page 78: Playback
PD-6 DVD Location Recorder (Chapter 5: Recording/playback) Normal audio playback Playback Make sure that a recorded disk is set to the tray. Load a desired audio file. You can select an audio file from the FILE SEL screen or using the [ CURSOR ] key. -
Page 79: Time Code Playback
PD-6 DVD Location Recorder (Chapter 5: Recording/playback) • Playback of a file recorded in two-file mode When playing back either one of two files recorded in two-file mode (“2+4” or “1+5”), the output assignment of the [ANALOG LINE OUT] connectors depends on the [REC TR] select switch position. -
Page 80: Skip/Locate Functions
PD-6 DVD Location Recorder (Chapter 5: Recording/playback) The PD-6 offers comprehensive skip/locate functions. Skipping by file When more than one audio file is created on the current disk, you can quickly skip to the beginning (ABS 0) of a desired track. -
Page 81: Locating To The Desired Time
You can locate the recorder to the desired position by specifying the time value. While the recorder is stopped, press any one of numeric keys. The PD-6 enters the time edit mode, while the TIME EDIT screen appears on the LCD display. <Note>... - Page 82 PD-6 DVD Location Recorder (Chapter 5: Recording/playback)
-
Page 83: Chapter 6: Tc Setup Mode
Check and edit the LTC start reference time at ABS 0. Select whether the PD-6 outputs time code or not while the recorder is paused. Select user bit of output time code when the [TC OUT] switch is set to “REPRO”. -
Page 84: How To Select The Tc Setup Menu
0) of an audio file. <Note> PD-6 records only the start time of LTC, and the internal generator generates and outputs LTC with reference to the start time. With a “BWF” file, the start time is recorded as “Time Reference” in “Broadcast Audio Extension Chunk”. -
Page 85: Time Code Output While Paused
When the [TC OUT] select switch is set to “REPRO” and the recorder is stopped (or paused), no time code is output. Press the [EXIT] key to exit the TC Setup mode. PD-6 DVD Location Recorder (Chapter 6: TC Setup mode) SKIP/CURSOR flashing... -
Page 86: User Bit Setting Of Playback Time Code
PD-6 DVD Location Recorder (Chapter 6: TC Setup mode) User bit setting of playback time code You can select the desired user bit of time code which is output from the [TIME CODE OUT] connector while the [TC OUT] is set to “REPRO”. -
Page 87: Editing The Internal Time Code Generator Setting
(“FREE RUN”, “REC RUN”, “24H RUN” or “EXT RUN”) is shown. • If no time code is fed to the PD-6 in the “EXT RUN” mode, “<<EXT TC Non!>>” is shown. • In the “REC RUN” or “24H RUN” mode, user bit is not shown. -
Page 88: User Bit Setting Of Internal Generator Time Code
PD-6 DVD Location Recorder (Chapter 6: TC Setup mode) User bit setting of internal generator time code You can set the time code user bit of the internal generator, which is output from the [TIME CODE OUT] connector when the [TC OUT] switch is set to “GEN”. -
Page 89: Chapter 7: Setup Mode
USB keyboard type setting (Keyboard) ...101 Pre-record time setting (Pre rec time) ...101 Setup data saving (Save user setup) ...102 Setup data loading (Load user setup) ...102 ROM version checking (Version) ...103 PD-6 DVD Location Recorder (Chapter 7: Setup mode) <Table of contents>... -
Page 90: Setup Menu Details
PD-6 DVD Location Recorder (Chapter 7: Setup mode) Setup menu details The following menus are available in the Setup mode. Note that the Setup mode menu may change when the PD-6 software is updated. Real Time Clock setting Digital out setting... -
Page 91: How To Select A Setup Menu
[SEL] dial /[ENTER] key When the [SHIFT] indicator is unlit, press the [SETUP/UTILITY] key. The PD-6 enters the Setup mode and the display shows the primary SETUP screen on which you can select a menu. “ ” tells you that more menus are hidden under the screen currently shown. -
Page 92: How To Make Setup Menu Setting
PD-6 DVD Location Recorder (Chapter 7: Setup mode) How to make Setup menu setting Some Setup menus have the dedicated screens for editing, while others do not have the dedicated screens and can be edited on the primary screen. A menu of the former type has “... -
Page 93: Setting The Digital Out Format (Digital Out)
PD-6 DVD Location Recorder (Chapter 7: Setup mode) Setting the digital out format (Digital out) The “Digital out” menu allows you to select the digital signal format (AES/EBU or S/ P DIF) of the signal fed from the outputs of the [DIGITAL I/O] connector. -
Page 94: Skip Mode Setting (Skip Mode)
PD-6 DVD Location Recorder (Chapter 7: Setup mode) Skip mode setting (Skip mode) The “Skip mode” menu selects the function of the [ With the “Skip mode” menu, you can select “File” or “CUE”. Diagnoses on/off setting (Diagnoses) The “Diagnoses” menu selects whether or not creating a diagnoses file which logs errors during recording, etc. -
Page 95: Reference Level Setting (Reference Level)
PD-6 DVD Location Recorder (Chapter 7: Setup mode) Reference level setting (Reference level) The “Reference level” menu selects the input reference level. With the “Ref. level” menu, you can select “-20 dB” or “-18 dB”. Option -20dB Sets the input reference level to -20 dB (default setting). -
Page 96: Slate Tone Recording Time And Mode Setting (Tone Rec Mode)
PD-6 DVD Location Recorder (Chapter 7: Setup mode) Slate tone recording time and mode setting (Tone rec mode) The “Tone rec mode” menu sets the recording time and mode of the slate tone which is recorded at the beginning of a file when recording is taken place in the New file mode. -
Page 97: Auto Cue Mode On/Off Setting (Auto Cue)
PD-6 DVD Location Recorder (Chapter 7: Setup mode) Auto cue mode on/off setting (Auto cue) The “Auto cue” menu selects whether or not recording a cue point at the record start position automatically when making recording to a “Tape” mode disk. -
Page 98: Error Tone Output Setting (Error Tone)
PD-6 DVD Location Recorder (Chapter 7: Setup mode) Error tone output setting (Error tone) The “Error tone” menu selects whether generating the error tone (warning tone) or not for each of four kinds of troubles (see below) independently. The error tone is generated from the internal monitor speaker (or headphones). -
Page 99: Battery Warning Setting (Batt Warning)
The “BATT warning” menu sets the threshold of the battery power voltage for automatically ending recording or playback, releasing the disk lock or generating the error tone while the PD-6 is running with the internal battery. To generate the error tone when the battery power voltage drops below the threshold, the “BATT warning”... -
Page 100: Limiter Parameter Setting (Limiter Parameter)
PD-6 DVD Location Recorder (Chapter 7: Setup mode) Limiter parameter setting (Limiter parameter) The “Limiter parameter” menu makes parameter setting for the limiter. On “Limiter parameter” menu screen, you can set “Grouping”, “Threshold” and “Ratio” parameters. <“Grouping”> <Note> Even if the [LIMITER] switch of a channel in the group is set to “OFF”, the input level of the channel is checked by the limiter. -
Page 101: Default File Name Setting (Default File Name)
PD-6 DVD Location Recorder (Chapter 7: Setup mode) Default file name setting (Default file name) When recording is made in the New File mode, a new file is created and a name is given automatically. The “Default file name” menu selects the name form of an audio file when it is created between date information base and scene/take number information base. -
Page 102: Default Track Name Setting (Default Track Name)
PD-6 DVD Location Recorder (Chapter 7: Setup mode) For example, if you set “SCENE NAME” to “Action” and “TAKE NUMBER” to “- 003”, the file name of an audio file created when recording in the “New File mode” is made for the first time is “Action-003”. -
Page 103: Usb Keyboard Type Setting (Keyboard)
The “Keyboard” menu selects the type of a USB keyboard connected to the [USB] connector. By connecting a USB keyboard, you can control some of the PD-6 from the keyboard. With the Keyboard” menu, you can select between “US” and “JAPAN”. -
Page 104: Setup Data Saving (Save User Setup)
PD-6 DVD Location Recorder (Chapter 7: Setup mode) Setup data saving (Save user setup) The “Save user setup” menu is used to save whole Setup data to a user box. You can load the Setup data saved as required. In the “Save user setup” menu screen, you can select a user box where data is saved, give a name to the box, and save the data. -
Page 105: Rom Version Checking (Version)
PD-6 DVD Location Recorder (Chapter 7: Setup mode) ROM version checking (Version) In the “Version” menu screen, you can check the software ROM version number and creation/revision date. - Page 106 PD-6 DVD Location Recorder (Chapter 7: Setup mode)
-
Page 107: Chapter 8: Utility Mode
Editing the reel number (volume label) [Reel No.] ...118 Selecting the record protection “On” or “Off” [Rec protect] ...119 Selecting the resume function “On” or “Off” [Resume] ...120 Setting IEEE1394 connection [IEEE1394] ...121 PD-6 DVD Location Recorder (Chapter 8: Utility mode) <Table of contents>... -
Page 108: Utility Menu Details
PD-6 DVD Location Recorder (Chapter 8: Utility mode) Utility menu details The Utility mode includes execution menus and setting menus regarding disks and files. The menu items may change when the PD-6 software is upgraded. Execution menu Edit File name File Info. -
Page 109: How To Select A Utility Menu
[SEL] dial/[ENTER] key When the [SHIFT] indicator is lit, press the [SETUP/UTILITY] key. The PD-6 enters the Utility mode and the display shows the primary UTILITY screen on which you can select a menu. “ ” tells you that more menus are hidden under the screen currently shown. -
Page 110: Editing A File Name [Edit File Name]
PD-6 DVD Location Recorder (Chapter 8: Utility mode) Editing a file name [Edit file name] The “Edit File name” menu edits a file name of the currently loaded audio file. Select the “Edit file name ” menu and press the [ENTER] key. -
Page 111: Editing A File Information Editing [File Info.]
The display shows the BWF sound sequence information. By rotating the [SEL] dial, the sound sequence information is scrolled. The information includes the following items. PD-6 DVD Location Recorder (Chapter 8: Utility mode) ” menu and press the [ENTER] key. - Page 112 PD-6 DVD Location Recorder (Chapter 8: Utility mode) The table below shows the details for the description information which Fostex registers by default according to the screen example above. These information can be used for creating an ALE file of AVID, as well as can be directly exported to the AVID system via IEEE 1394 (or via a disk).
-
Page 113: Editing A Description Information
PD-6 DVD Location Recorder (Chapter 8: Utility mode) Editing a description information Select a description information item and press the [ENTER] key. The leftmost character of the selected item flashes. You can now make editing. Use the [SKIP/CURSOR on the right of “=”. -
Page 114: Deleting An Unnecessary Audio File [Delete File]
PD-6 DVD Location Recorder (Chapter 8: Utility mode) Deleting an unnecessary audio file [Delete file] Using the “Delete file” menu, You can delete the currently loaded audio file. Select the “Delete file ” menu and press the [ENTER] key. The “Del. file” screen appears, on which the current file number and file name are shown, while “Sure?”... -
Page 115: Restoring A Deleted Audio File [Restore Del. File]
The file is restored. After “Completed!” is shown, the Utility mode exits. <Note> The restored file returns to the original position (file number) when it was deleted. PD-6 DVD Location Recorder (Chapter 8: Utility mode) ” menu and press the [ENTER] key. -
Page 116: Optimizing The Current Disk [Optimize Disk]
PD-6 DVD Location Recorder (Chapter 8: Utility mode) Optimizing the current disk [Optimize disk] Using the “Optimize disk” menu, You can optimize a DVD-RAM disk. By optimizing a used disk, deleted (hidden) audio files are completely deleted, and the disk free space increases. -
Page 117: Formatting The Current Disk [Format]
Using the “Format” menu, you can format the current disk In the following description, we assume to reformat a used DVD-RAM disk in the “Normal” or “Tape” mode. See “Chapter 2: Before using the PD-6” on page 24 for details about initially formatting an unused disk. <Notes>... - Page 118 PD-6 DVD Location Recorder (Chapter 8: Utility mode) After editing the reel number (or leaving the reel number as the default setting), press the [ENTER] key. The reel number is set, while the current “Format mode” option (“Normal”, by default) starts flashing automatically.
- Page 119 You need to replace the disk. It may also be possible that a disk rejected by a PD-6 is accepted by another PD-6, because the criterion of rejecting disks may not be exactly the same between PD-6s.
-
Page 120: Editing The Reel Number (Volume Label) [Reel No.]
PD-6 DVD Location Recorder (Chapter 8: Utility mode) If you format a disk in the “Normal” mode, “—No Files!—” appears, showing that no audio file exists on the disk. If you format a disk in the “Tape” mode, an audio file named “Tape_mode1.wav”... -
Page 121: Selecting The Record Protection On Or Off [Rec Protect]
Press the [EXIT] key to exit the Utility mode. <Note> On the Normal screen, a record protected audio file has the “key” icon beside the file name, as show below. PD-6 DVD Location Recorder (Chapter 8: Utility mode) flashing... -
Page 122: Selecting The Resume Function On Or Off [Resume]
PD-6 DVD Location Recorder (Chapter 8: Utility mode) Selecting the resume function on or off [Resume] Using the “Resume” menu, you can select “On” or “Off” of the resume function for the currently loaded audio file. By setting this menu to “On”, the current file information including the current... -
Page 123: Setting Ieee1394 Connection [Ieee1394]
Using the “IEEE1394” menu, you can select “CONNECT” or “DISCONNECT” of the IEEE1394 connection. By selecting “CONNECT”, the [IEEE1394] connector can be used to connect the PD-6 to a personal computer, and you can control the PD-6 drive from the computer. <Note>... - Page 124 PD-6 DVD Location Recorder (Chapter 8: Utility mode)
-
Page 125: Chapter 9: Edl Sel Mode
PD-6 DVD Location Recorder (Chapter 9: EDL SEL mode <Creating and editing an ALE file>) Chapter 9: EDL SEL mode This chapter describes details about the EDL SEL mode. In this mode, you can create or edit the ALE (Avid Log Exchange) file list on a disk. This file list is used to export data to the AVID system. -
Page 126: Creating A New Ale File
PD-6 DVD Location Recorder (Chapter 9: EDL SEL mode <Creating and editing an ALE file>) On a DVD-RAM disk, the “info” folder is created under the “bwff” folder. The “Info” folder contains ALE (Avid Log Exchange) files and various information files such as a diagnoses file. -
Page 127: Pd-6 Dvd Location Recorder (Chapter 9: Edl Sel Mode
PD-6 DVD Location Recorder (Chapter 9: EDL SEL mode <Creating and editing an ALE file>) Use the [SEL] dial (or the numeric keys) to enter the desired name. In the screen example below, “ALL-TAKE” is entered as a file list name. - Page 128 PD-6 DVD Location Recorder (Chapter 9: EDL SEL mode <Creating and editing an ALE file>) While “Video format” is highlighted, press the [ENTER] key. The display changes to show the screen on which you can select the video format. The current option flashes (default: PAL).
-
Page 129: Adding Audio Files To An Ale File
PD-6 DVD Location Recorder (Chapter 9: EDL SEL mode <Creating and editing an ALE file>) Press the [ENTER] key. A new ALE file is created and added to the ALE file list. The file extension “.ale” is automatically added when an ALE file is created. - Page 130 PD-6 DVD Location Recorder (Chapter 9: EDL SEL mode <Creating and editing an ALE file>) While “<New entry>” is highlighted, press the [ENTER] key. After showing “Please wait!”, the display changes to shows the “Sel. new entries” screen for selecting audio files.
-
Page 131: Viewing And Editing Audio File Entries
PD-6 DVD Location Recorder (Chapter 9: EDL SEL mode <Creating and editing an ALE file>) Viewing and editing audio file entries You can view audio file entries in an ALE file, as well as add (or delete) an audio file entry to (or from) the ALE file. -
Page 132: Adding An Audio File Entry To An Existing Ale File
PD-6 DVD Location Recorder (Chapter 9: EDL SEL mode <Creating and editing an ALE file>) Adding an audio file entry to an existing ALE file You can add an audio file entry to an existing ALE file. Deleting an audio file entry You can delete an unnecessary audio file entry from the ALE file. -
Page 133: Editing An Ale File
PD-6 DVD Location Recorder (Chapter 9: EDL SEL mode <Creating and editing an ALE file>) Editing an ALE file You can edit an existing ALE file. Editing an ALE file name You can edit an ALE file name shown in the ALE file list. The following example shows how to edit the “ALL-TAKE.ale”... -
Page 134: Remaking An Ale File
PD-6 DVD Location Recorder (Chapter 9: EDL SEL mode <Creating and editing an ALE file>) Remaking an ALE file If you edit an audio file which is used in the ALE file and the start time, end time, or the description information is changed, the ALE file must be remade. -
Page 135: Deleting An Ale File
PD-6 DVD Location Recorder (Chapter 9: EDL SEL mode <Creating and editing an ALE file>) Deleting an ALE file You can delete an audio file entry in the ALE file. The following procedure example describes how to delete the “ALL-TAKE.ale”... - Page 136 PD-6 DVD Location Recorder (Chapter 9: EDL SEL mode <Creating and editing an ALE file>)
-
Page 137: Chapter 10: Exporting Files Using Ieee1394
Chapter 10: Exporting files using IEEE1394 This chapter describes how to transfer audio files between the PD-6 and a personal computer using IEEE1394. Connection between the PD-6 and a PC ...137 How to disconnect the PD-6 ...137 Example of copying data to an external hard disk ...138 Example of exporting data to a computer application ...138... - Page 138 By connecting the PD-6 to a personal computer via the [IEEE1394] connector, audio file data can be transferred. PD-6 audio data can be copied to a hard disk on the personal computer, or exported to an application software such as Digidesign Pro Tools.
-
Page 139: Connection Between The Pd-6 And A Pc
In the following procedure, we assume that a recorded DVD-RAM disk is set to the PD-6 and an audio file is loaded. If no disk is set or the door is not locked, you cannot make the “IEEE1394” menu setting in the Utility mode. -
Page 140: Example Of Copying Data To An External Hard Disk
Pro Tools software application. Note that the screen examples below may differ from the screen you actually see. Make sure that the PD-6 drive icon is shown on the PC desktop (the icon design differs depending on the PC). Start up an appropriate application such as Explorer on the computer, and copy an audio data file in the PD-6 drive to the hard disk. - Page 141 PD-6 DVD Location Recorder (Exporting files using IEEE1394) Select and click an audio file in the “bwff” directory on the disk (indicated by arrow 4). The selected audio file is shown in “Region in current file”. Click “Convert ->”, followed by “Done” (indicated by arrow 5).
- Page 142 PD-6 DVD Location Recorder (Exporting files using IEEE1394) The saved file is added to the audio region list (arrow 7). After making “Spot” active, drag & down the audio region list to the track area (arrow 8). The “Spot Dialog” setting window appears.
-
Page 143: Chapter 11: Specifications
PD-6 DVD Location Recorder (Chapter 11: Specifications) Chapter 11: Specifications... - Page 144 PD-6 DVD Location Recorder (Chapter 11: Specifications) *0 dBu=0.775 Vrms, 0 dBV=1 Vrms. Reference level : -18 dB/-20 dB (default: -18 dB, selectable in the "Ref. Level" menu of the Setup mode) ANALOG MIC/LINE IN (CH 1 through 6) • Connectors <LINE>...
- Page 145 Recording/playback Recording device Recording Format Recording Medium Sampling Frequency Quantization Recording Track Track mode PD-6 DVD Location Recorder (Chapter 11: Specifications) BNC type TTL level LEMO 5pin Complies to ASCII & LTC I/O 10-pin (male)/balanced (Hirose) More than 10k +4dBu...
- Page 146 PD-6 DVD Location Recorder (Chapter 11: Specifications) R/P Frequency Response Signal to Noise Ratio Line Dynamic Range Reference Recording Level T. H. D. Cue Point Chunk Dimensions Weight Power sources Power consumption Battery life * " " is a trademark of DVD format/Logo Licensing Corporation.
-
Page 147: Declaration Of Ec Directive
NAME: I. D. elrf. electronic Ltd. ADD: ARMULA 38 108 REYKJAVIK, ICELAND TEL: (+354) 588 5010, FAX: (+354) 588 5011 PD-6 DVD Location Recorder (Chapter 11: Specifications) <ITALY> NAME: Proel S. p. A. ADD: Zona Via Alla Ruenia, 37/43 64027 - Sant’Omero (Teramo),... - Page 150 FOSTEX CO. 3-2-35, Musashino, Akishima-shi, Tokyo, Japan 196-0021 FOSTEX AMERICA 15431, Blackburn Ave., Norwalk, CA 90650, U. S. A. © PRINTED IN JAPAN APR. 2003 8288 498 000 FX...
Need help?
Do you have a question about the PD-6 and is the answer not in the manual?
Questions and answers