Table of Contents
Advertisement
Quick Links
Advertisement
Table of Contents

Subscribe to Our Youtube Channel
Related Manuals for Supero Supero SAS 815TQ


Summary of Contents for Supero Supero SAS 815TQ
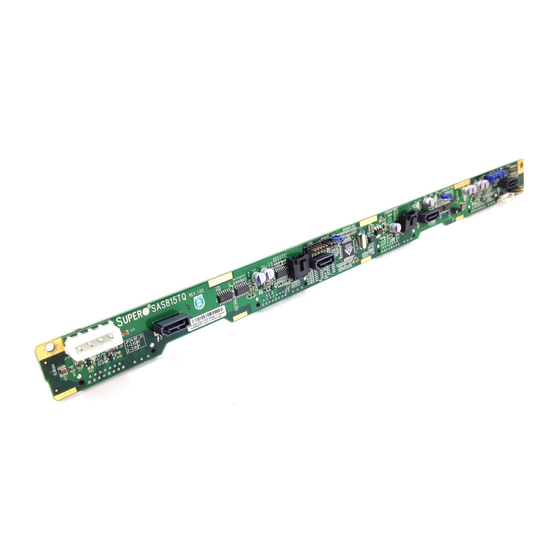
- Page 1 JP40 JP42 JP51 JTAG UPGRADE JP29:9071 RST JP18:BUZZER RESET UPER SAS815TQ JP29 JP18 JP33 REV 1.00 JP34 M9 M15 SIDEBAND +12V JP47 JP10 +12V +12V JP26 JP44 ACT IN ACT1 ACT2 ACT3 ACT0 SAS 815TQ Backplane USER'S GUIDE Rev. 1.0a...
- Page 2 Clara County in the State of California, USA. The State of California, County of Santa Clara shall be the exclusive venue for the resolution of any such disputes. Supermicro's total liability for all claims will not exceed the price paid for the hardware product.
-
Page 3: Table Of Contents
Safety Information and Technical Specifi cations Table of Contents Chapter 1: Safety Guidelines ESD Safety Guidelines ..................1-1 General Safety Guidelines ................1-1 An Important Note to Users ................1-1 Chapter 2: Jumper Settings and Pin Defi nitions Front Connectors and Jumpers ............... 2-1 Front Connector Pin Defi... - Page 4 SAS 815TQ Backplane User's Guide Notes...
-
Page 5: Chapter 1: Safety Guidelines
Safety Information and Technical Specifi cations Chapter 1 Safety Guidelines To avoid personal injury and property damage, carefully follow all the safety steps listed below when accessing your system or handling the components. ESD Safety Guidelines Electric Static Discharge (ESD) can damage electronic com ponents. To prevent dam- age to your system, it is important to handle it very carefully. - Page 6 SAS 815TQ Backplane User's Guide Notes...
-
Page 7: Front Connectors And Jumpers
Safety Information and Technical Specifi cations Chapter 2 Jumper Settings and Pin Defi nitions Front Connectors and Jumpers JTAG UPGRADE JP29:9071 RST JP18:BUZZER RESET JP40 JP42 JP51 SAS815TQ JP29 JP18 JP33 UPER REV 1.00 JP34 M9 M15 SIDEBAND +12V JP47 JP10 +12V +12V... -
Page 8: Front Connector Pin Defi Nitions
SAS 815TQ Backplane User's Guide Front Connector and Pin Defi nitions #1. Backplane Main Power Connectors Backplane Main Power The 4-pin connectors, designated JP10 4-Pin Connector (JP10) provide power to the backplane. See the Pin# Defi nition table on the right for pin defi nitions. +12V 2 and 3 Ground... - Page 9 Safety Information and Technical Specifi cations #6. Sideband Headers Sideband Headers (JP51) The sideband headers are designated Pin # Defi nition Pin # Defi nition JP51. For SES-2 to work properly, you must Backplane Controller connect an 8-pin sideband cable. See the Addressing ID (SB6) (SB5)
-
Page 10: Jumper Settings
SAS 815TQ Backplane User's Guide Front Jumper Locations and Pin Defi nitions JP29 JP18 JTAG UPGRADE JP29:9071 RST JP18:BUZZER RESET JP40 JP42 JP51 JP29 JP18 JP33 UPER SAS815TQ REV 1.00 JP34 M9 M15 SIDEBAND +12V JP47 JP10 +12V +12V JP26 JP44 ACT IN ACT0... - Page 11 Safety Information and Technical Specifi cations C and SGPIO Modes and Jumper Settings This backplane can utilize I C or SGPIO. I C is the default mode and can be used without making changes to your jumpers. The following information details which jumpers must be confi...
-
Page 12: Rear Connectors And Led Indicators
SAS 815TQ Backplane User's Guide Rear Connectors and LED Indicators H 2 M 4 M 9 M 1 SAS #0 SAS #1 SAS #2 SAS #3 Rear SAS/SATA Connectors Rear Connector SAS Drive Connector Number Number SAS #0 SAS/SATA HDD #0 SAS #1 SAS/SATA HDD #1 SAS #2...
Need help?
Do you have a question about the Supero SAS 815TQ and is the answer not in the manual?
Questions and answers