Table of Contents
Advertisement
Quick Links
Advertisement
Table of Contents

Related Manuals for Roberts R9940


Summary of Contents for Roberts R9940
- Page 1 R9940 3-band RDS PLL digital radio Please read this manual before use...
-
Page 2: Table Of Contents
Contents Features ............. 1 FM mono/stereo button ......19 Control locations ........2 Setting the sleep timer ......19 Display information ......... 4 Display back light ........20 Installing batteries ........5 Lock button ..........20 Battery replacement ....... 6 AC adaptor .......... -
Page 3: Features
Features Large easy to read Liquid Crystal Display (LCD) Adjustable sleep timer allows you to fall asleep showing station name, frequency, time, memory to music. location and function status. Snooze function - turns off alarm for five minutes. RDS station name display. Twenty seven memory presets offer instant access to your favourite stations on LW, MW and FM. -
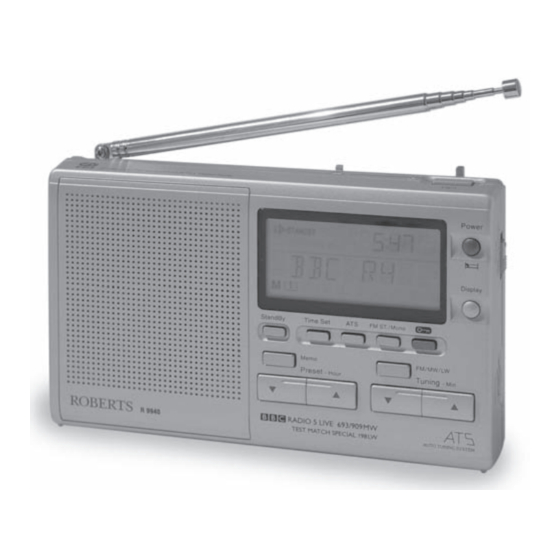
Page 4: Control Locations
Controls 1. Standby button. 2. Liquid crystal display. 3. Time set button. 4. ATS button. 5. FM Stereo/Mono button. 6. Lock button. 7. Power/Sleep button. 8. Display button. 9. Waveband button. 10. Tuning/Minute + button. 11. Tuning/Minute - button. 12. Preset/Hour + button. 13. - Page 5 15. Clock auto adjust switch. 16. Headphone socket. 17. DC input socket. 18. Telescopic aerial. 19. Light button. 20. Tone control switch. 21. Volume control. 22. Folding stand (on rear) If you need any further advice, please call our Technical Helpline on :- 020 8758 0338 (Mon-Fri)
-
Page 6: Display Information
Display A. Alarm indicators F. Key lock indicator. K. Frequency and text indicators. B. RDS indicator. G. Low battery indicator. L. Stereo indicator. C. Sleep time indicator. H. Frequency units. D. Snooze indicator. I. Memory number. E. Time. J. Memory indicator. -
Page 7: Installing Batteries
Installing batteries 1. Position the radio face down on a soft surface. 2. Press the catch as shown and slide in the direction of the arrow. 3. Lift out the battery cover 4. Insert 4 x LR6 (AA) size batteries as shown in the diagram. -
Page 8: Battery Replacement
Battery replacement The battery indicator will appear in the display immediately your radio is switched off. Batteries should be replaced when the indicator shows less than 3. After removing batteries you have approximately 3 minutes to replace the batteries after which clock and memory information will be lost. - Page 9 4. Press and hold down the Tuning up or down buttons until the frequency in the display begins to change rapidly, release the button. 5. The radio will now start to search the FM waveband and will stop when it finds a station of sufficient strength.
-
Page 10: Setting The Clock Manually
Setting the clock time manually When batteries are installed for the first time the display will show - - : - -. Time can be manually set with the radio switched on or off. The clock uses the 24 hour system e.g. 2:00pm is shown as 14:00. -
Page 11: Setting The Buzzer Alarm
Setting the buzzer alarm Note: Clock uses 24 hour system. 1. Repeatedly press and release the Standby button until the display shows ‘Buzzer’. 2. Whilst the display symbol and alarm time are flashing set the required hour using the Hour + and - buttons. 3. -
Page 12: Setting The Radio Alarm
Setting the radio alarm Note: Clock uses 24 hour system. 1. Repeatedly press and release the Standby button until the display shows ‘Last CH’. 2. Whilst the display symbol is flashing set the required hour using the Hour + and - buttons. 3. -
Page 13: Search Tuning
Search tuning 1. Switch on your radio by pressing the Power button. 2. Select the required waveband by repeat pressing of the Waveband button. The waveband selected will appear in the display. On FM fully extend the Telescopic aerial. On MW and LW rotate your radio for best reception. -
Page 14: Manual Tuning
Manual tuning 1. Switch on your radio by pressing the Power button. 2. Select the required waveband by repeat pressing of the Waveband button. The waveband selected will appear in the display. On FM fully extend the Telescopic aerial. On MW and LW rotate your radio for best reception. -
Page 15: Mw (Am) Tuning Step Size
MW (AM) tuning step size In Europe and other parts of the world MW tuning steps are 9kHz, in America the MW tuning step size is 10kHz. To change the MW tuning step size from 9KHz to 10KHz proceed as follows:- 1. -
Page 16: Presetting Stations
Presetting stations You may store up to 9 stations on FM, 9 on MW and 9 on LW giving a total of 27 preset stations. 1. Tune into the required station using one of the tuning methods previously described. 2. Press and release the Memo button, the word SAVE - ->... -
Page 17: Recalling A Preset Station
Recalling a preset station 1. Switch on your radio using the Power button. 2. Select the desired waveband using the Bands button. 3. Press either of the Preset buttons to cycle through the available preset stations. Deleting a preset station Your radio is equipped with a Memory scan facility. -
Page 18: Ats (Automatic Tuning System)
ATS (Automatic Tuning System) The automatic tuning system will scan the selected waveband and automatically store stations in the memory presets. note: ATS operates on FM an MW bands only - activating the ATS function will overwrite any stations previously stored in the memory presets 1. -
Page 19: Operating Your Radio Using Rds
Operating your radio using RDS (Radio data system) The Radio Data System (RDS) is a system in which inaudible digital information is transmitted in addition to the normal FM radio programme. 1. Switch on your radio and select the FM waveband. 2. -
Page 20: Display Modes
Display Modes (FM only) 1. Whilst tuned to a station displaying its RDS station name, you can change between station name and frequency by pressing and releasing the Display button. 2. The display will show the stations frequency for approximately 5 seconds before reverting to showing station name... -
Page 21: Fm Mono/Stereo Button
FM stereo/mono button (FM only) 1. If the station being received is weak some hiss may be audible, to reduce the hiss press the FM ST/ Mono button to switch to mono mode. The stereo indicator will be removed from the display. 2. -
Page 22: Display Backlight
Display backlight 1. Pressing the Light button will switch on the display backlight and illuminate the display for approximately 7 seconds. Lock button The Lock button is used to prevent unintentional operation. 1. Press the Lock button , the symbol will appear in the display. -
Page 23: Ac Adaptor
Using an AC adaptor (not included) The AC adaptor for use with the R9940 should provide 6 volts DC output at 300mA centre pin negative (Roberts type PU6-B). Insert the adaptor plug into the DC socket on the left side of the radio. Plug the adaptor into a standard 13A mains socket outlet. -
Page 24: Headphones
Headphones Headphones or earphones for use with your radio should be stereo and fitted with a 3.5mm stereo jack plug. Insert the headphone plug into the socket on the left side of the radio. When the headphones are plugged in the loudspeaker is automatically disconnected. -
Page 25: Troubleshooting/Reset Button
Troubleshooting/Reset button If your radio fails to operate correctly, or some digits on the display are missing or incomplete carry out the following procedure. 1. Switch off the radio and remove the batteries. 2. With the aid of a suitable implement (the end of a paper clip) press the reset button located in the battery compartment for at least 5 seconds, this will reset the microprocessor, clock time and clear... -
Page 26: Specifications
Specifications Power requirements Sockets 6.0V @ 300mA Headphone socket 3.5mm dia stereo. centre pin negative DC input socket 6.0 volts centre pin negative. Batteries 4 x IEC size LR6 (AAsize) Battery Life Approx. 20hrs of listening when Frequency Range 87.5 - 108.0MHz used for 4 hours a day at normal - 1710kHz... -
Page 27: Guarantee
In the event that it is not possible to return the instrument to the Roberts' dealer from whom it was purchased, please contact Roberts Radio service department at the address shown on the rear of this manual before taking further action. - Page 28 ROBERTS RADIO TECHNICAL SERVICES 97-99 Worton Road Isleworth Middlesex TW7 6EG Technical Helpline :- 020 8758 0338 (Mon-Fri during office hours) Issue 1...
Need help?
Do you have a question about the R9940 and is the answer not in the manual?
Questions and answers