
Subscribe to Our Youtube Channel
Related Manuals for Roberts R9939


Summary of Contents for Roberts R9939
- Page 1 R9939 PLL Synthesised 3 band mains battery radio Please read this manual before use...
-
Page 2: Table Of Contents
Contents Important Information ............1 Specifications ..............17 Automatic FM setup ............2 Circuit features ..............17 Controls ................3-4 Mains supply ..............18 Display ................5 Guarantee ............back cover Battery Operation .............. 6 Mains Operation ..............6 Important Information - please read before use Setting the clock time ............ -
Page 3: Automatic Fm Setup
Automatic FM setup When your radio is first connected to a power supply (batteries or mains) or after a power failure (when backup batteries are not installed), the Auto setup will automatically search the FM waveband and store stations in presets. 1. -
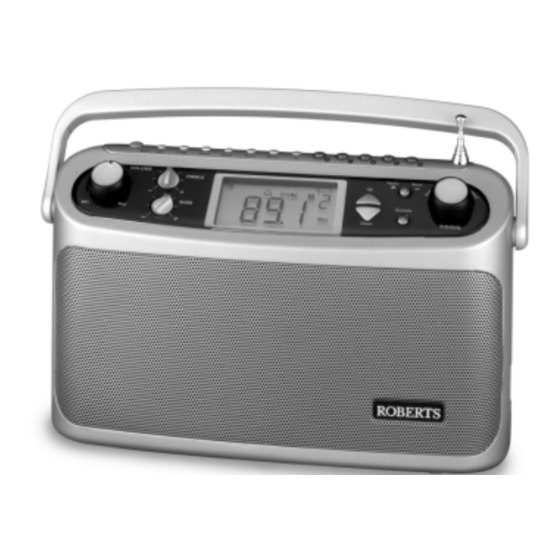
Page 4: Controls
Controls (Top) 1. On/Off button 7. Band button 13. Snooze button 18. Treble control 2. Mains LED indicator 8. Memo button 14. Alarm mode button 19. Bass control 3. Light button 9. +5 button 15. Tuning down button 20. Volume control 4. - Page 5 Controls (Rear) 21. Headphone socket (on side) 23. Mains socket 22. Battery compartment If you need any further advice, please call our Technical Helpline on :- 020 8758 0338 (Mon-Fri)
-
Page 6: Display
Display 1. Waveband indicators 5. Preset indicator 2. Alarm symbol 6. Frequency units 3. Sleep time symbol 7. Frequency/time digits 4. Battery indicator... -
Page 7: Battery Operation
4. If the radio is not to be used for any extended period of time it is recommended that the batteries are removed from the radio. We would recommend for economy that the R9939 is used on the mains whenever possible with battery operation for occasional or stand-by use only. -
Page 8: Setting The Clock Time
Setting the clock time 1. Ensure that you radio is switched off. 2. When first connected to mains or batteries the display will show "12:00" 3. Hold down the Mode button until the display begins to flash. 4. Set the hours using the Down button or turn Tuning Control to the left. -
Page 9: Setting The Alarm Time
Setting the alarm time 1. Ensure that you radio is switched off. 2. Press and release the Mode button. The current alarm time and a flashing alarm symbol will appear in the display. 3. Press and hold down the Mode button until the alarm time flashes in the display. -
Page 10: Displaying The Alarm Time
Displaying the alarm time 1. Switch off your radio using the On/Off button. 2. Press the Mode button once to display alarm time. Clock time will resume automatically after 3 seconds. Wake to buzzer 1. Set the alarm time as previously described. 2. -
Page 11: Wake To Radio
Wake to radio 1. Set the alarm time as previously described. 2. Switch off your radio using the On/Off button. 3. Press and release the Alarm button until either the symbol appears in the display. 4. Press the Radio/Buzz button until the symbol appears in the display. -
Page 12: Operating Your Radio - Search Tuning
Operating your radio - search tuning 1. Switch on your radio by pressing the On/Off button. 2. Select the required waveband by pressing the Band button. The waveband selected will appear in the display. On FM fully extend the Telescopic aerial. On MW and LW rotate your radio for best reception. -
Page 13: Operating Your Radio - Manual Tuning
Operating your radio - manual tuning 1. Switch on your radio by pressing the On/Off button. 2. Select the required waveband by pressing the Band button. The waveband selected will appear in the display. On FM fully extend the Telescopic aerial. On MW and LW rotate your radio for best reception. -
Page 14: Presetting Stations
Pre-setting stations You may store up to 10 different stations on FM and MW and 5 stations on LW giving a total of 25 preset stations. 1. Switch on your radio using the On/Off button. 2. Select the desired waveband using the Band button. 3. -
Page 15: Recalling A Preset Station
Recalling a preset station 1. Switch on your radio using the On/Off button. 2. Select the desired waveband using the Band button. 3. Press one of the Preset buttons 1-5 to recall the station. On FM and MW Presets 6 to 10 are obtained by pressing +5 and Preset button 1 to 5. -
Page 16: Sleep Timer
Sleep timer Your radio can be set to turn off after a preset time has elapsed. 1. Press and hold down the button until the desired time is reached (maximum 90 minutes in 10 minute steps). The radio will switch off after the sleep time has elapsed. 2. -
Page 17: Troubleshooting
Troubleshooting Due to external interference (caused by static charges from carpets, thunderstorms, etc.), the control electronics of your radio could receive bad information. If the display is incomplete or the radio is not responding to control buttons, proceed as follows:- Remove the power supply (the mains and all batteries) and re-install them again after one minute. -
Page 18: Specifications
Specifications Circuit Features Power Requirements Loudspeaker 92mm 4ohms Mains AC 230 volts, 50Hz only Batteries 4 x LR14 (C size) for radio Output Power 1W into 4ohms 2 x LR6 (AA size) for clock/memory Headphone socket 3.5mm dia Battery Life Approx. -
Page 19: Mains Supply
Mains supply The wire coloured BLUE must be connected to the terminal marked N or The R9939 will operate from a supply of AC 230 volts, 50Hz only. coloured BLACK. DO NOT cut off the mains plug from this equipment. If the plug... -
Page 20: Guarantee
In the event that it is not possible to return the instrument to the Roberts' dealer from whom it was purchased, please contact Roberts Radio Technical Services at the address shown below. These statements do not affect the statutory rights of a consumer.
Need help?
Do you have a question about the R9939 and is the answer not in the manual?
Questions and answers