Table of Contents
Advertisement
Quick Links
I N S T A L L A T I O N I N S T R U C T I O N S
Instructions d´installation
Istruzioni di installazione
Installationsanleitung
Instrucciones de instalación
RSA Projector Mounts
RPA Elite Series Projector Mount
RPA Elite Series Projector Mount
RPA Elite Series Projector Mount
RPA Elite Series Projector Mount
RPA Elite Series Projector Mount
RPA Elite Series Projector Mount
Installatie-instructies
Instruções de Instalação
RSA
Advertisement
Table of Contents

Related Manuals for CHIEF RSA


Summary of Contents for CHIEF RSA
- Page 1 Instructions d´installation Instrucciones de instalación Istruzioni di installazione Installatie-instructies Installationsanleitung Instruções de Instalação RSA Projector Mounts RPA Elite Series Projector Mount RPA Elite Series Projector Mount RPA Elite Series Projector Mount RPA Elite Series Projector Mount RPA Elite Series Projector Mount...
-
Page 2: Important Warnings And Cautions
It is the verantwortlich, dass alle Komponenten unter Einhaltung der installer’s responsibility to make sure the combined weight of mitgelieferten Anweisungen korrekt zusammengebaut und all components attached to the RSA does not exceed 25 lbs eingebaut werden. (11.34 kg). AVISOS y PRECAUCIONES WARNUNG: Wenn für diese Komponente keine... -
Page 3: Installation Instructions
È responsabilità dell'installatore verificare che il peso totale di tutti i componenti montati sul RSA non superi 11.34 kg (25 lb). ADVERTÊNCIA: Se não ler, compreender completamente e seguir todas as instruções podem ocorrer graves lesões pessoais, danos no equipamento e a garantia de fábrica... - Page 4 Il van alle componenten die aan de RSA worden bevestigd een incombe à l'installateur de s'assurer que tous les composants gewicht van 11.34 kg niet overschrijdt.
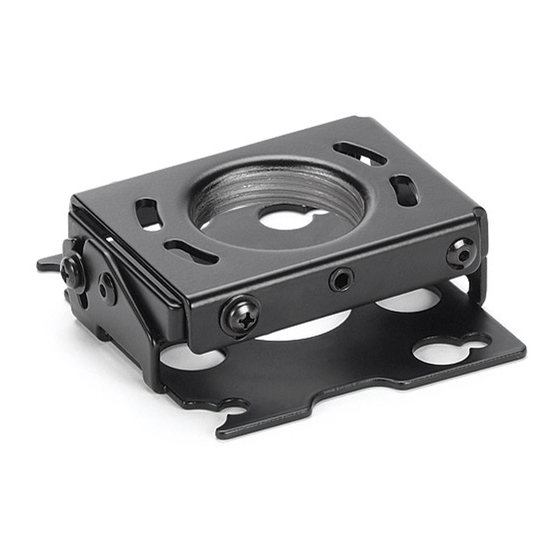
- Page 5 Installation Instructions RSA Projector Mounts LEGEND Pencil Mark Tighten Fastener Marquage au crayon Serrez les fixations Segno a matita Serrare il fissaggio Stiftmarkierung Befestigungsteil festziehen Marcar con lápiz Apretar elemento de fijación Potloodmerkteken Bevestiging vastdraaien Marcar com lápis Apertar fixador...
-
Page 6: Tools Required For Installation
RSA Projector Mounts Installation Instructions Hammer Target of Projector Martillo Punto de enfoque del proyector Hammer Ziel des Projektors Martelo Mira do projector Martello Punto di proiezione Hamer Doel van de projector Marteau Cible du projecteur TOOLS REQUIRED FOR INSTALLATION 7/16"... - Page 7 IMPORTANT ! : When RSA is properly positioned, the set screw access hole should be pointing directly at target. (see bottom detail in figure at left) Secure RSA to pipe by turning set screw with a 5/ 32" hex key until tight. CAUTION: DO NOT OVERTIGHTEN! Overtightening of setscrew can damage threads on pipe.
-
Page 8: Wood Stud Installation
MUST be capable of supporting five times the combined weight of all equipment being mounted. Ø 2.5mm Using the RSA as a guide, mark four mounting hole locations with a pencil or similar tool. Drill four 3/32" (2.5mm) dia. pilot holes to a depth of 1-3/4"... -
Page 9: Concrete Installation
MUST be capable of supporting five times the combined weight of all equipment being mounted. Using the RSA as a guide, mark four mounting hole locations on ceiling using a pencil or similar tool. Drill four 1/4" (6.3mm) diameter pilot holes to a depth of 2-1/2"... - Page 10 I N S T A L L A T I O N I N S T R U C T I O N S Instructions d´installation Instrucciones de instalación Istruzioni di installazione Installatie-instructies Installationsanleitung Instruções de Instalação SSBU SSMU Universal Interface Brackets Spanish Product Description German Product Description Portuguese Product Description...
- Page 11 SSBU/SSMU Installation Instructions DISCLAIMER Milestone AV Technologies, and its affiliated corporations and PRECAUCIÓN: Una not de PRECAUCIÓN llama su atención subsidiaries (collectively, "Milestone"), intend to make this sobre la posibilidad de dañar o destruir el equipo si no sigue manual accurate and complete. However, Milestone makes no las instrucciones.
- Page 12 Installation Instructions SSBU/SSMU WARNUNG: Wenn das zulässige Gewicht überschritten AVVERTENZA: La mancata comprensione e ottemperanza wird, kann dies zu schweren Körperverletzungen oder alle istruzioni fornite può provocare gravi lesioni personali, Schäden an den Geräten führen! Der Monteur ist dafür danni all'apparecchiatura o annullare la garanzia fornita dal verantwortlich, dass das kombinierte Gewicht aller produttore.
- Page 13 SSBU/SSMU Installation Instructions WAARSCHUWING: Overschrijding van het draagvermogen ADVERTISSEMENT: Le manque de la lecture, de la kan de oorzaak zijn van ernstig persoonlijk letsel en compréhension et du respect total de toutes les instructions, beschadiging van de apparatuur! Degene die het product peut entraîner des blessures corporelles graves, installeert is ervoor verantwoordelijk dat het totale gewicht endommager l'équipement ou annuler la garantie d'usine.
- Page 14 Installation Instructions SSBU/SSMU LEGEND Tighten Fastener Pencil Mark Apretar elemento de fijación Marcar con lápiz Befestigungsteil festziehen Stiftmarkierung Apertar fixador Marcar com lápis Serrare il fissaggio Segno a matita Bevestiging vastdraaien Potloodmerkteken Serrez les fixations Marquage au crayon Loosen Fastener Drill Hole Aflojar elemento de fijación Perforar...
- Page 15 SSBU/SSMU Installation Instructions TOOLS REQUIRED FOR INSTALLATION 1/4" (included) 5/32" (security) (included) PARTS (OR) A (1) B (1) A (1) [SSMU interface plate] [Base plate bracket] [SSBU interface plate] [Universal Projector Interface Hardware Kit] D (4) [Thumb nut] L (4) K (4) M (4) 8-32 x 1/4"...
-
Page 16: Assembly And Installation
Installation Instructions SSBU/SSMU ASSEMBLY AND INSTALLATION Insert screws through M4 flat washers (R), screw adapters with height-adjustable nuts and into projector holes. (See Figure 2) Remove Screw Adapters from SSBU/SSMU Legs NOTE: Only use washers (R) if using L or M screws to attach Press locking buttons on SSBU/SSMU leg (C) firmly and simultaneously push clip cover toward enclosed sliding stud screw adapters to projector. - Page 17 SSBU/SSMU Installation Instructions Place SSBU/SSMU legs (C) over screw adapters and Maneuver legs so that sliding stud mount brackets and height-adjustment nuts. (See Figure 4) screws are towards the middle of the projector. (See Figure 6) and (See Figure 7) NOTE: Make sure arm latch clips are in the unlocked position.
- Page 18 Place SSBU/SSMU base plate (B) over SSBU/SSMU interface plate (A). (See Figure 9) Figure 10 Figure 9 Attach SSBU/SSMU to RSA/RSM. Refer to RSA/RSM installation manual for details. Security Screw Installation (Optional) Install #8-32 x 3/8" button head security screws (F) into security holes on SSBU/SSMU legs.
- Page 19 Europe A Fellenoord 130 5611 ZB EINDHOVEN, The Netherlands P +31 (0)40 2668620 F +31 (0)40 2668615 Chief Manufacturing, a products division Asia Pacific A Office No. 1 on 12/F, Shatin Galleria of Milestone AV Technologies 18-24 Shan Mei Street...
Need help?
Do you have a question about the RSA and is the answer not in the manual?
Questions and answers