
Related Manuals for Fisher & Paykel OB24SDPX


Summary of Contents for Fisher & Paykel OB24SDPX
-
Page 1: Installation Instructions
Installation instructions User guide Built-in oven Instructions d'installation Guide d’utilisation Four encastré OB24SDPX model US CA... -
Page 2: Important - Please Read And Follow
Dear Customer, Thank you for having purchased and given your preference to our product. The safety precautions and recommendations reported below are for your own safety and that of others. They will also provide a means by which to make full use of the features offered by your appliance. Please preserve this booklet carefully. -
Page 3: User Instructions
✓ Switch the empty oven ON at maximum temperature for about two hours to eliminate traces of grease and smell from the components. ✓ Let the oven cool down, switch off the electrical supply, then clean the inside of the oven with a cloth soaked in water and neutral detergent and dry thoroughly. -
Page 4: Control Panel
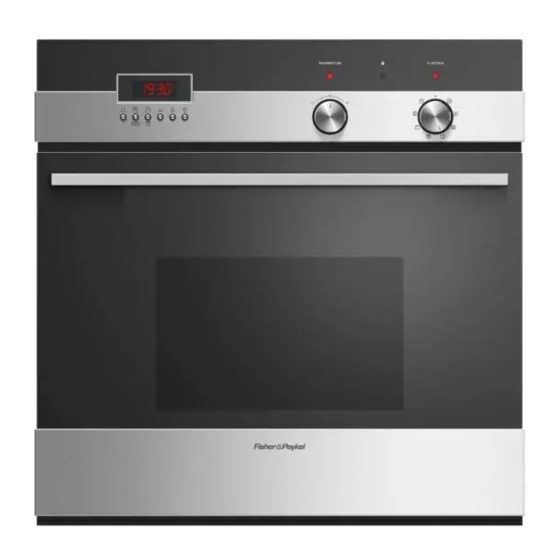
2. Electronic programmer 3. Temperature knob (potentiometer) 4. Door locked pilot light 5. Oven heating pilot light 6. Oven on pilot light WARNING - VERY IMPORTANT NOTE: The temperature knob (potentiometer) turns to right and left only to symbols + and -. -
Page 5: Using The Oven For The First Time
- Put the shelf and the tray in the oven. - Switch the oven on when it is empty (on any cooking function – NOT SELF CLEANING) at maximum power for about 2 hours to remove traces of grease and smells from the components. -
Page 6: Selecting The Functions
(or the symbol with the mark printed on the print). Important: In all cooking functions the oven must always be used with the DOOR CLOSED. If the door stays open “... - Page 7 The infrared element, the upper heating element and the fan switch on. The heat is mainly diffused by radiation and the fan distributes it in the whole oven. The tempera- ture can be set between 120 °F (50 °C) and 480 °F (250 °C).
-
Page 8: Self-Cleaning Function
• Do not wait for the oven to be very greasy before performing this cleaning. It should not be performed after every cooking, either, but only when the level of dirt justifies it (on average 1 –... - Page 9 SELECTING °F/°C ON THE DISPLAY Turn the oven selector knob to a cooking function (i.e. Press key 5 on the programmer to reduce the temperature until you reach the minimum value (120 °F/50 °C). With °F/°C flashing on the display press key 5 again (if °F/°C is not flashing press key 4 before pressing key 5) until OFF appears on the display.
-
Page 10: Setting The Cooking Temperature
5 °F (5 °C) intervals, by means of the temperature knob (potentiometer) or the program keys. Function During cooking the oven temperature (°F or °C) is measured by a sensor inside selector knob the cavity and is shown on the program display until set temperature is reached. -
Page 11: Very Important
Do not use any degreasing products (e.g. degreasing sprays, detergents, etc.). Close the oven door (if it is open or not closed properly the self cleaning cycle will not start). - Page 12 I I I I I I door Steady The function selector has been turned to the self cleaning position with the oven door open or not perfectly closed. Or the door has been opened before the cycle has been started with confirmation from key 3 What to do: Close the door and repeat previous cycle.
- Page 13 Wait for the oven to cool down completely. Remove the pulverised dirt. Open the oven door and remove the residue of pulverised dirt inside the oven with a damp cloth. IMPORTANT: Before switching the oven on again in any function wait for the appliance to cool down completely.
- Page 14 What to do: 1. Turn the function selector to (OFF) 2. Wait for the oven to cool down completely so that the door opens 3. Switch the appliance off for a few seconds. If after this procedure the display is still off: 4.
-
Page 15: Cooking Advice
– The cooking temperatures must be as close as possible with a maximum difference of 70-80 °F (20-25 °C) between the different foods. – Different dishes must be placed in the oven at different times according to the cooking time required for each one. This type of cooking obviously provides a considerable saving on time and energy. - Page 16 – Position the shelf on the first or second level from the top (fig. 2.2). – Turn on the broil element, as explained in the preceding paragraphs and let the oven preheat for about 5 minutes with the door closed.
-
Page 17: Setting The Time
The intermittent audible signal, duration 30 seconds, sounds when the timer or semi- automatic or automatic cooking have reached the end of the time set. It also sounds to signal that the door is open (see oven use chapters). To silence the audible signal press any of the programmer keys. -
Page 18: Semi-Automatic Cooking
TIMER The timer function is only used to count the time and does not influence oven operation or any program which are in progress or set. Press push button 1. The bell symbol will start to flash. Press keys 5 or 6 to set the time required. -
Page 19: Automatic Cooking
The cooking symbol goes out. Starting cooking The pan symbol lights up. The oven switches on and the cooking cycle set starts. During cooking During the cooking cycle, the display shows the oven temperature measured by the probe or pre-set temperature. - Page 20 CANCELLING A SET PROGRAM To cancel any program just turn the function selector to Note: if during a set program the function selector is turned to program is cancelled. EXAMPLES OF PROGRAMMING AUTOMATIC COOKING ➁ Time needed to cook the food (2 hours) Time when cook- ➀...
-
Page 21: Cleaning And Maintenance
✓ For difficult dirt, use a specific non-abrasive product available commercially or a little hot vinegar. INSIDE OF OVEN ✓ This must be cleaned regularly. ✓ With the oven warm, wipe the inside walls with a cloth soaked in very hot soapy water or another suitable product. WARNING VERY IMPORTANT... -
Page 22: Oven Shelf Installation/Removal
Fig. 4.3a Fig. 4.3b OVEN SHELF INSTALLATION AND REMOVAL The oven shelves are provided with a security block to prevent accidental extraction. They must be inserted operating as per figure 4.1. To pull them out remove shelf in the inverse order. -
Page 23: General Information
INSTALLATION INSTRUCTIONS WARNING! THIS APPLIANCE HAS TO BE INSTALLED BY A QUALIFIED INSTALLER. Installation must conform with local codes. Improper installation, adjustment, alteration, services, or maintenance can cause injury or property damage. Consult a qualified installer or service agent. IMPORTANT: The use of suitable protective clothing/gloves is recommended when handling, installing of this appliance. -
Page 24: Installation To The Cabinet
The oven should then be secured by 4 screws fitted into the holes provided at the sides of the oven (Fig. 5.3). If you open the oven door, you will see some screw holes. Remember the housing should not be free standing but be secured to the wall and/or adjacent fittings. - Page 25 5.4 and 5.5. The walls surrounding the oven must be made of heat-resistant material. Taking care NOT to lift the oven by the door handle. 23" 5/8 min (600 mm min) 1" 11/64 (30 mm) 1"...
-
Page 26: Electrical Connection
7. Crimp the green & yellow (or green) and white oven wires. 8. Connect the crimped green & yellow (or green) and white oven cable wires to the neutral (white) wire in the junction box (Fig. 6.1). -
Page 27: Electric Diagram
ELECTRIC DIAGRAM Door opened/closed control device EL 1000 AUX ETA °C ST1 PROBE OVEN DOOR LATCH AUX ETA 3 ETA EL 1000 SIEBE ENCODER COOLING LOCK/UNLOCK RELAY 3 EL1000 EARTH Oven door latch switch 33 ETA 34 ETA RELAY OVEN FAN... - Page 28 Cher client, Nous vous remercions d’avoir acheté et préféré notre produit. Les mesures de sécurité et les recommandations ci-dessous sont pour votre propre sécurité et pour celle des autres. Elles permettront également de profiter au maximum des fonctions offertes par votre appareil. Veuillez ranger le présent livret avec soin.
- Page 29 MODE D’EMPLOI CONSIGNES ET RECOMMANDATIONS IMPORTANTES ✓ Après avoir déballé l’appareil, assurez-vous qu’il n’est pas endommagé. Si vous n’êtes pas certain, ne l’utilisez pas et consultez votre fournisseur ou un technicien professionnel qualifié. ✓ Les éléments d’emballage (sacs de plastique, mousse de polystyrène, clous, feuillards de cerclage, etc.) doivent être gardés hors de la portée des enfants car ils peuvent entraîner de graves blessures.
-
Page 30: Tableau De Commande
Fig. 1.1 Commandes du four : 1. Bouton de sélection de fonction 2. Programmateur électronique 3. Bouton de réglage de la température (potentiomètre) 4. Voyant de verrouillage de la porte 5. Voyant de fonctionnement du four 6. Voyant de mise sous tension du four ATTENTION - REMARQUE TRÈS IMPORTANTE Le bouton de réglage de la température (potentiomètre) tourne vers la droite et vers la gauche jusqu’aux symboles + et -. -
Page 31: Caractéristiques Générales
comment utiliser le four autonettoyant CARACTÉRISTIQUES GÉNÉRALES Le four comporte des caractéristiques de fonctionnement spéciales. Cinq fonctions différentes sont mises à votre disposition pour satisfaire tous vos besoins de cuisson; la cuisinière comporte aussi une fonction autonettoyante qui per- met de nettoyer la cavité du four à haute température, une fonction de décongélation et une fonction d’éclairage du four. -
Page 32: Sélection Des Fonctions
Fig. 2.1 SÉLECTION DES FONCTIONS Vous pouvez sélectionner la fonction de cuisson en tournant le bouton de sélection de fonction afin que la marque corresponde au symbole imprimé sur le tableau (ou que le symbole corresponde à la marque imprimée sur le tableau). Important : Peu importe la fonction de cuisson utilisée, la PORTE du four doit toujours être FERMÉE. - Page 33 CUISSON À CONVECTION CLASSIQUE Les éléments chauffants supérieur et inférieur se mettent en marche. La chaleur est diffusée par convection naturelle et la température doit être réglée entre 120 °F (50 °C) et 480 °F (250 °C). Lorsque vous sélectionnez cette fonction, le pro- grammateur électronique commence la cuisson avec une température de préchauffage réglée à...
- Page 34 Attention : Au cours de l’autonettoyage, les pièces accessibles peuvent deve- nir très chaudes. Tenez les enfants à l’écart. IMPORTANT : Certains oiseaux sont très sensi- bles aux vapeurs dégagées pen- dant l’autonettoyage des fours. Une exposition à ces vapeurs pourrait causer la mort de certains oiseaux.
- Page 35 SÉLECTION DE °F/°C SUR L’ÉCRAN D’AFFICHAGE Tournez le bouton de sélection de fonction du four à une fonction de cuisson (ex. Pressez le bouton 5 du programmateur pour réduire la température jusqu’à attein- dre la valeur minimale (120 °F/50 °C). Lorsque °F/°C clignote sur l’écran d’affichage, pressez le bouton 5 à...
-
Page 36: Réglage De La Cuisson
Programmateur Bouton de réglage de la sélection de température ➀ ➁ ➁ ➂ (SEULEMENT POUR LES FONCTIONS DE CUISSON) REMARQUE : Le bouton de réglage de la température (potentiomètre) tourne vers la droite et vers la gauche jusqu’aux symboles + et -. Forcer le mécanisme pourrait endommager le bouton de réglage de la tempéra- ture. -
Page 37: Très Important
COMMENT DÉMARRER L’AUTONETTOYAGE Important : L’autonettoyage ne doit être effectué que lorsque le four est vide; donc, avant de démarrer le cycle, retirez tous les accessoires (grilles, lèchefrite, ...) de la cavité du four essuyez toute trace de liquide qui aurait débordé. - Page 38 I I I I I I I I I I I I I I I I I I I I PROBLÈMES DE DÉMARRAGE ET DE FONCTIONNEMENT DU CYCLE D’AUTONETTOYAGE s’affiche en continu door La porte du four était ouverte ou mal fermée lorsque le bouton de sélection de fonction a été...
- Page 39 COMMENT ARRÊTER L’AUTONETTOYAGE Tournez le bouton de sélection de fonction à 0 (OFF) (four ARRÊTÉ) Si la température de la cavité du four est supérieure à 570 °F (300 °C) 1a. L’heure apparaît de façon continue sur l’écran d’affichage du programmateur. 1b.
- Page 40 SITUATIONS ANORMALES ET/OU PROBLÈMES DE FONCTIONNEMENT lors de la cuisson ou de l’autonettoyage. 30 F0 30 F1 s’affiche lors de la cuisson ou de l’autonettoyage Le capteur de température du four est abîmé ou ne fonctionne pas convenablement. Le ventilateur reste en marche et si l’autonettoyage est en cours, la porte reste ver- rouillée.
- Page 41 CONSEILS DE CUISINE STÉRILISATION La stérilisation des aliments à conserver dans des pots remplis et hermétiquement fermés, se fait comme suit : a. Tournez le bouton à la position b. Réglez le thermostat à 350 °F (175 °C) et préchauffez le four. c.
-
Page 42: Cuisson Au Gril
Fig. 2.2 Fig. 2.3 INCORRECT Fig. 2.4 CORRECT Fig. 2.5 CUISSON AU GRIL Très important : Vous devez toujours fermer la porte du four lorsque vous utilisez l’élément du gril. - Placez la grille à la première ou deuxième position à partir du haut (fig. 2.2). –... -
Page 43: Réglage De L'heure
comment utiliser le programmateur électronique Le programmateur électronique est un dispositif qui regroupe les fonctions suivantes : – Horloge de 12 heures avec affichage lumineux (P sur l’affichage correspond à PM). – Minuterie (jusqu’à 23 heures et 59 minutes). – Programme pour cuisson au four semi-automatique. –... - Page 44 MINUTERIE La fonction de minuterie n’est utilisée que pour compter le temps et n’affecte pas le fonctionnement du four ni tout autre programme réglé ou en cours. Pressez le bouton poussoir 1. Le symbole de cloche commencera à clignoter. Pressez les boutons 5 et 6 pour régler le temps voulu. Le décompte se met en marche immédiatement.
-
Page 45: Cuisson Automatique
CUISSON AUTOMATIQUE Commence la cuisson à l’heure programmée et arrête le four automatiquement après le temps de cuisson programmé. Réglage Réglez la fonction de cuisson en tournant le bouton de sélection de fonction du four à la fonction désirée. La température de cuisson apparaît sur l’écran d’affichage. Pour la modifier, procé- dez tel qu’expliqué... -
Page 46: Programmation De La Cuisson Automatique
ANNULATION D’UN PROGRAMME Pour annuler un programme, tournez simplement le bouton de sélection de fonction à 0 (OFF) (four ARRÊTÉ). Remarque : Si au cours d’un programme, le bouton de sélection de fonction est tourné 0 (OFF) à (four ARRÊTÉ), AUTONETTOYAGE ou éclairage du four, le programme est annulé. -
Page 47: Nettoyage Et Entretien
nettoyage et entretien RECOMMANDATION GÉNÉRALE ✓ Important : Avant toute opération de nettoyage et d’entretien, débranchez l’ap- pareil de l’alimentation électrique. ✓ Il est recommandé de nettoyer l’appareil lorsqu’il est froid, en particulier pour le net- toyage des pièces émaillées. ✓... -
Page 48: Retrait De La Porte Du Four
Cran d’arrêt Fig. 4.1 Fig. 4.2 Fig. 4.3 Fig. 4.3a Fig. 4.3b INSTALLATION ET RETRAIT DE LA GRILLE DU FOUR Les grilles du four sont munies d’un système de blocage qui permet d’éviter qu’elles ne sortent accidentellement du four. Elles doivent être insérées tel qu’indiqué à la figure 4.1. Pour les enlever, tirez-les dans le sens contraire. -
Page 49: Instructions D'installation
INSTRUCTIONS D’INSTALLATION AVERTISSEMENT! CET APPAREIL DOIT ÊTRE INSTALLÉ PAR UN INSTALLATEUR QUALIFIÉ. Cet appareil doit être installé conformément aux codes locaux. Une mauvaise installation, modification, réparation, ou un mauvais réglage ou entretien peuvent causer des blessures ou des dommages matériels. Consultez un installateur qualifié ou un agent autorisé. IMPORTANT : L’utilisation de vêtements et de gants de protection est recommandée lors de la manutention et l’installation de cet appareil. - Page 50 Fig. 5.1 Fig. 5.2 installation à l’armoire RENSEIGNEMENTS GÉNÉRAUX Le four peut être installé dans des modules standards, d’une largeur et d’une profondeur minimales de 23-5/8 po (600 mm). L’installation nécessite un compartiment tel qu’illustré aux figures 5.1 et 5.2. Au bas, le four doit reposer sur des supports pouvant supporter son poids.
- Page 51 Pour assurer la ventilation interne, des canaux d’aération doivent être installés tel qu’illustré aux figures 5.4 et 5.5. Les parois entourant le four doivent être faites de matériaux résistants à la chaleur. Prenez soin de NE PAS soulever le four par la poignée de porte.
- Page 52 AVERTISSEMENT AVANT D’INSTALLER L’APPAREIL, POUR ÉVITER TOUT RISQUE DE CHOC ÉLECTRIQUE, COUPEZ LE COURANT AU TABLEAU DE DISTRIBUTION ET VEILLEZ À CE QUE CE DERNIER SOIT VERROUILLÉ AFIN D’ÉVITER UNE MISE SOUS TENSION ACCIDENTELLE. Câble trifilaire de l’alimentation électrique Boîte de jonction Fils noirs Fils rouges Fils...
-
Page 53: Schéma Électrique
SCHÉMA ÉLECTRIQUE Dispositif de contrôle de l’ouverture/fermeture de la porte EL 1000 ÊTA AUX °C SONDE VERROUILLAGE THERMIQUE DE LA PORTE DU FOUR ÊTA AUX (ÊTA) 3 ÊTA EL 1000 SIEBE ÊTA ÊTA CODEUR VENTILATEUR DE REFROIDISSEMENT RELAIS D E VERROUILLAGE/ DÉVERROUILLAGE 3 EL1000... - Page 56 être modifiées à tout moment. Nous vous recommandons de vérifier auprès de votre revendeur que ce manuel décrit le produit actuellement disponible. www.usa.fisherpaykel.com US CA Built-in oven user guide Published: 03/2007 Part No. 599406 A Elba Part No. 1103005...
Need help?
Do you have a question about the OB24SDPX and is the answer not in the manual?
Questions and answers