Table of Contents
Advertisement
Quick Links
Advertisement
Table of Contents

Related Manuals for Philips/Magnavox CCZ192AT


Summary of Contents for Philips/Magnavox CCZ192AT
- Page 1 Owner's Man,_a!
- Page 2 _kThe "exclamation point" calls As a member of the PHILIPS MAGNAVOX "family" you're entided attention to fimtures for which to protection by one of the most comprehensive warranties and you should read the e_closed tit- outstanding service networks in the industry.
-
Page 3: Introduction 3
Introduction 3 Welcome to yourTV/VCR owner's manual, This manual hassixsections: SettingUp Your"I'V/VCR;Descriptionof Controls; BasicOperations;Recording Options; PlayingOptions;and InformationYou May Need.The instructionsexplainall of the TV/VCR's fea- tures, which are listedbelow. Features A-13 Repeat Play Automatic Channel Setup Automatic Operation Features Automatic Tracking Adjustment Closed Caption Daylight-SavingTime High Quality (HQ) System... -
Page 4: Table Of Contents
4 Table o fContents Setting UpYour TV/VCR Introduction ............Table of Contents ............Before Using the TV/VCR ..........Hooking Up the TV/VCR ..........6 - 7 Turning On the TV/VCR ..........LanguageSelection ............. Automatic Channel Setup ........... 10 - II Setting the Clock .......... -
Page 5: Before U Sing T He Tv/Vcr 5
Before U sing t he TV/VCR 5 Putting Batteries in the Remote Control Remove the battery compartment lid on the bottom of the remote control by sliding it in the direction of the arrow. Place two AA batteries inside the battery compartment with their + and - ends aligned as indicated. -
Page 6: Hooking Up The Tv/Vcr
6 H001dng UpThe TV/VCR Hook up yourTV/VCR using one of the connections shown. Connect a Cable signal • a/1 antenna Hooking UpYourTV/VCR ANT(enna) Jack. With a Cable Signal or Outdoor Antenna B• the IN Jackon the Cable Box. Connect the Cable signalto Hooking UpYour "FVNCR... - Page 7 H00king UpThe TY/VCR (cant'd) 7 Hooking UpYour TV/VCR to Another Video Source (VCR or Camcorder) You may need this connection if you want to copy tapes. Detailsare on page.3I. Use an Audio cable to connect the AUDIO OUT Jack on the VCR to the AUDIO Jack on AUDIO/VIDEO OUT the front of the TV/VCR.
-
Page 8: Turning Onthetv/Vcr
8 Turning OntheTV/VCR • • • • • • • * • • • • • • • • • • • • • • • • • • • • • • • • • • • • • • • • • o• •... -
Page 9: Languageselection
Language Selection 9 Follow the stepsbelow to changethe language of the on-screen displays. Press the MENU button. VCRpROGRAM _E_IINDE_. Press the PLAYI& button or the STOP/Y button to select PRIM. SETUR Then, press the RIWVDII_ button. • SELECT L_I_.JA_ P_F_RY SETUP - TO END _.r_ Press the PLAYI&... - Page 10 I0 Automatic Channel Setup AlthoughtheTV/VCR may automatically memorize the channels you receive when you turn it on for the first time, you mayset up channels. channels againby followingthe stepsbelow. Wait for theTV/VCR to set up Press the MENU button. TO ADJUST PRE_ -ql I I_ Pre_ the PLAYI&...
-
Page 11: Automatic Channel Setup
Automatic Channel Setup (cant'd) I I Adding/Deleting Channels Press the MENU button. Press the PLAY/A button or the STOP/V button to select CHANNEL TO ADJUST PRE_ _111_ CHI23 • ICN_L_ NEL Press the Number buttons or the CHANNEL A/V but- tons to enter the channel number you want to add or delete. -
Page 12: Setting The Clock
12 Setting t heClock There are three waysto set the clock:Manually, w ith Automatic PBSChannelSelection,or with Hanual PBSChannelSelection. With manualclock settin_ you tell the'FV/VCR the current time. With Automatic or ManualPBSChannelSelection,the'I'V/VCR gets the time from your localPBSstation.If you useeither Manual PBSChannelSelection or Automatic PBSChannelSelection, f ollow the stepson page 19 to havethe'i-V/VCR maintain the clock accordingto your Time Zone. - Page 13 Setting t heCIock I con d ) 13 If ON appears beside AUTO CLOCK, press the F.FVYDIII_ button so that OFF appears to the fight of AUTO CLOCK, then press the MENU button. If OFF appears beside AUTO CLOCK, press the MENU button. DATE --/--/-- IANUAL CLOCK END PRESSEXIT...
- Page 14 14 Se_ng theClock (cont'd) Automatic PBS Channel Selection Press the MENU button. VCR _OG_I • PRIM, SETUP Press the PLAYIA button or the STOP/I' button to select PRIM. SETURThen, press the F.F_fD/I_ button. r_.LE_r AV _ Press the PLAYIA button or the STOP/V button to select SET CLOCK.Then, press the I=.I:_NDII_ button.
- Page 15 Setting t heClock ( cant'd) 15 the time. Wait for theTV/VCR to find Press the PLAYI. button or the STOP_t' button to select SET PBS CH.AUTO.Then, press the F.FWD/I_ button. TiME - - :- - DATE - - I - - I - - mm®...
- Page 16 16 Setting t heClock (cont'd) Manual PBS Channel Selection Press the MENU button. REMINDER B_NIN_I Press the PLAY/A button or the STOP/V button to select PRIM. SETUR Then, press the F._D/IP. button. • SELECT L_K_[ AI3TO PROGRAMMING CH MB<_'_ R_4_ VOLUMEBAR [ON] SET CLOCK...
-
Page 17: Setting The Clock
Setting t heClock (cant'd) 17 • • * * • • • • • • • • • • • • • • • • • • • • • • • • • • • • • • • • • • • • • • • • • • • • • • • • • • • • • • • • o• •... -
Page 18: Daylight-Saving Time
18 Daylight-Saving Time • • • • • • • • • • • • • • • • • • • • • • • • • • • • • • • • • • • • • • • • • • • • • • • • • • • • • • • • • • • • • • •• •... -
Page 19: Timezone 19
TimeZone 19 When you set the clock using AUTO CLOCK, specifya time zone in which a local PBSchannelis located. The'I'V/VCR will maintain the clock accordingto your Ume zone. Press the MENU button. PROGRAM REMINDE_ IGHTN_ Press the PLAYIA button or the STOPI_F button to select PRIM. -
Page 20: Front Panel
20 Front Panel Cassette Compartment Insert a video cassette tape here. Wireless Remote Sensor Receivesa signal f rom your remote control so you can operate theTV/VCR from a dis- tance. STOP/EJECT Button Pressonce to stop the tape.When playbackis stopped,press to eject the tape. Pressto selectan item in the pop up menu. -
Page 21: Rearpanel 21
RearPanel 21 © ANT(enna) Jack AC Power Cord Connect your antennaor cablehere, Connect to a standardAC outlet to Detailsore on pagessix- seven. supplypower to the TV/VCR. Antenna Hole Connect the stem of an indoor antenna here. Detailsore on pagesix. -
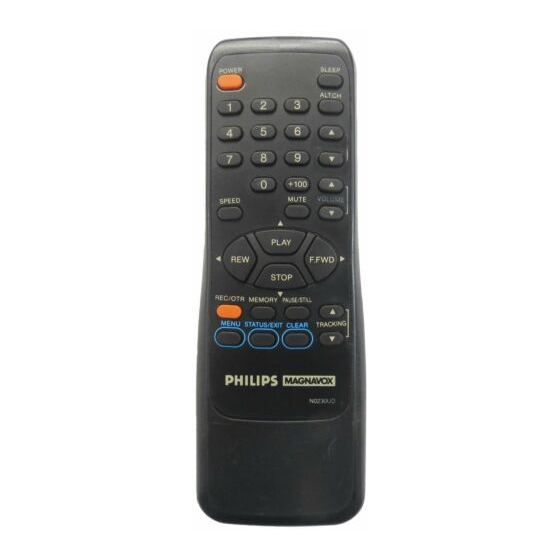
Page 22: Remote Control Buttons
22 Remote C ontrol Buttons • • • • • • • • • • • • • • • • • • • • • • • • • t • • • • • * • • • • • • • • • • • • • • • • • • • • • • • • • • • • • • • • • • • • • • • • • I• •... -
Page 23: Remote Control Buttons
Remote Control Buttons {c0nt'd) 23 ALT. CH (Alternate Channel) Button Press to return to the "IV channelyou were viewingimmediately before switchingto your current channel. CHANNEL A/Y Buttons Pressto scan through the'rV/VCR's channels, VOLUME A/_' Buttons Press to adjustthe sound level. If you presstheVOLUME JJY buttons when the sound is muted,the soundwill be restored. -
Page 24: Adjusting The Picture Controls
24 Adjusting thePicture C ontrols • • • • • • • • • • • • • • • • • • • • • • • • • • • • • • • • o• • • • • • • • • • • .*• • • • • • • • • • • • • • • • • • • • • • • • • • • • • • • • • • • • • • • • • • • • • • • • • • • • • • • • • • • • • • • • • • Followthese stepsto adjustthe TV/VCR's brightness, picture, color, Unt, and sharpness. - Page 25 Adjusting thePicture Controls (cont'd) 25 Decrease Increase BRIGHTNESS decreased brightness increased brightness decreased contrast PICTURE increased contrast COLOR more brilliant paler TINT more purple more green softer SHARPNESS dearer Press the REW(ind)/_l button to decrease a picture control. Press the F.FWD/I_ button to increase a picture...
-
Page 26: On-Screen Status Displays
26 On cmen Status Displays A statusdisplay will appearwhen you pressthe STATUS/EXITbut- ton or certain functionbuttons.The contentsof the statusdisplay will vary.To choosethe statusdisplaymode, follow the steps below. Function If you select STATUS ON, then select COUNTER ONLY Channel Button OFF: Time Pressed •... -
Page 27: Reminder 27
Reminder 27 • • • • • • • • • • • • • • • • • • • • • • • • • • • • • • • • • • • • • • • • • • • • • • • • • • • • • • •1 •... -
Page 28: Playing
28 Playing Follow the stepsbelow to playa tape. Insert a tape in the TV/VCR. Insert a tape in theTV/VCR.The power will come on.If the on the TV/VCP_ Press the STOP/EJECT button tape's record tab hasbeen removed, playbackshouldstart auto- matically. If playback does not start automatically, press the PLAY/A button to start playback. -
Page 29: Recording 29
Recording 29 • • • • • • • • • • • • • • • • • • • • • • • • • • • • • • • • • • • • • • • • • • • • • • • • • • • • • • • • • • • • • • • • • • • • • • • • • • • • • • • • • • • • • • • •• •... -
Page 30: Recording Options One-Touch Recording
30 One-T0uch Recording The One-Touch Recording(OTR) functionallowsyou to program an immediatetimed recordingfrom 30 minutes to eighthours long without settingthe timer. Beforeyou begin,make sure: Pressthe STOP/EJECT button on theTV/VCR to stop the • Channelsare set up. OTR. • There is a tape in theTV/VCR.The record tab must be intact. Use the CHANNEL &/T buttons or the Number buttons... -
Page 31: Rerecording (Tape Duplication)
Rerecording (Tape Duplication) 31 AUDIO andVIDEO OUT Jackson source unit (VCR or Camcorder) AudioCable(white) from AUDIOOUT toAUDIO _" "'_ AUDIO and VIDEO Video Cable (yellow) lrom Jacks o nTVNCR VIDEO OUT tOVIDEO Make the connections shown above, using audio and video cables. -
Page 32: Timer Recording
32 Timer R ecording Followthe stepsbelow to program the TV/VCR to record TV pro- gramswhile you're awayfrom home.TheTV/VCR will turn itself on, record, and turn itself off automatically. B eforeyou begin,make SUre: • The clock is set. If not, CLOCK MUST BE SET appears. •... - Page 33 Timer R ecording (cont'd) 3 3 Use the Number buttons (I - 8) to select a position in which to store the timer recording. Flashing numbers indi- cate an open position (one in which a timer recording has not yet been stored).
- Page 34 34 Timer Recording (cont'd) Press the Number I button to record in SP speed, press the Number 2 button to record in LP speed, or press the Number 3 button to record in SLP speed. Detai/sabouttape speedare on page 29. You cannotusethe SPEEDbutton at this time.
-
Page 35: Timer Recording
Timer R ecording (cont'd)35 Checking or Clearing Timer Recordings With theTV/VCR on, press the MENU button. Press the PLAYIA button or the STOPIV button to select VCR PROGRAM, then press the F.FWDIII_ button. C_GD _ Press the PLAYIA button or the STOPIY to select PRO- GRAM REVIEW, then press the F.FWDII_ button. -
Page 36: Defeat Recording
36 Defeat R ecording Follow the steps below to prevent accidental recording. Press the MENU button. SETUP REMINDEP. • PR_M. SE-PUP _WrNEr_ Press the PLAYIA button or the STOPIT button to select VCR SETUP, then press the F.FWDI I_ button. III_.AT ,wAy {OFF]... -
Page 37: Setting The Sleeptimer
Setting t heSleep T imer37 Use the sleeptimer to programtheTV/VCR ix) shut off in a cer- tain amount of time. Press the SLEEP button. The sleeptimer display will appear on-screen.(You can not set the sleep timer duringa recording.) Within five seconds, press the SLEEP button repeatedly to select 30 minutes, 60 minutes, 90 minutes, or 120 min- utes. -
Page 38: Closed Caption
38 Closed C aption When you watch a programthat is beingbroadcastwith closed captions, y ou canaccesson-screen boxescontaining the pro- gram'sdialogue (for example,what a characteris saying), dialogue in a foreign language,or information(suchas a channelguide, schedule, o r announcements).Followthe stepsbelow to select closedcaptions. -
Page 39: Closed Caption
Closed C aption ( cant'd) 3 9 Press the STATUSIEXIT button. The type of closedcaptions you selected at step 3 will appearon-screen. StandardClosed Captions Half-screen text ingrecordingor tape playbackif COUNTERONLYis sett_ ON. ou cannotviewclosed ceptions dur- Abbrevia_ons, symbols, and other gremmatJcal shortcuts are often usedin orderto keep pacewith the on-screen a ction.Thisdoesnot indi-... -
Page 40: Volume Bar
40 Volume Bar Usualb/.the volume b_r appears when you press _eVOLUHE k/_' buttons, ff you do not need it, set r_eVOLUHE BAR to OFF position. For example, v/nen you watch a program that is being broadcastwith closedcaptions, y ou may chooseto set theVOL- UblE BAR to OFF so the captionscan remain on-screen.Thecap- tionswill remain on-screenevenwhen you pressthe VOLUME buttons or the MUTE button. - Page 41 Repeat Play41 Press the MENU button. VCR _R/_t SETUp _qlON PRIM.SETUP Press the PLAYIA button or the STOPPV button to select VCR SETUP, then press the F.FWDII_ button. ONE TIttE PLAY [ON] ON-SCREENMODE OB_.AT RECORDING[OFF] _> VCR SE_JP SELECT AV CHOOSE _- END PRE_ Ex_'r Press the PLAYIA button or the STOPIV button to select...
-
Page 42: Repeat Play
42 A. BRepeat Play Followthe stepsbelow to programthe'rV/VCK to playthe mater- be'cween two specified points (A and B) on a tape over and Insert a tape in the TV/VCP,. over again. Insert a tape in the'rV/VCR. Press the MENU button. SETUp •... - Page 43 A - BRepeat Play (cont'd) 4 3 Press the STATUS/EXIT button to remove the display. A-B REPEATwill appear on-screen.Beneathit, the le_er A will flash besidethe real-rime counter. • A-BREPEAT Play, fast forward, or rewind the tape to the position at which you want to begin playback.
-
Page 44: Real-Time Counter Memory
44 Real.Time Counter Memory • • •... • • •. • • • • • • •. • • • • to * * • • • • • •.. • •. * • • • •. •. • • • • • • •..•... -
Page 45: Automatic Operation Features 45
Automatic Operation Features 45 • • • • • _••.Boe.. JOe. OOOett•O•OIDDODee,•eeOOODee,,DeODB JOQ.OOOOIOOeeDt•eOeOOOt •eOtOtO.IOODOeeOO,ee•,•••••.••••,••• The followingplaybackfeatureswill alwaysoperate. Automatic Playback When you put a tape in the'l'V/VCR, the power will come on automatically.If the tape's record tab is missing,playback will begin.If a timer recording is set,the power will not come on auto- matically when you insert a tape with the record tab intact.If a timer recording is set and theTVNCR power is off,theTV/VCR will eject the tape if the record tab is missing. -
Page 46: Playbackoptions
46 Playback Options Forward and Reverse Searching (SP/LP/SLP) During tape playback, p ressand release the EFVVD/I_ button or the EE'_/(ind)/_l button.A fast forward or reverse picture search will begin. C_ GD (3DG_ To return to normal playback, p ressthe PLAY/& button. Super High Speed Searching (LP/SLP) During tape playback, p ressthe EFWD/I_ button or the REVV(ind)/_l button,then pressagain.The'l'V/VCRwill now... -
Page 47: Specifications/ Glossary
Specifications / Glossary 47 Specifications Glossary General : AUDIO laclc jack locatedon the front of the : "rv/vcR which is usedto record audio from anoth- '; CRT: 19-inch in line gun Televisionsystem: NTSC-N er source. Closedcaption system: Section15.119, F CC Automatic Channel S_t_4p: processin which the (FederalCommunicationsCommission) S tandard i "I'V/VCR, s cansall available channelsand placesthe... -
Page 48: Helpful Hints
48 Helpful H ints If you are havingproblemswith your product,checkthis list of problemsand possiblesolutionsbefore requesting service.Youmay be able to solve the problemyourself. If you need to calla customerservice representative, pleaseknow the model number and serialnumber of your product before you call.This informationis displayed on the backof the product.Also,pleasetake a moment to identifythe problem you are having, a nd be preparedto explainthis to the representative. -
Page 49: Helpful Hints
Helpful Hints (cant'd) 4 9 • • • • • • • • • • • • • • • • • • • • • • • • • • • • • • • • • • • • • • • • • • • o• •... -
Page 50: Limited Warranty
50 Lim edWa anty I"V/VCR COMBINATION 90 Days Free Labor/OneYearFree Parts Exchange(TwoYearsFree Exchangeon Color PictureTube) Thisproduct must be carried in for repair. WHO IS COVERED? may be a delay if the appropriate spare parts and You must have proof of purchase to receive warranty technical manual(s) are not readily available). -
Page 51: Index
Index51 a-b repeat play ..42 - 43 menu tape accessories....button ....duplication ..... ant(enna)jack ... 6, 21 speed ....29, 47 front panel button access . .20 audio jack ... 7, 20, 3 I mute button ....time automatic se_ing ..... -
Page 52: Suppliedaccessories
Check to be sure the items on this page are packed with your TY/VCR. These accessories are provided to help you use or set up your TV/VCR. " - :Lighted Re'mote Conm_-4ror CCZ 191 (4835 218 37228) RemoteControl (.or_CC_ 192 (4835 218 37216) TwoAA Batteries (4835...
Need help?
Do you have a question about the CCZ192AT and is the answer not in the manual?
Questions and answers